Royal Navy Submarine models in 1:350 Scale
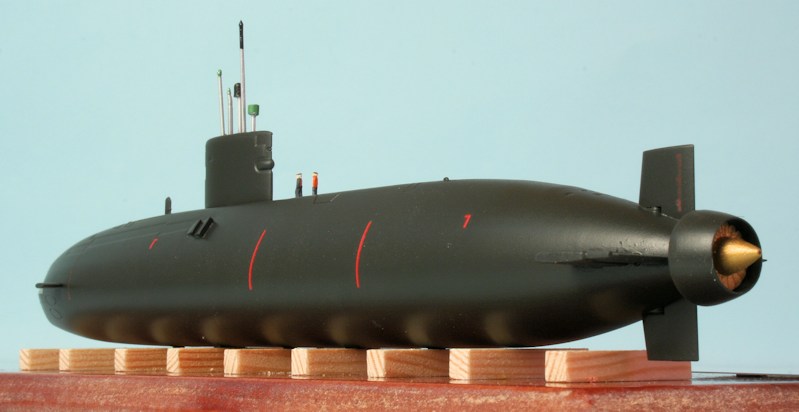
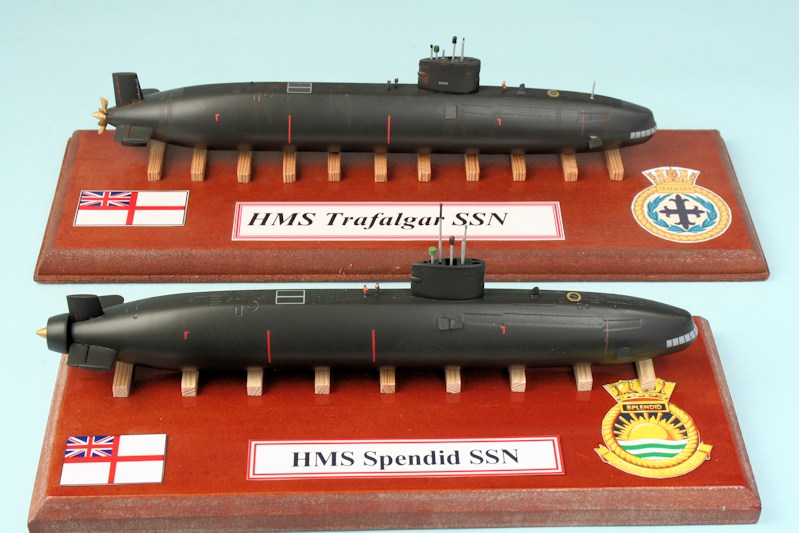
HMS Trafalgar SSN - Airfix kit
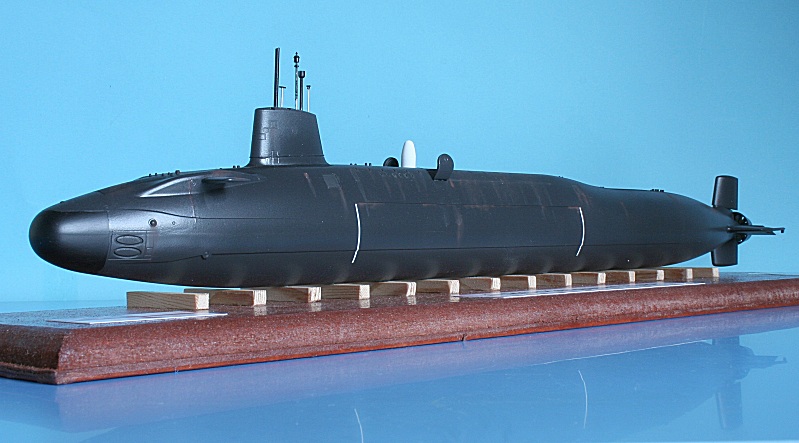
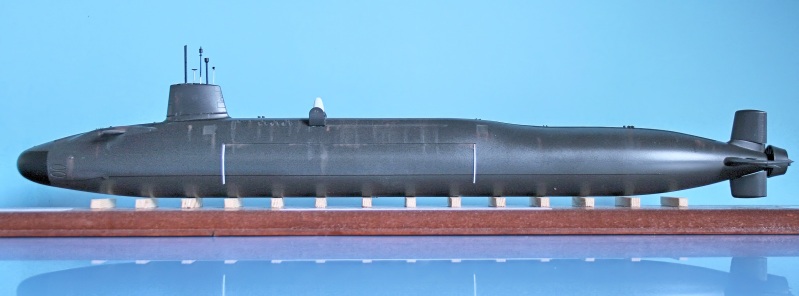
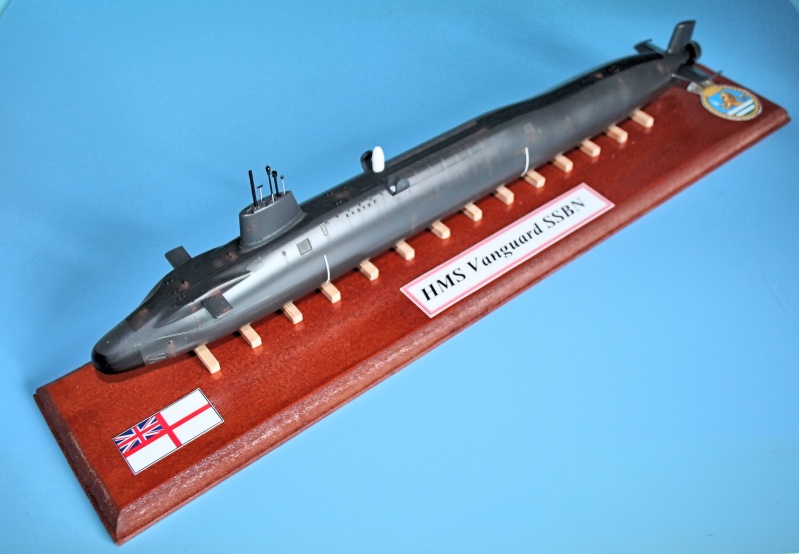
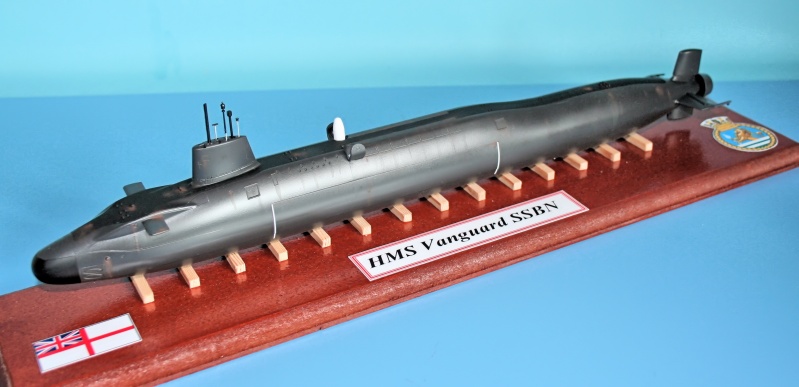
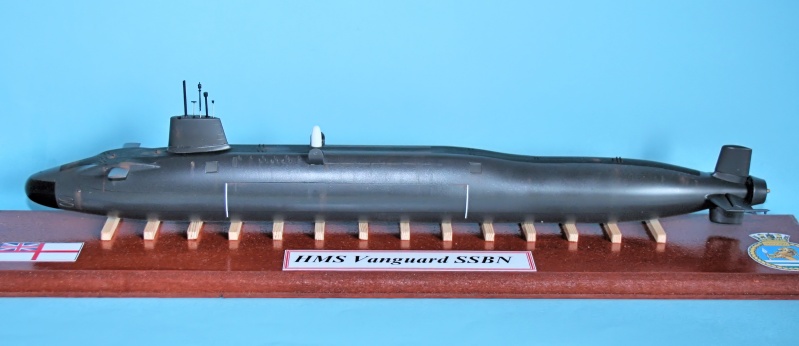
HMS Vanguard SSBN - Bronco Models kit
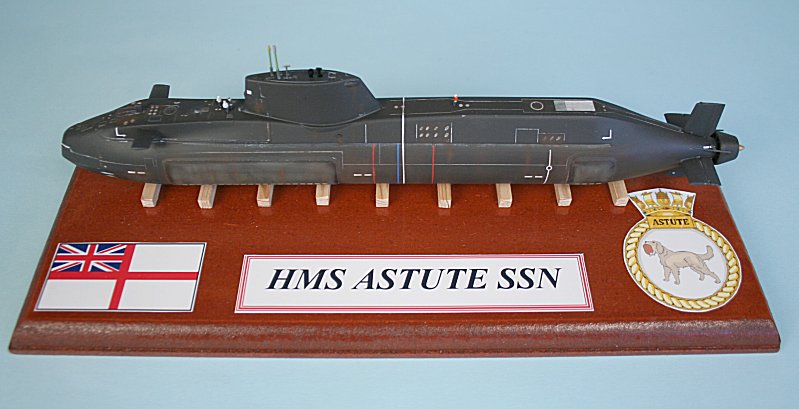
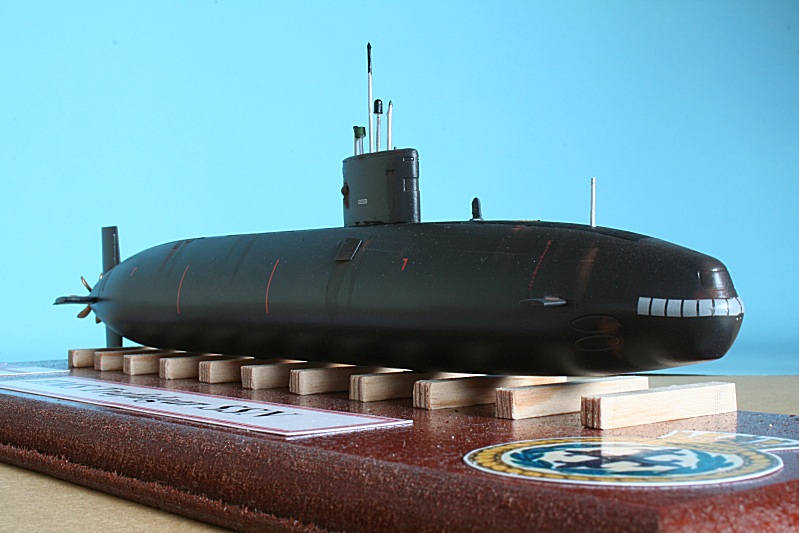
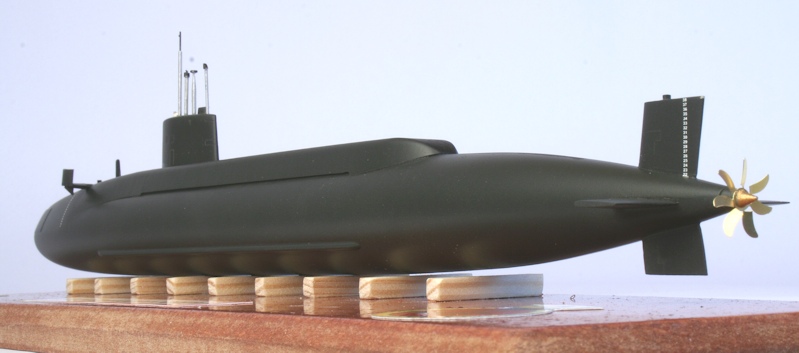
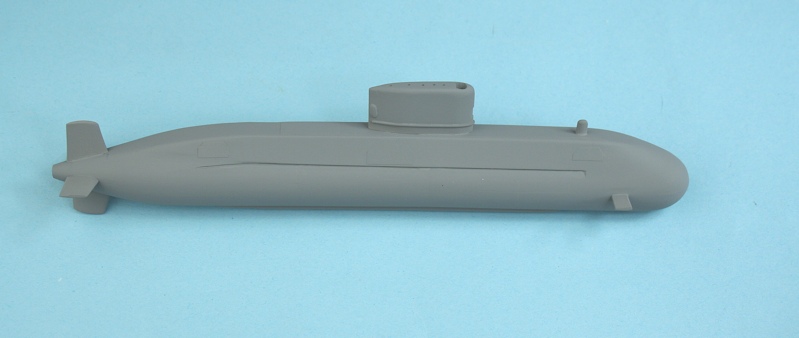
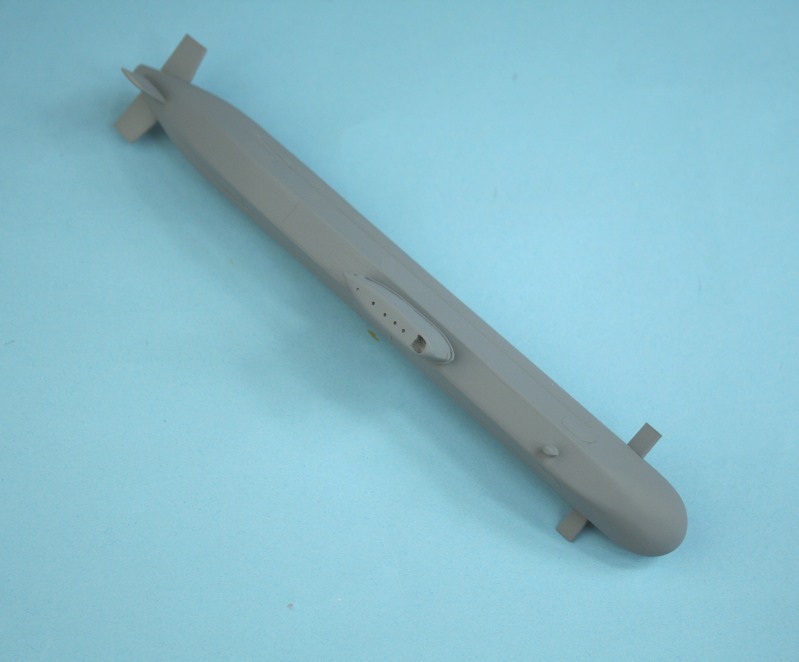
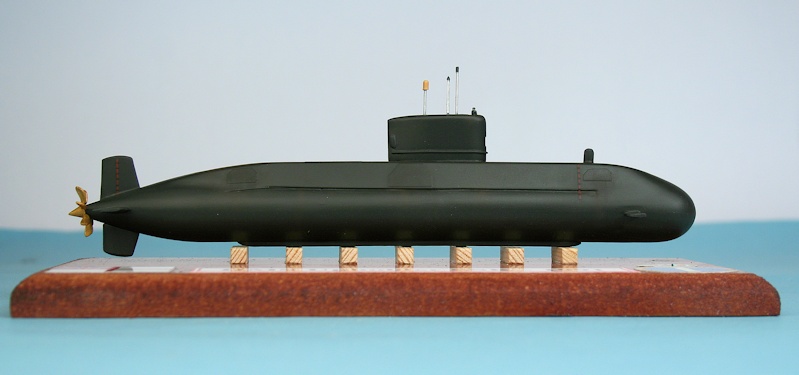
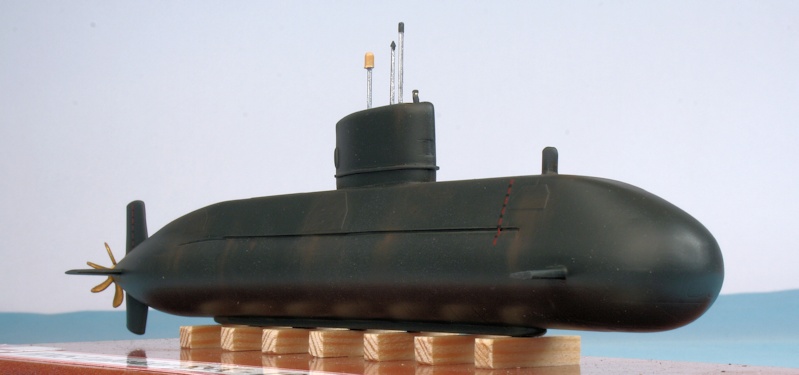
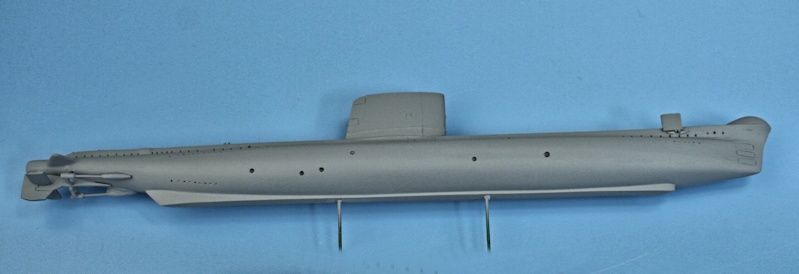
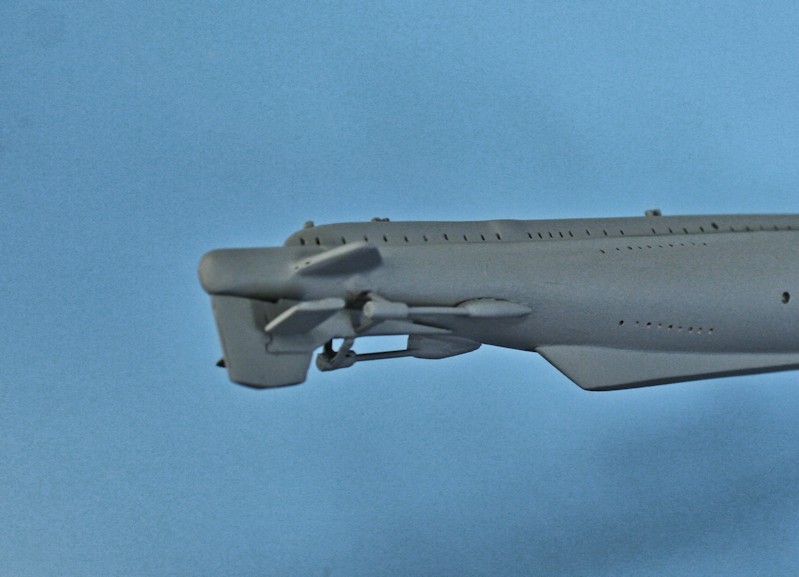
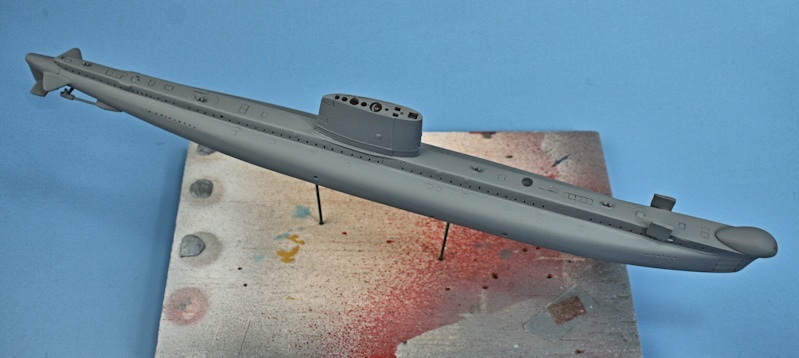
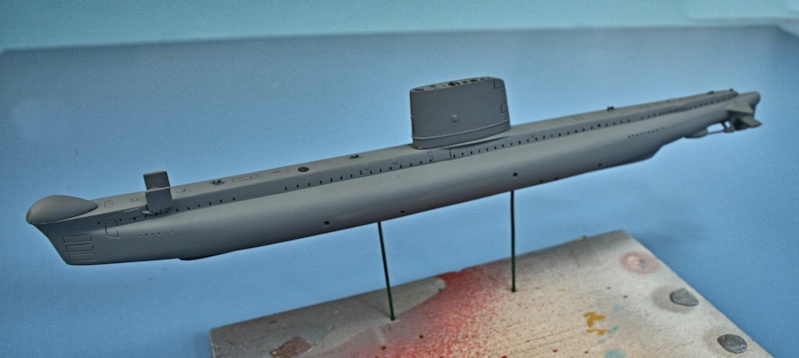
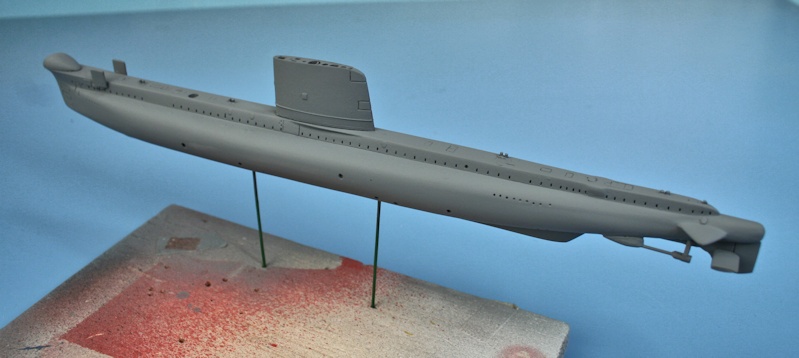
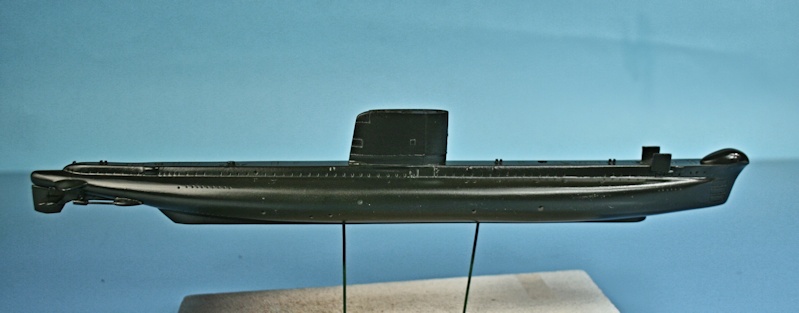
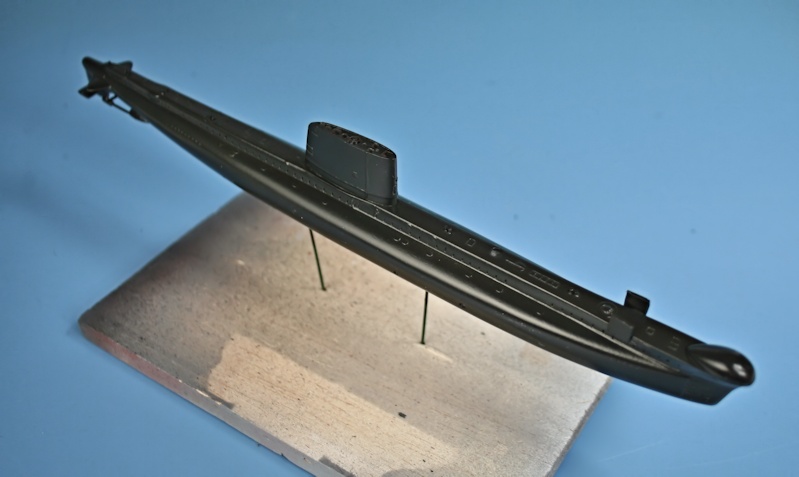
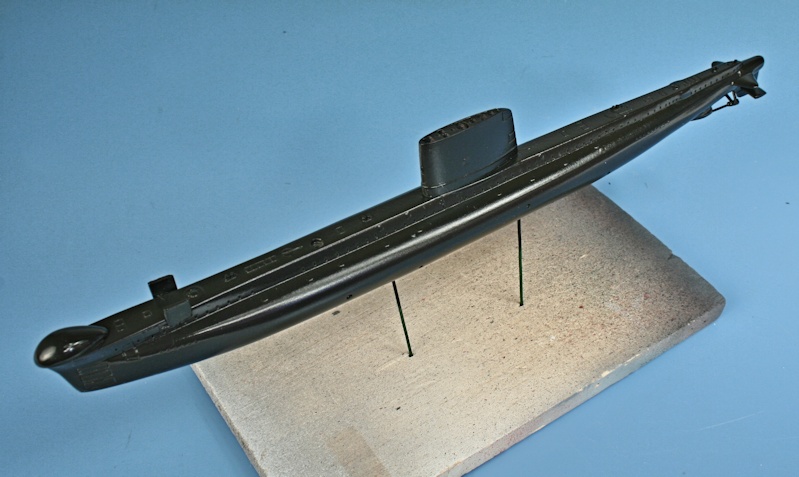
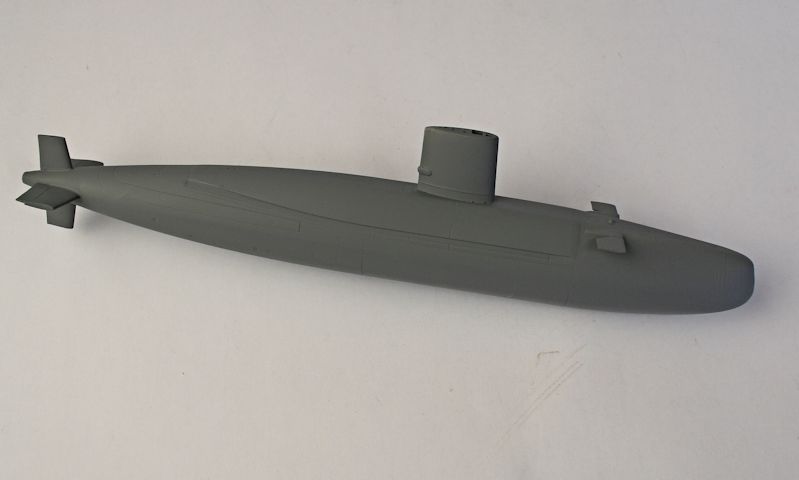
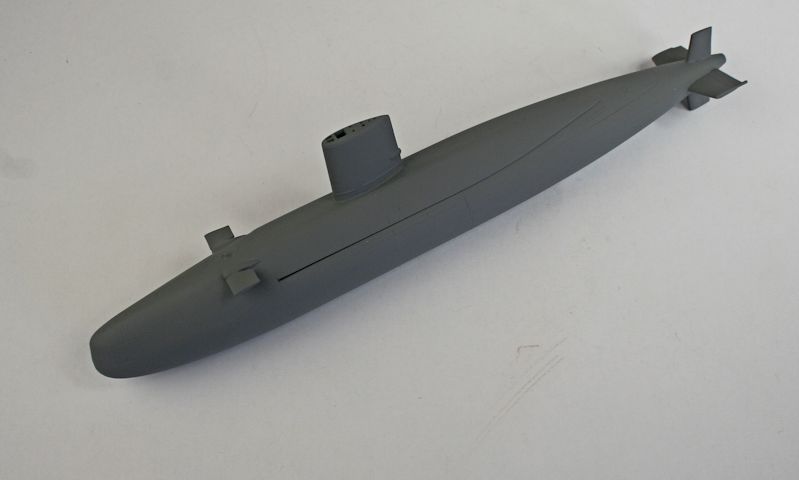
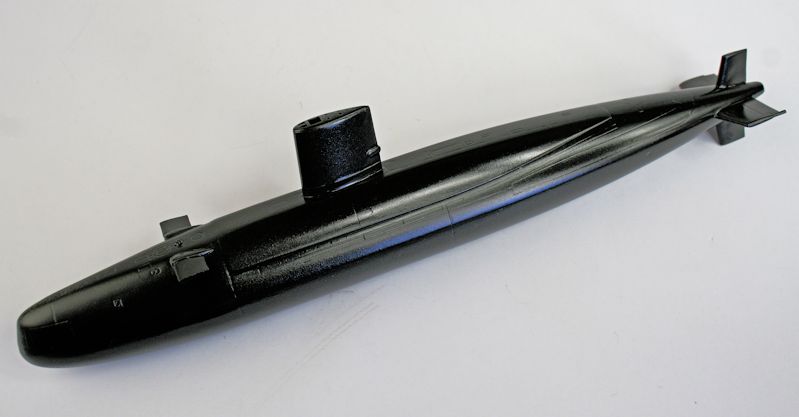
HMS Astute SSN - Hobby Boss 1:350 scale kit.
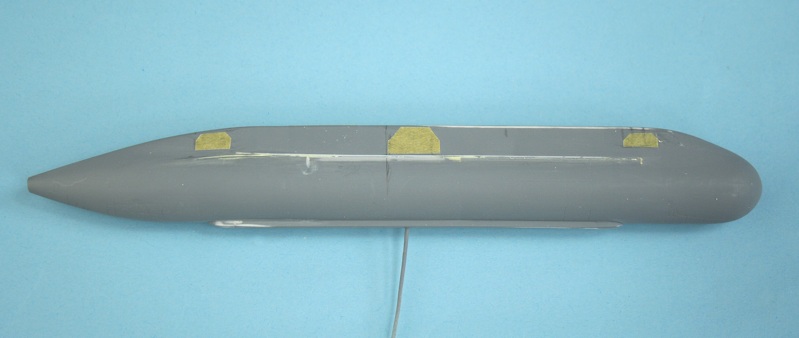
HMS Astute SSN
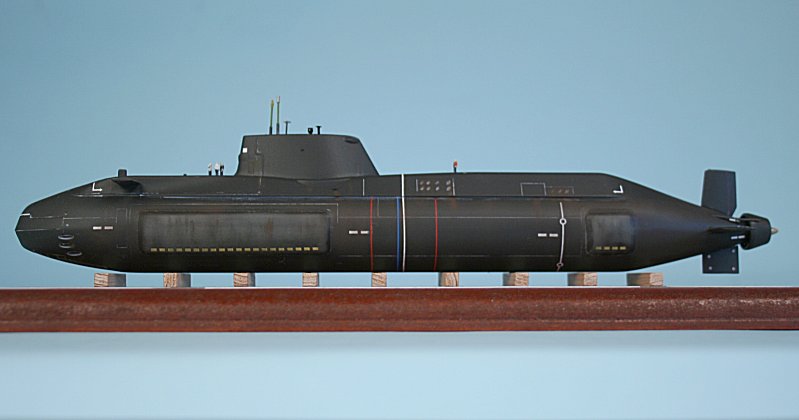
HMS Astute.
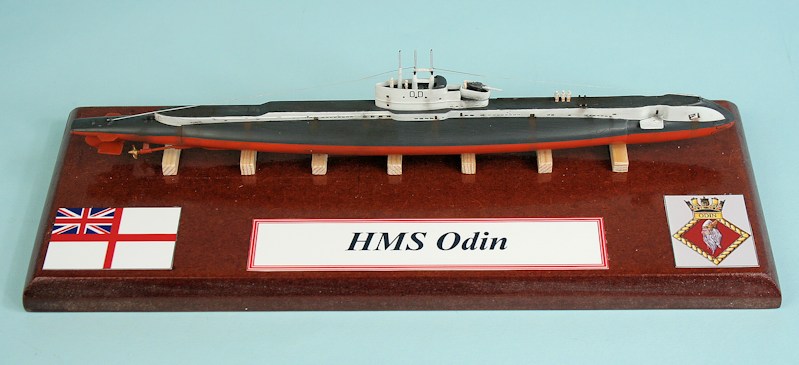
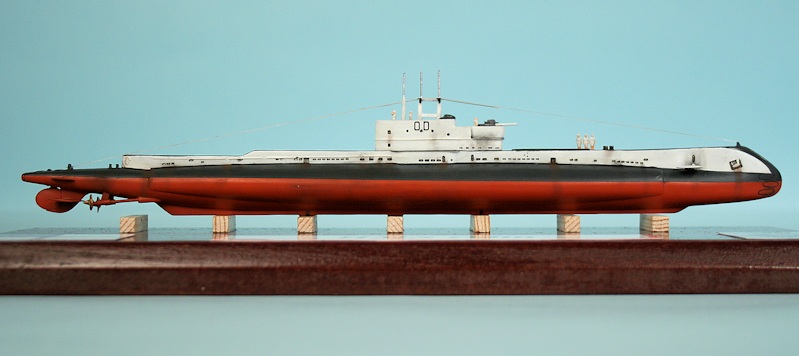
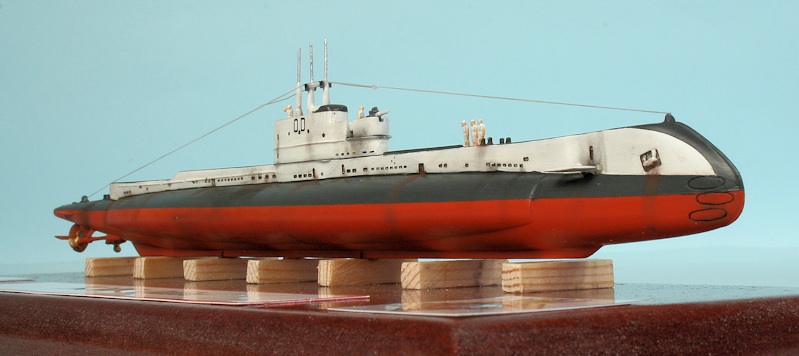
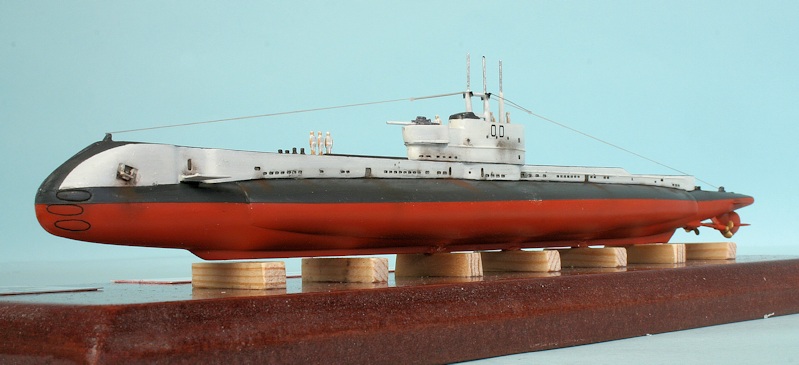
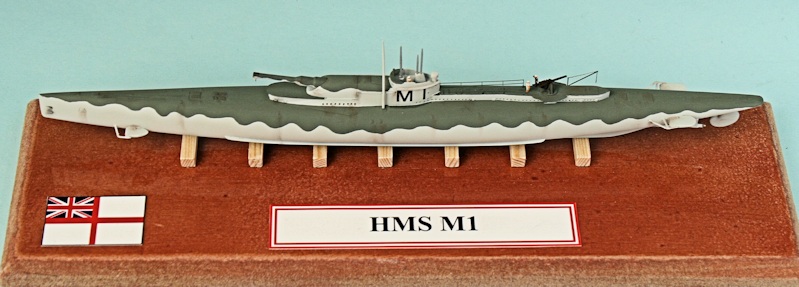
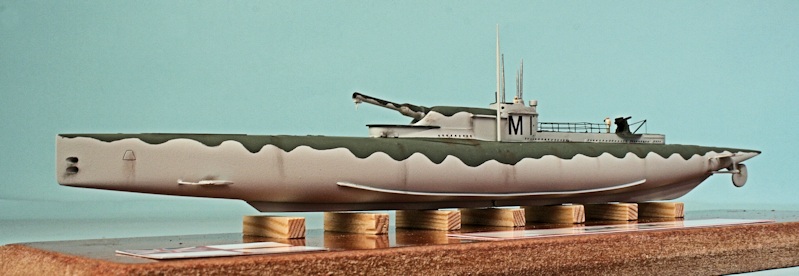
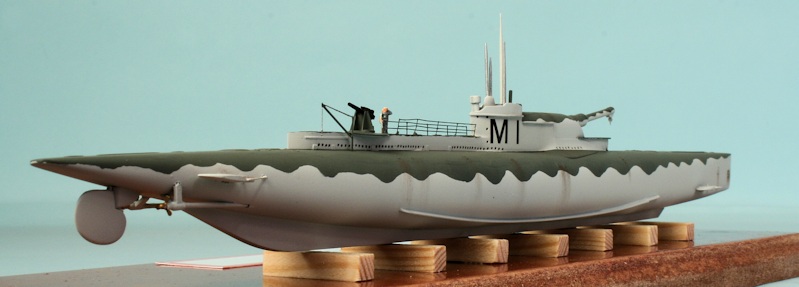
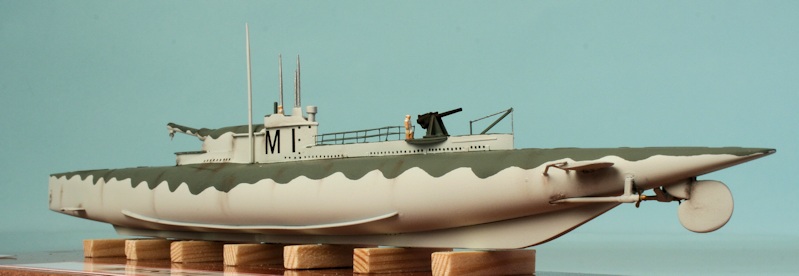
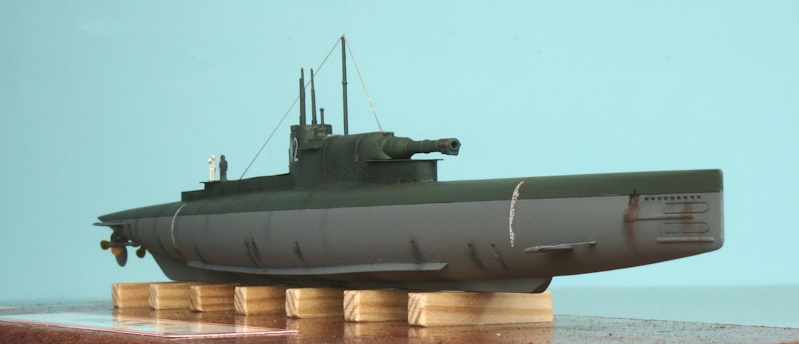
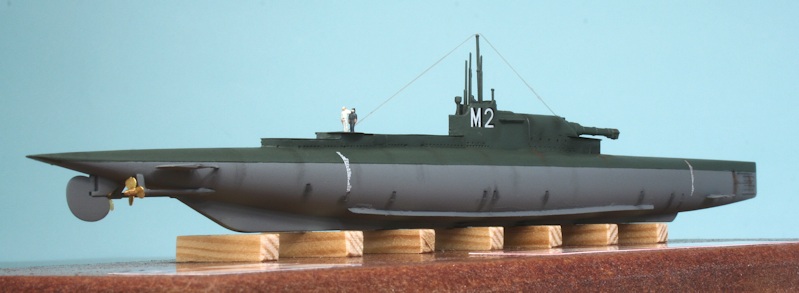
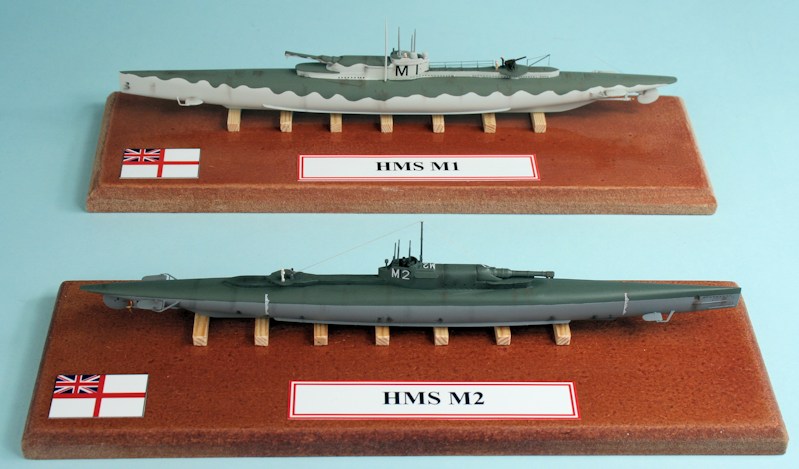
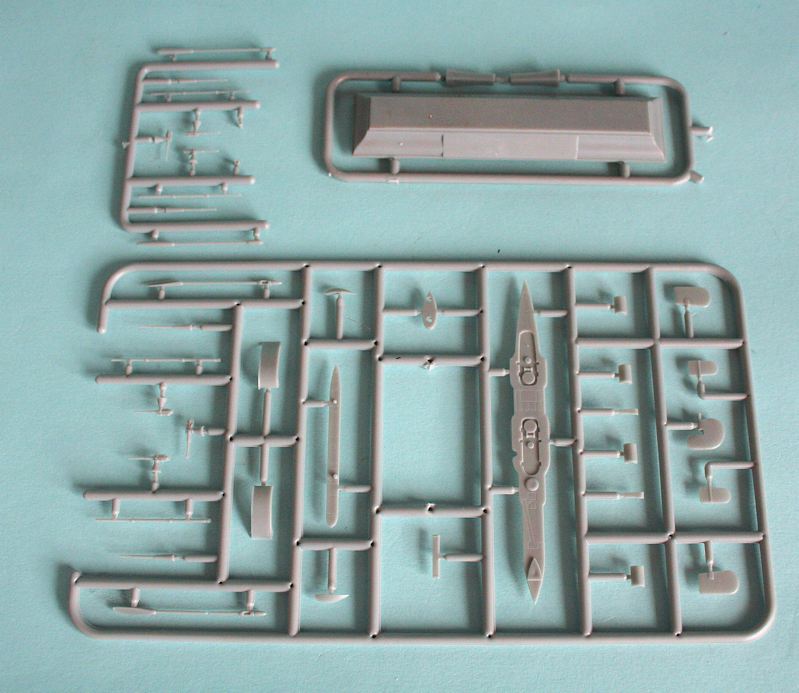
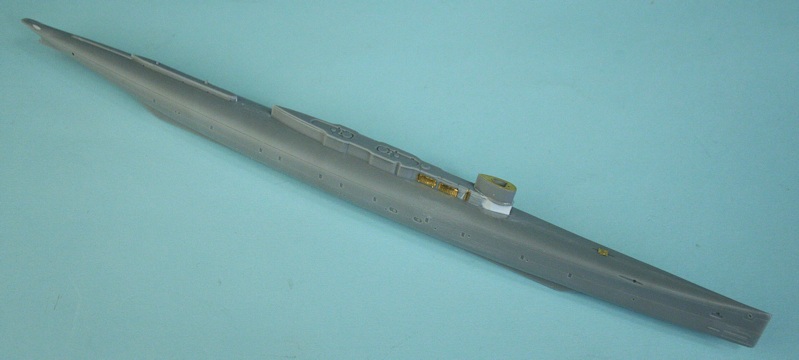
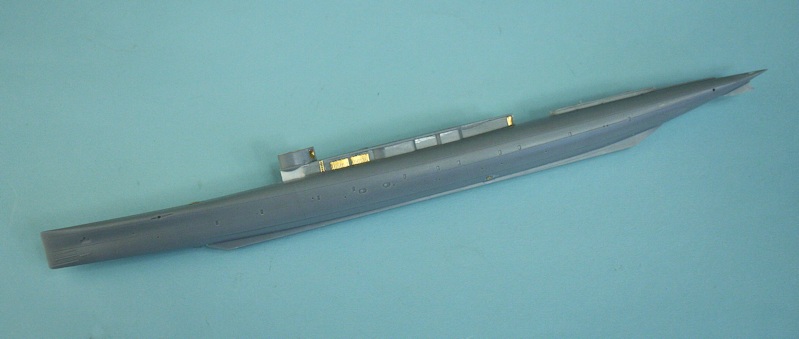
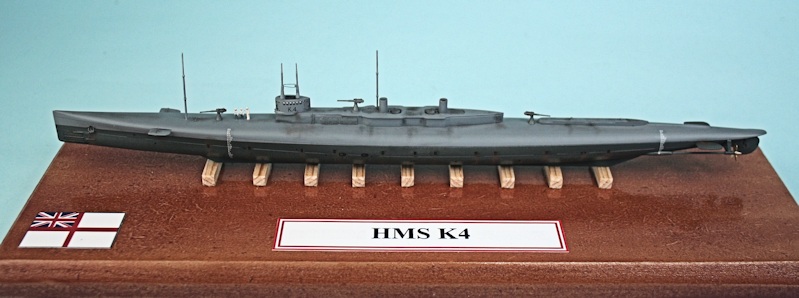
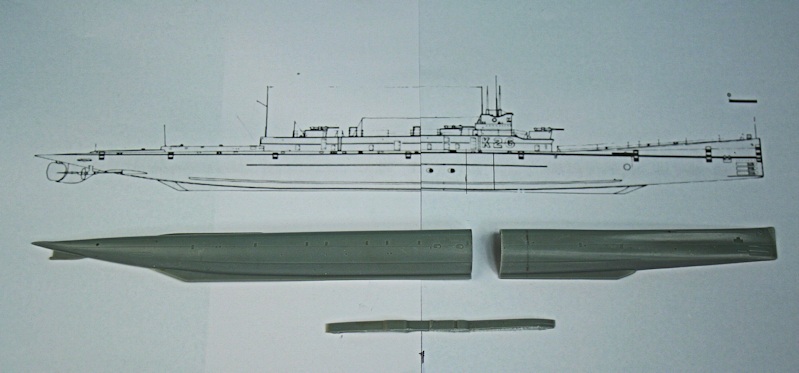
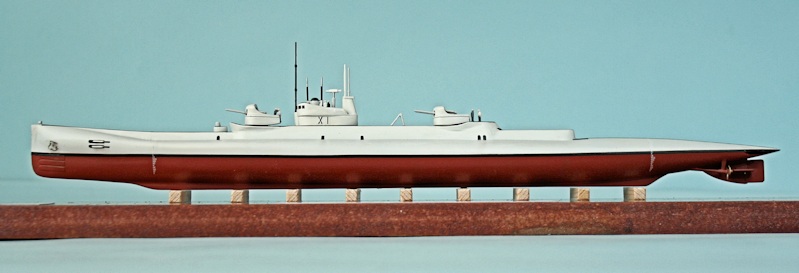
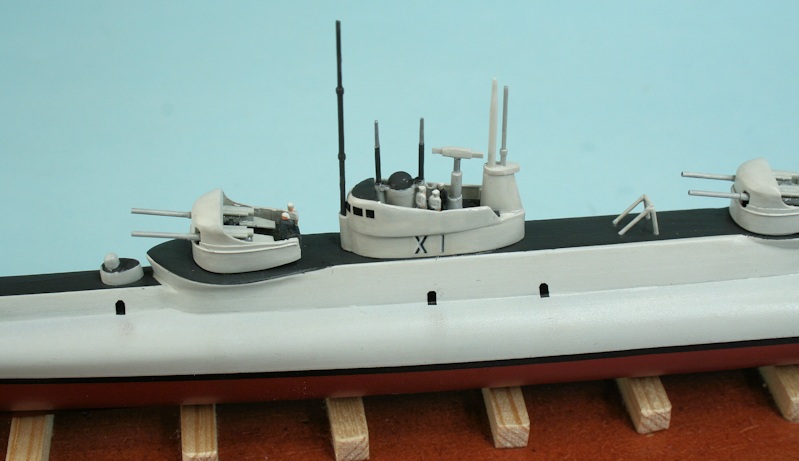
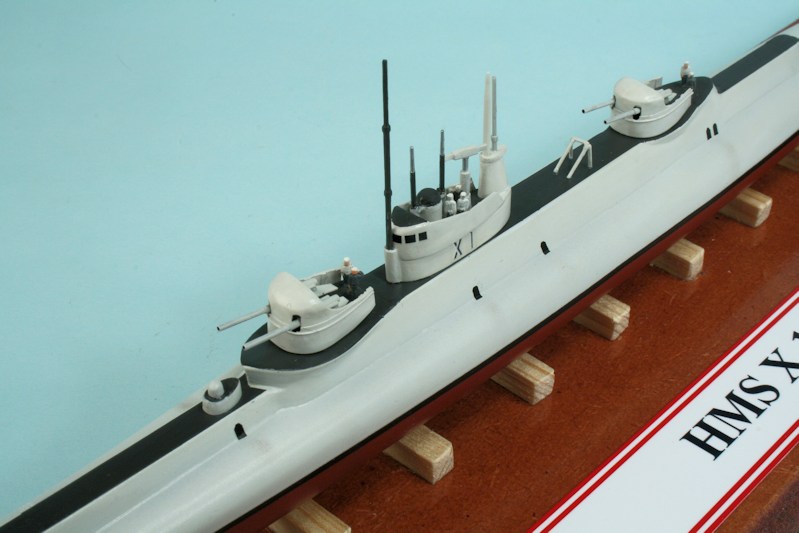
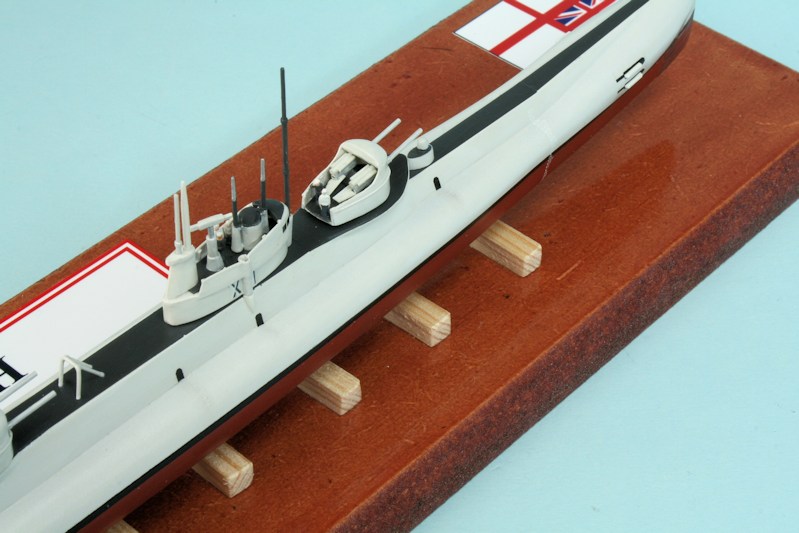
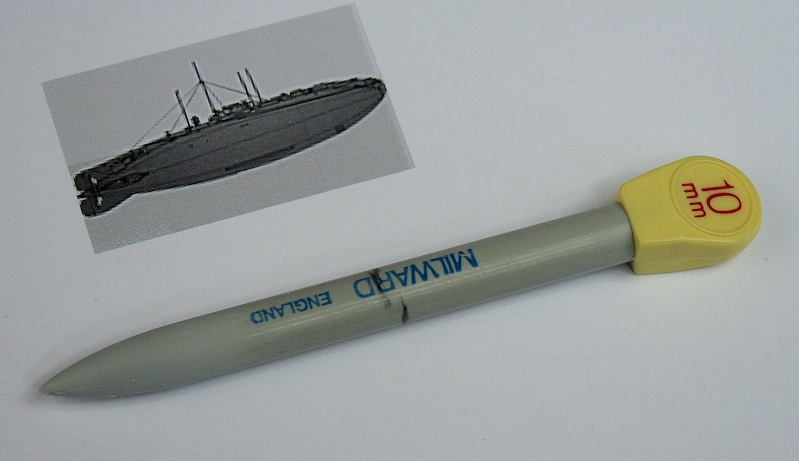
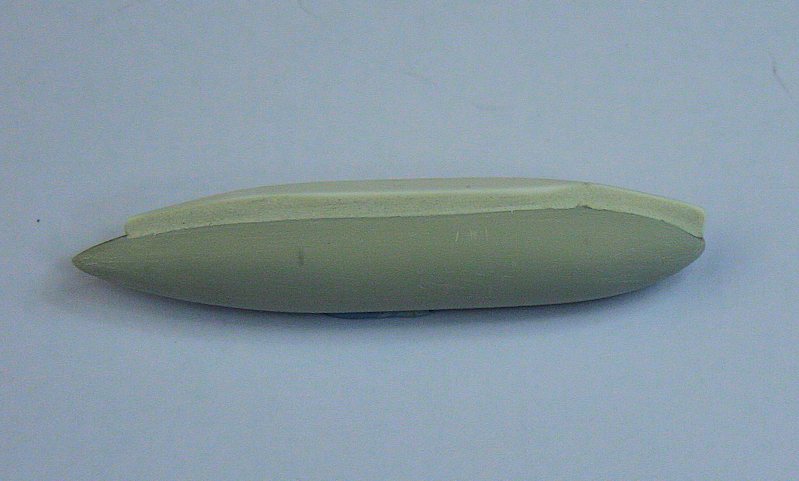
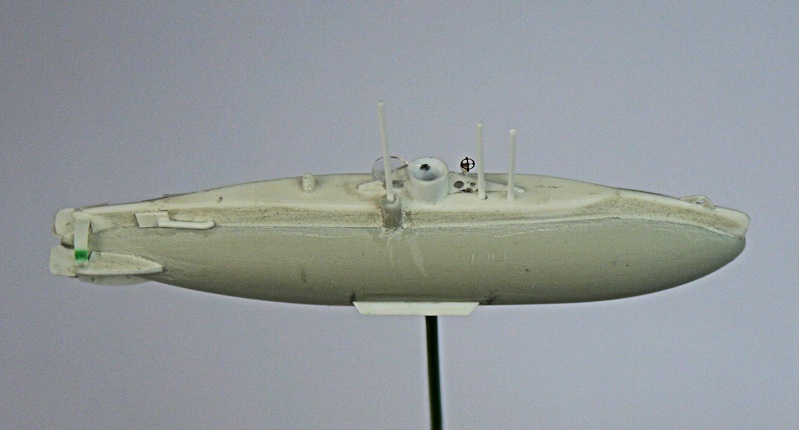
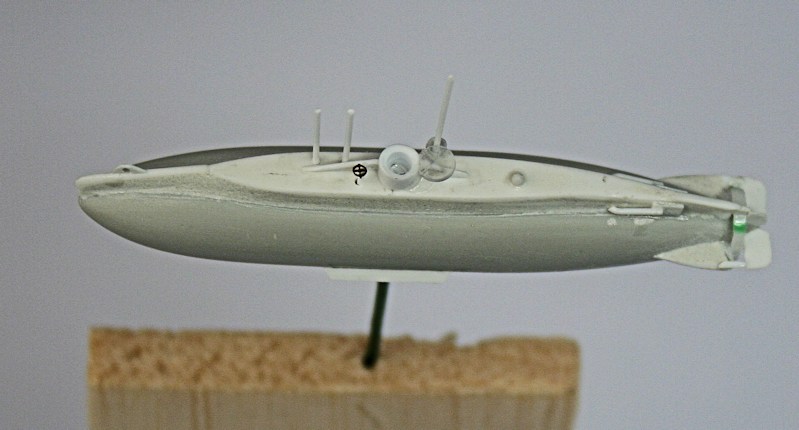
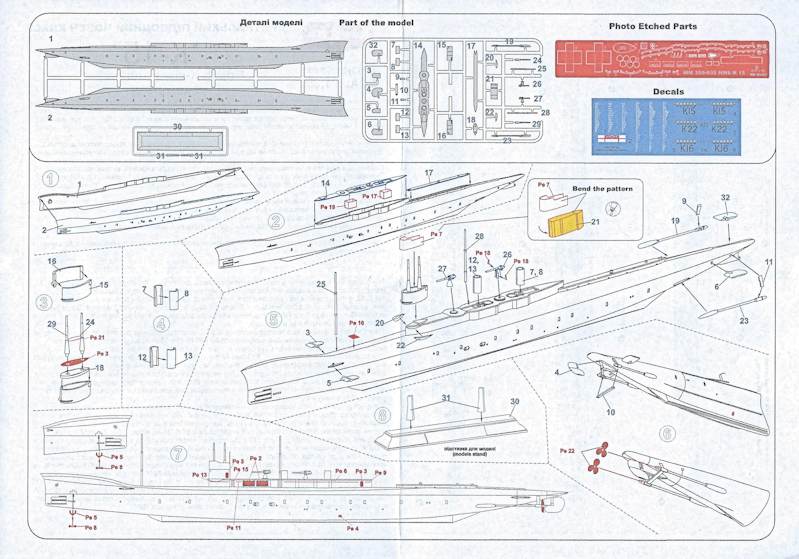
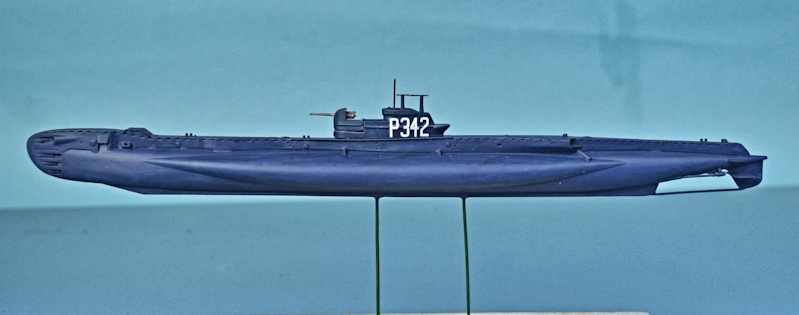
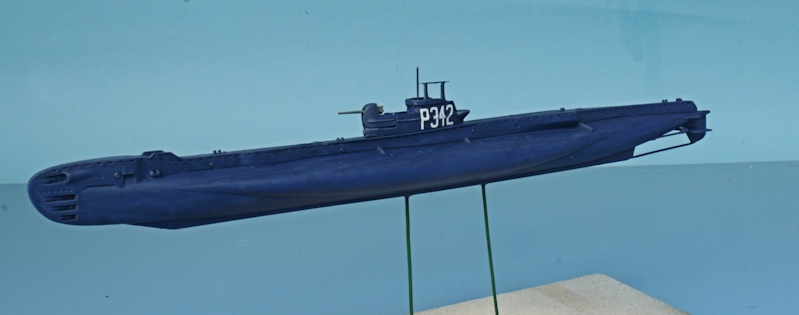
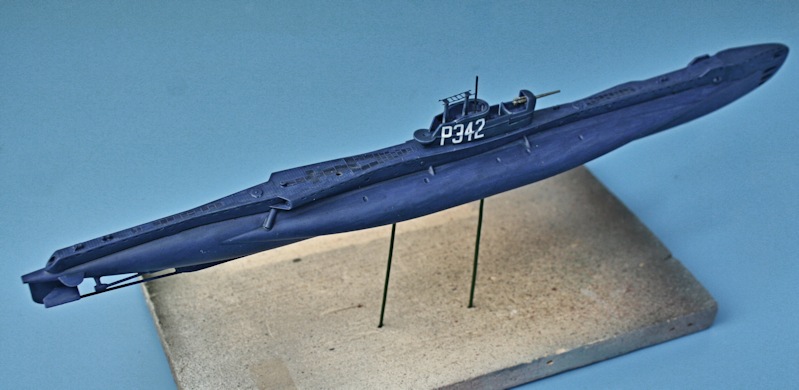
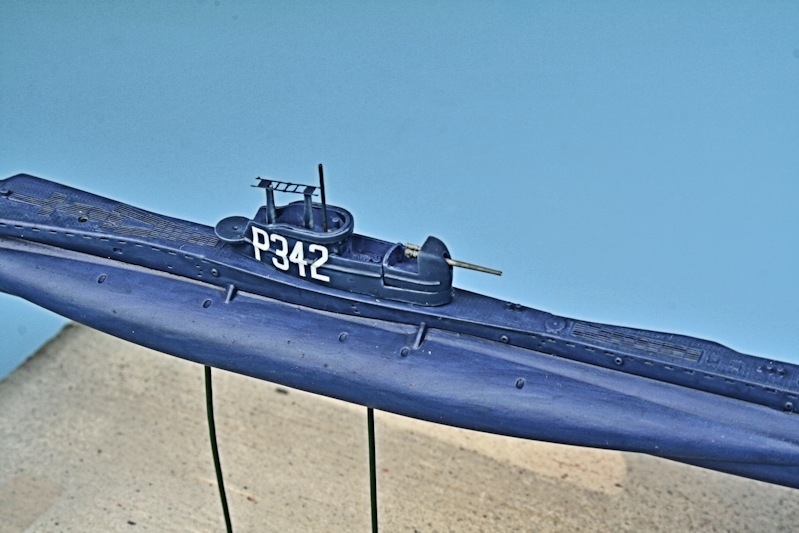
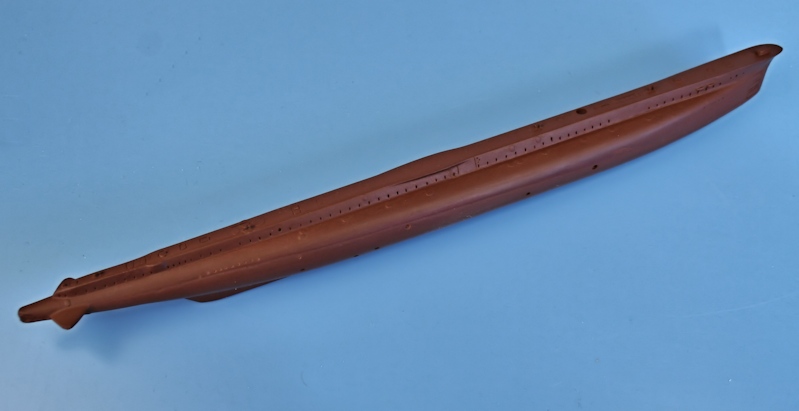
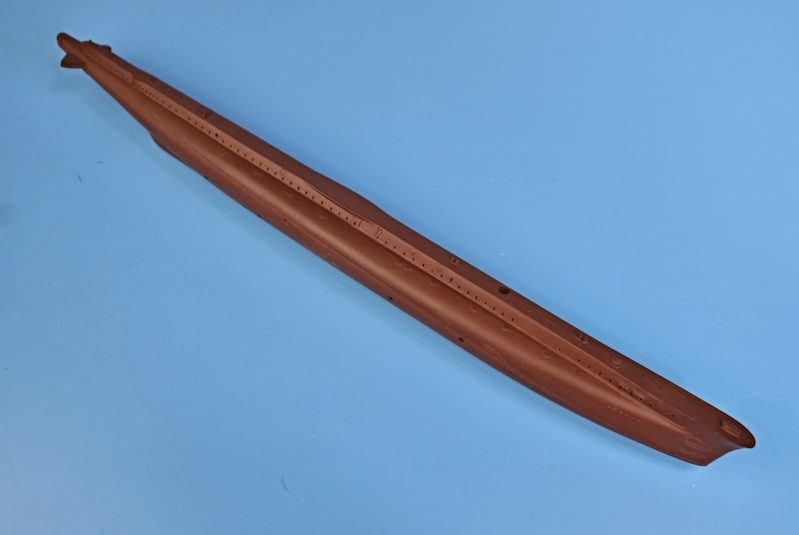
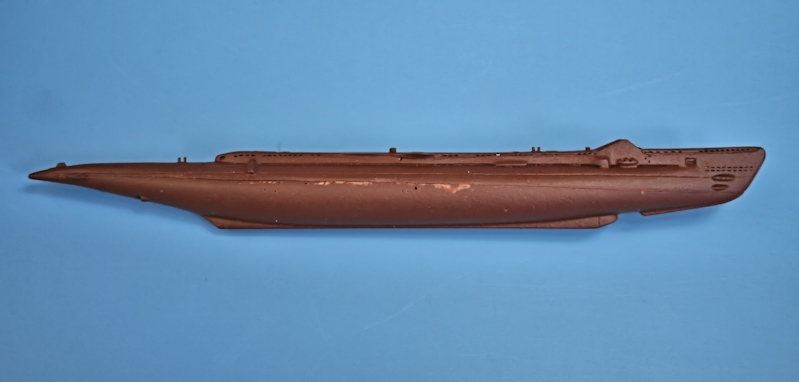
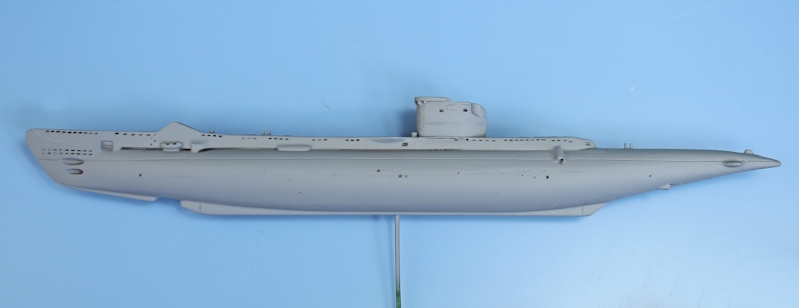
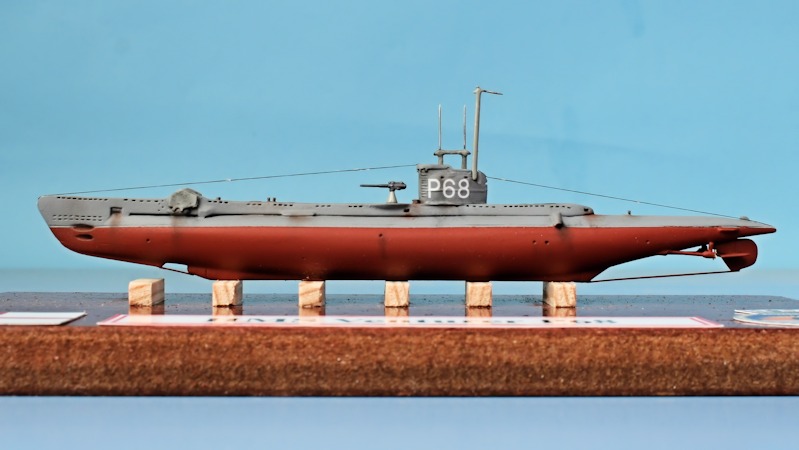
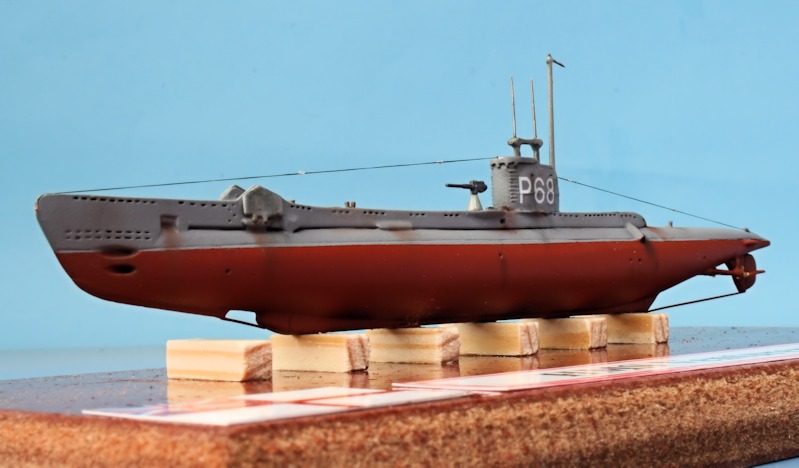
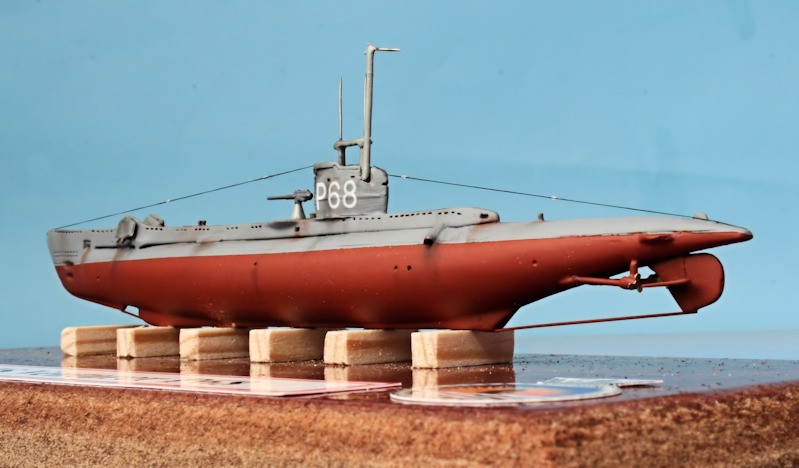
HMS M.1
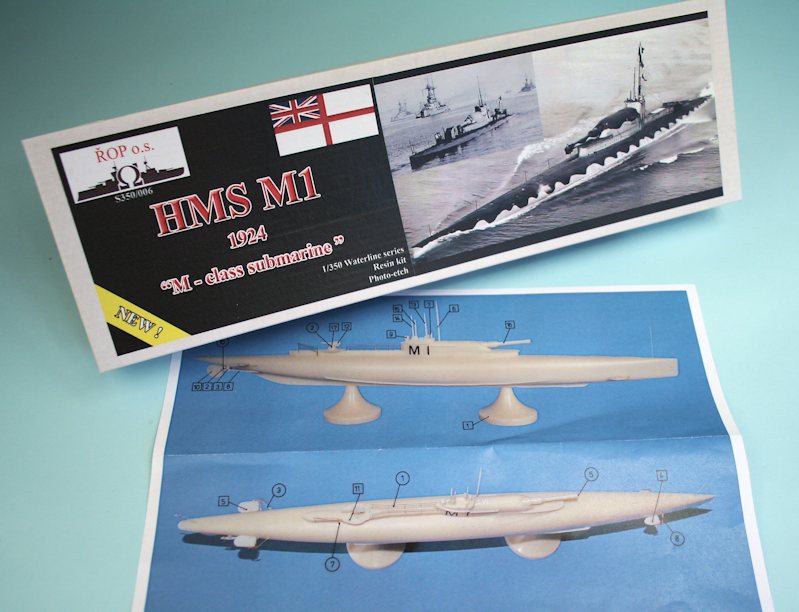
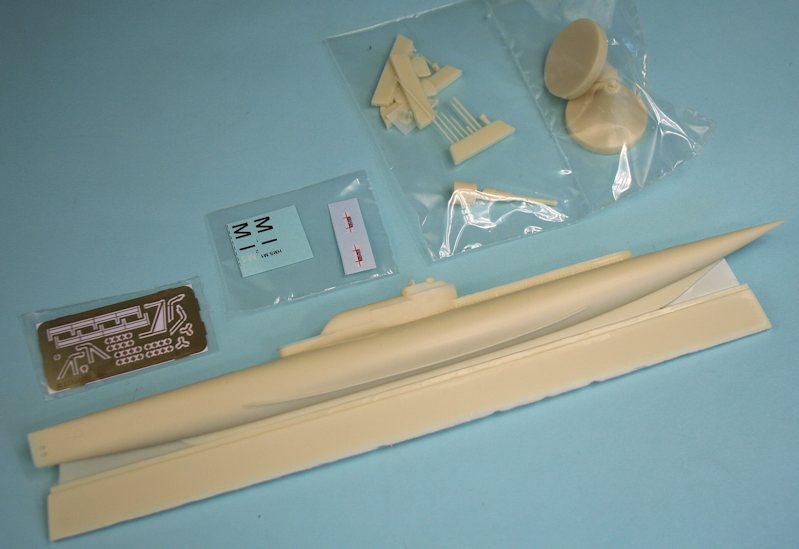
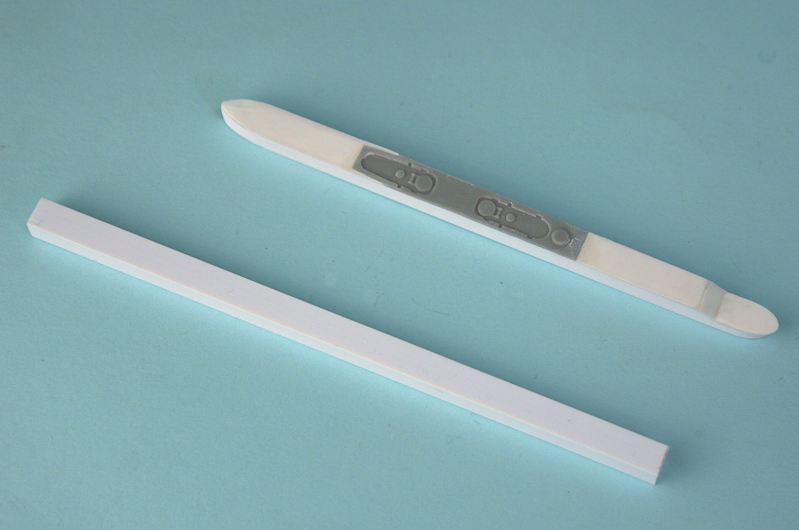
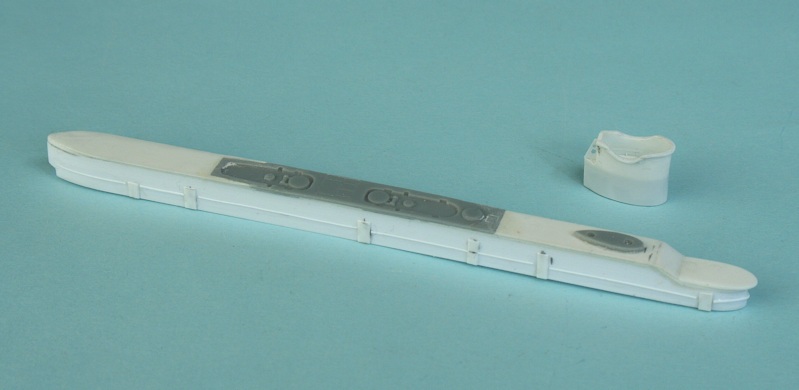
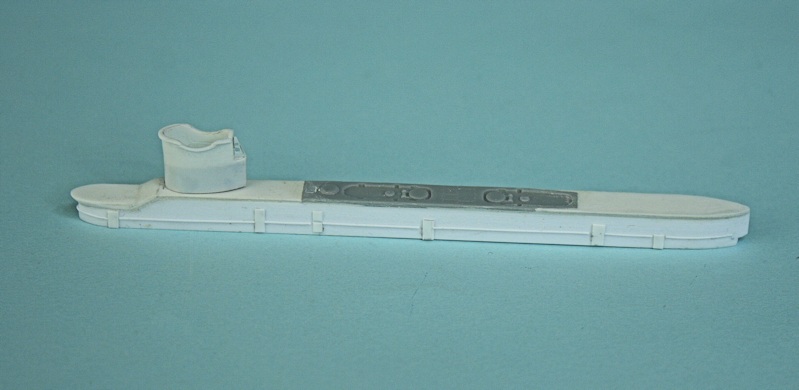
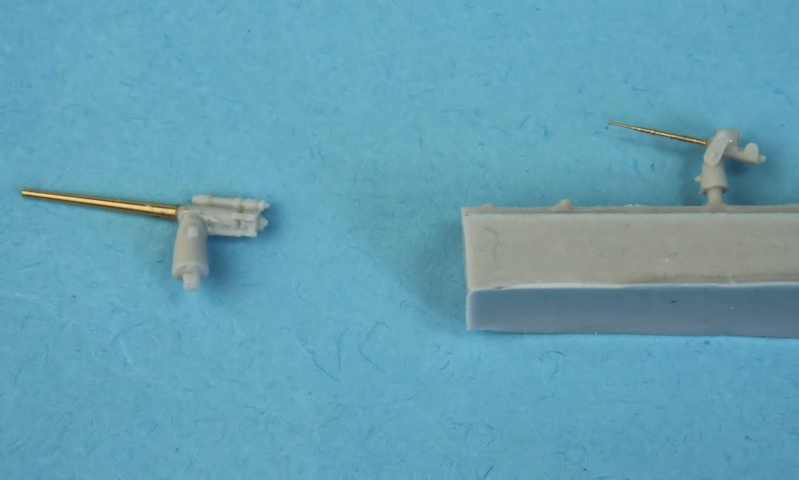
Resin, etched-brass and decals for M1 - they also do M2 & M3.
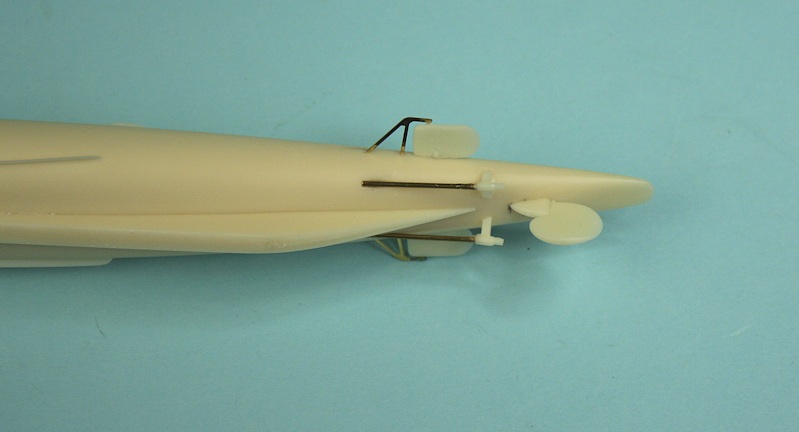
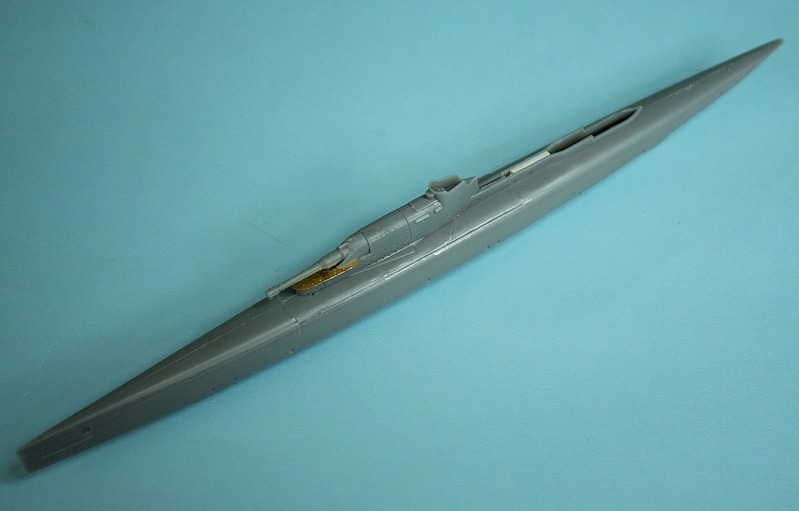
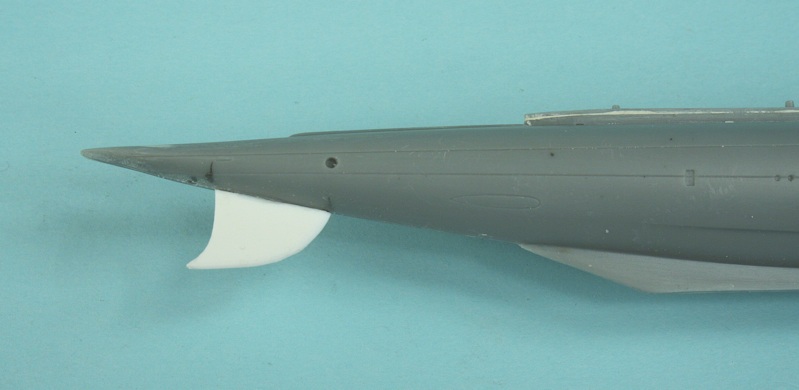
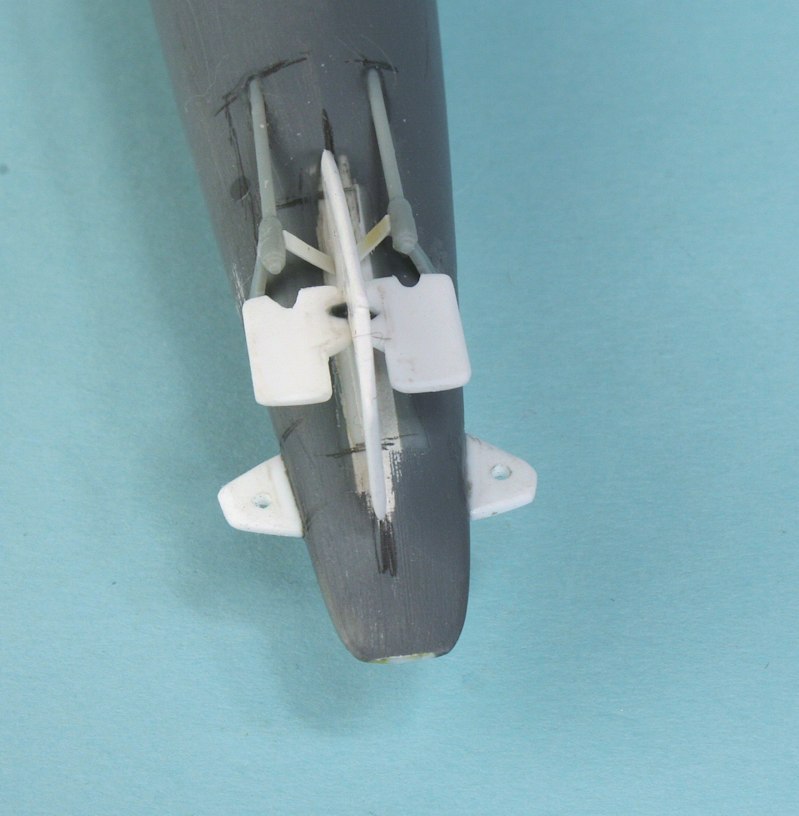
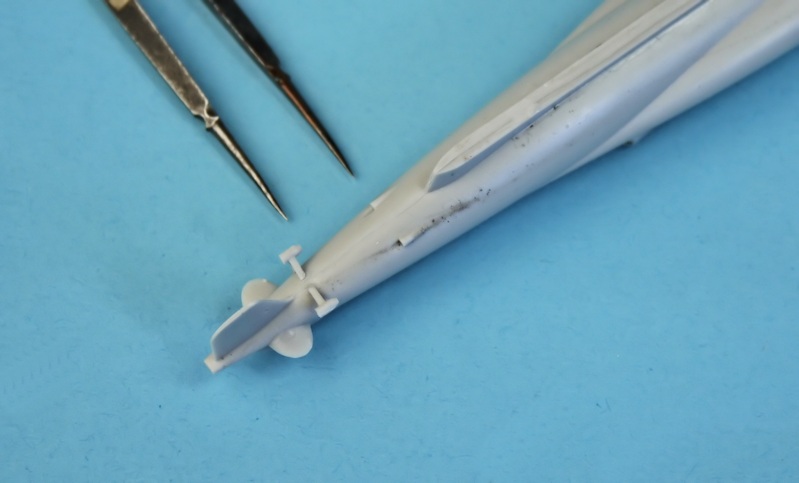
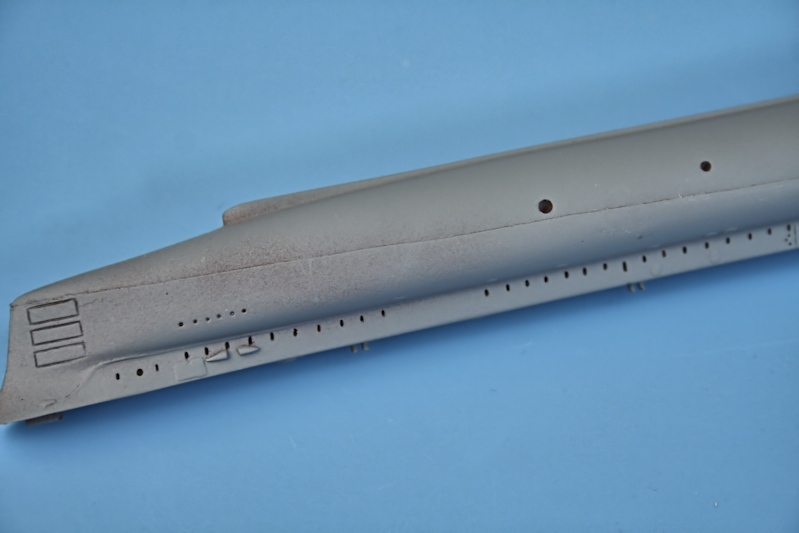
Prop shafts, diving planes & rudder added.
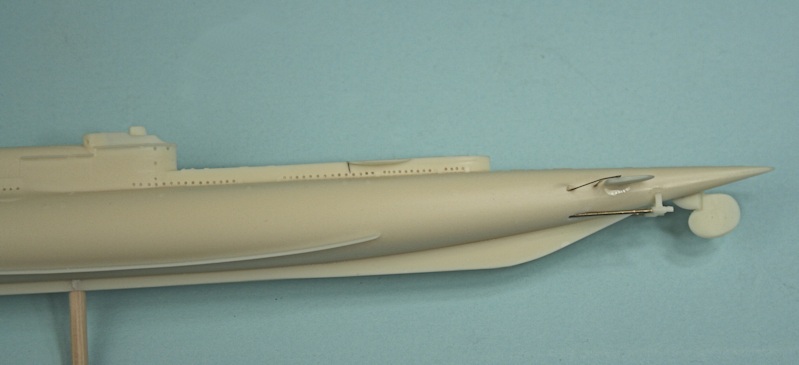
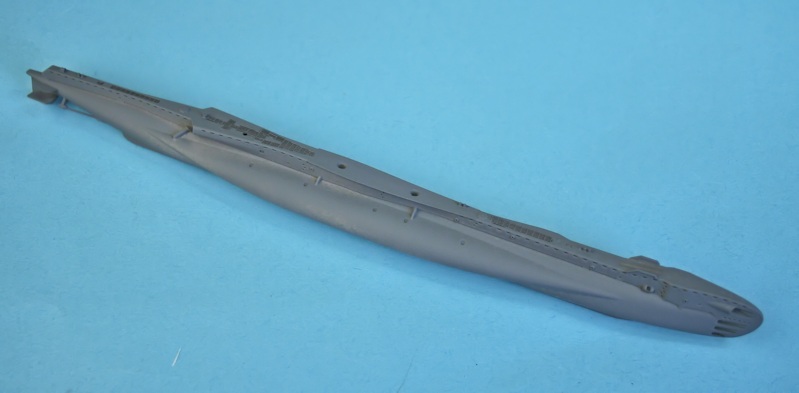
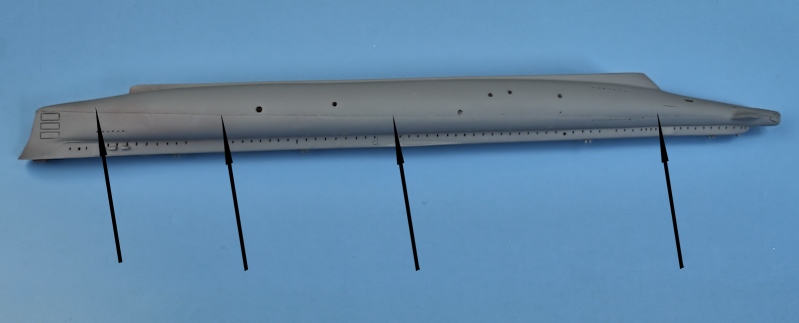
Dozens of free-flood holes drilled out.
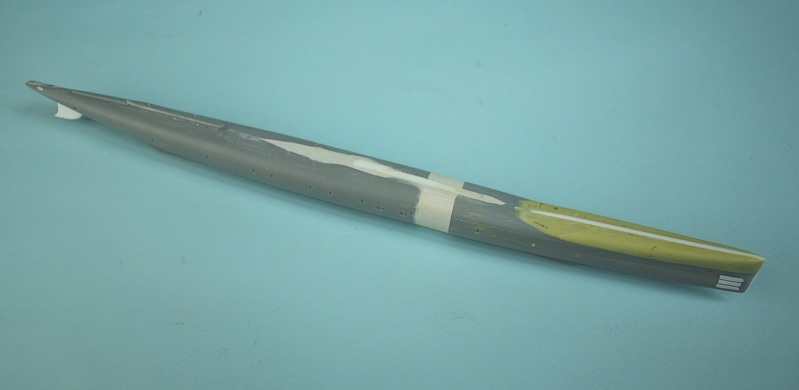
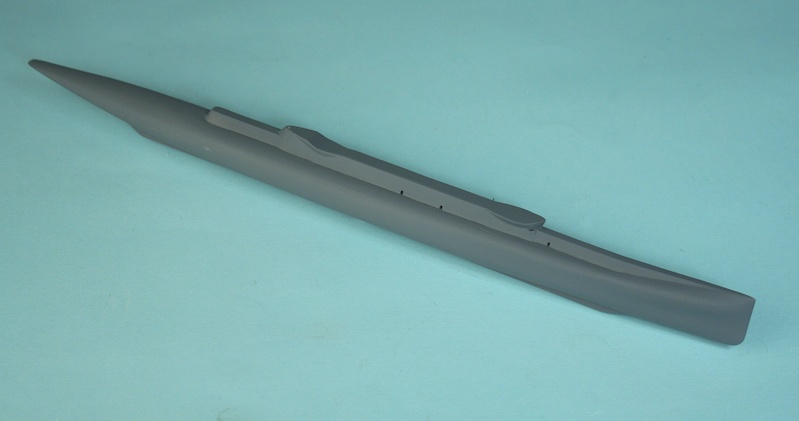
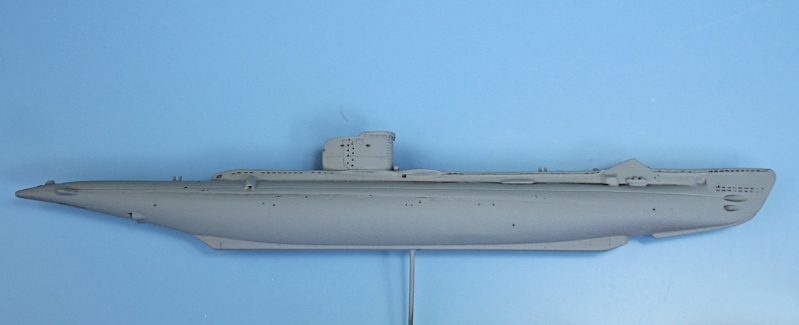
Finished model.

Return
Box art.
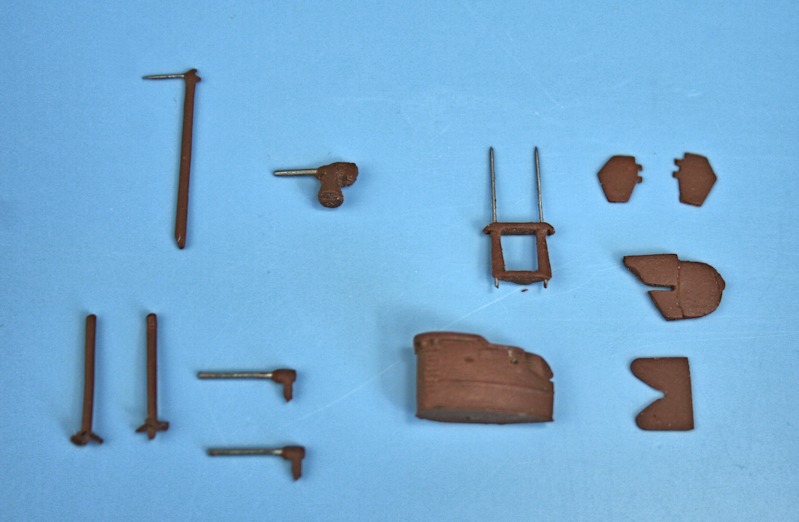
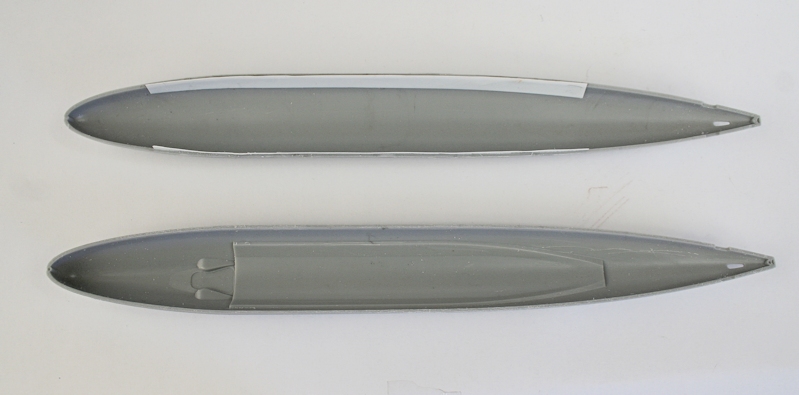
Kit contents
Construction Diagram
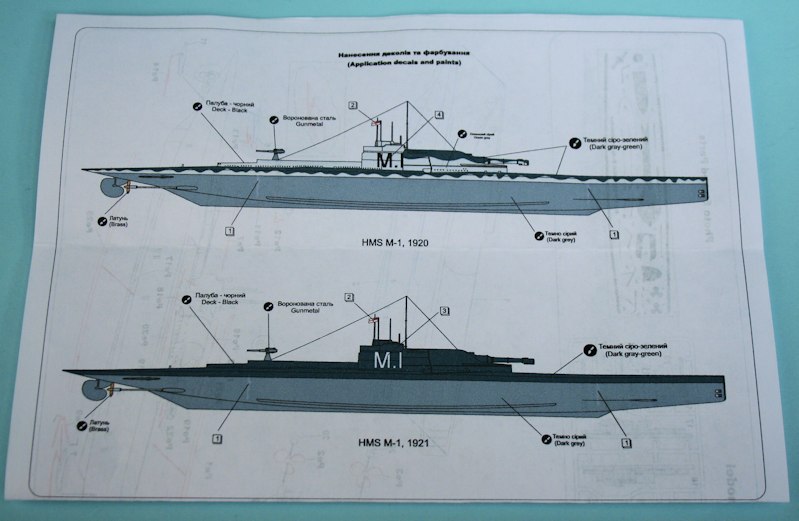
Colour schemes for two versions

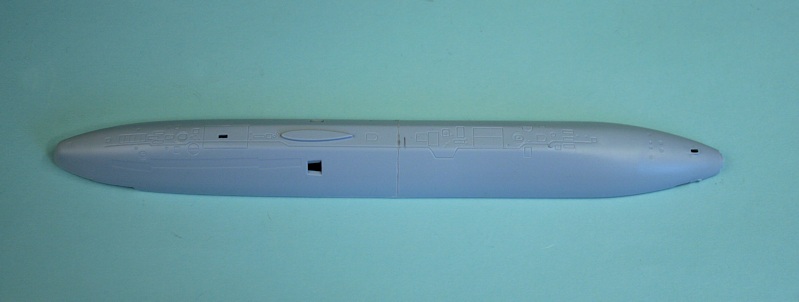
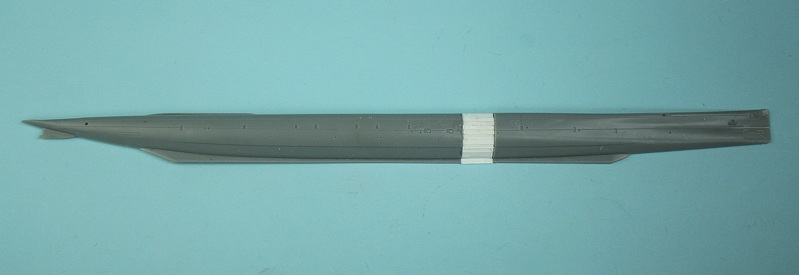
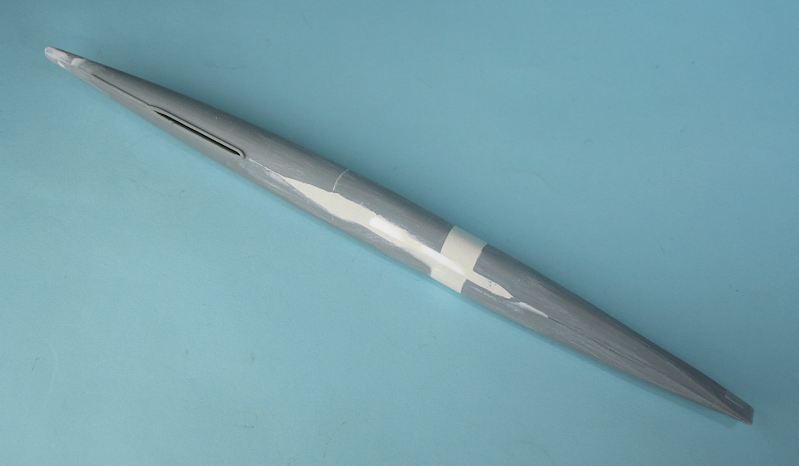
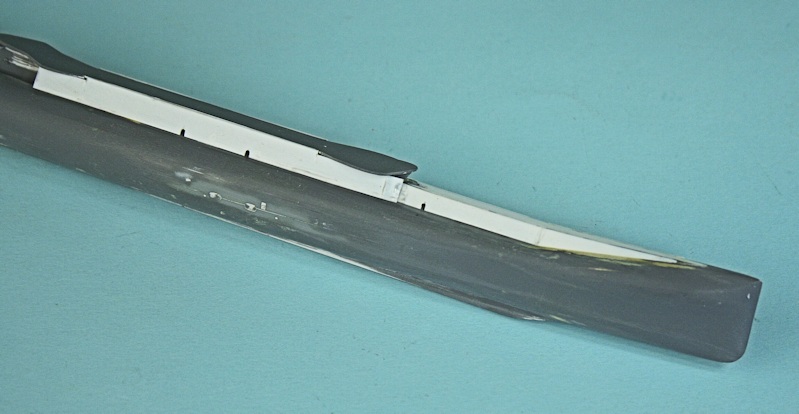
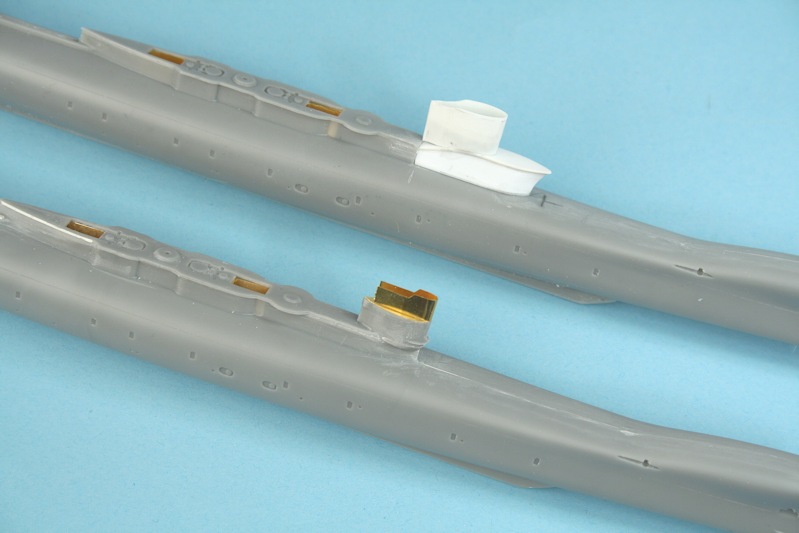
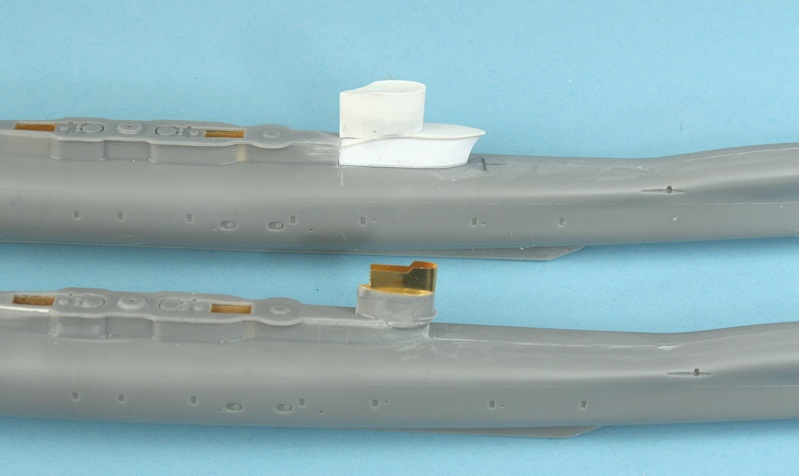
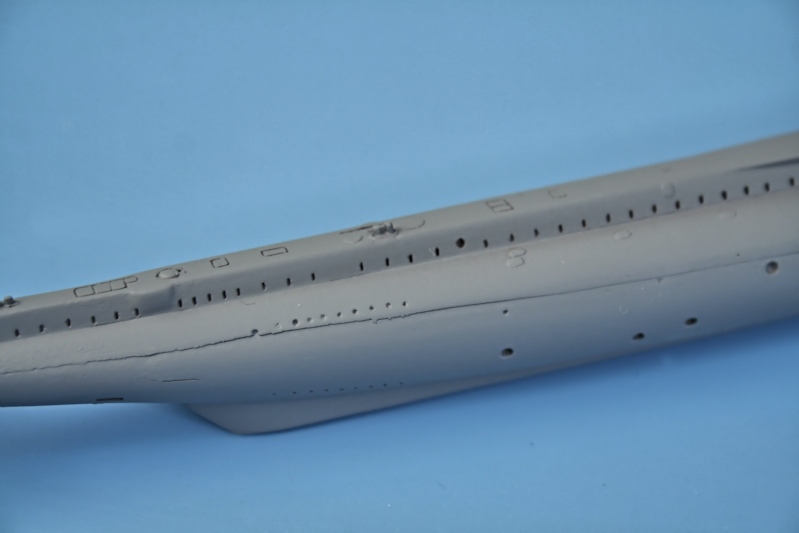
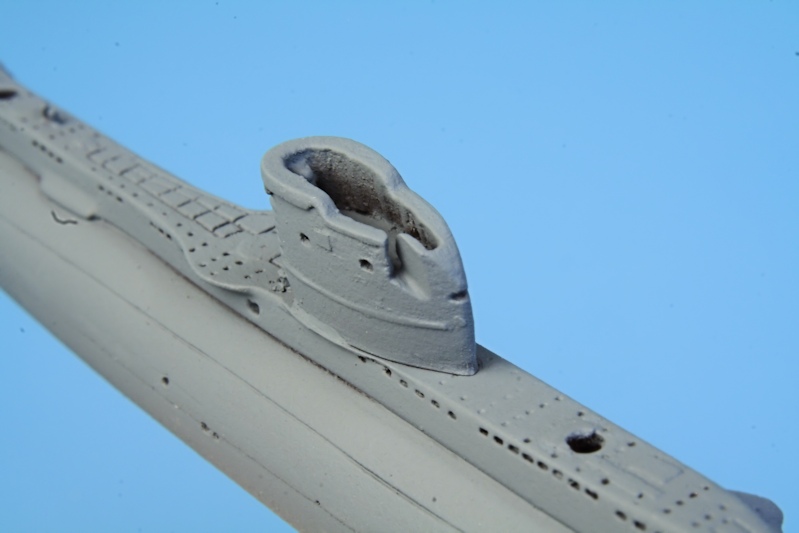
To cater for different versions (M1/M2/M3) the superstructure is a separate part.....
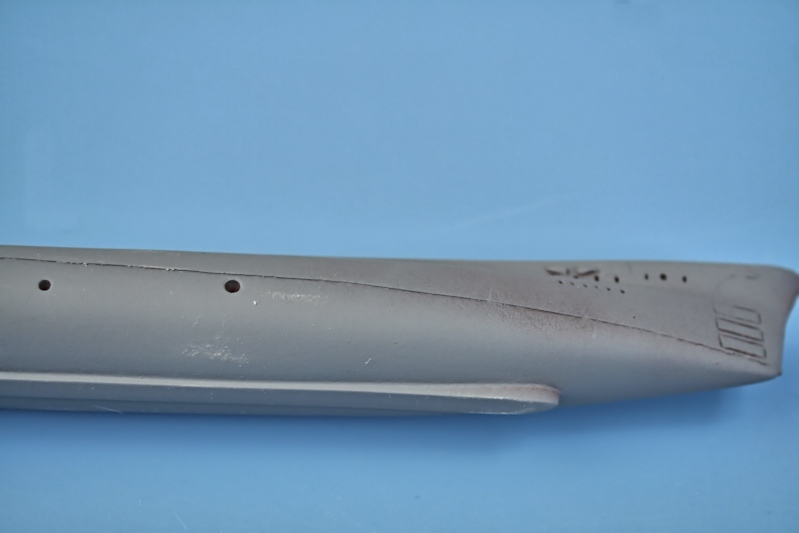
..... which means that there is a join line to fill.
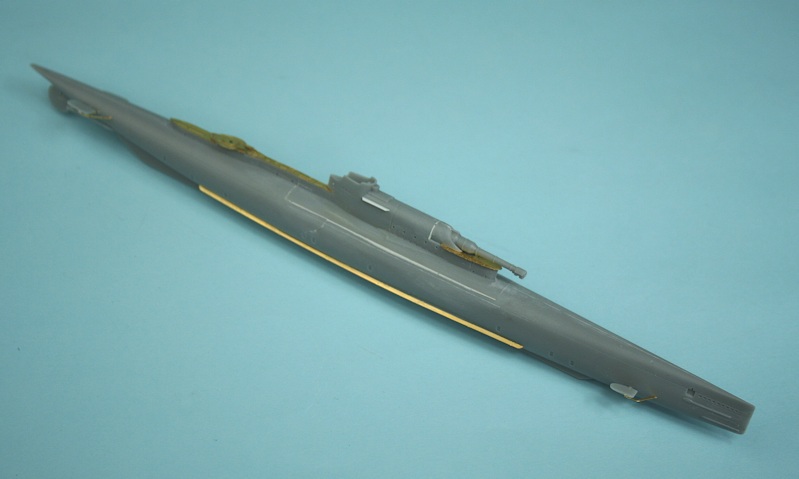
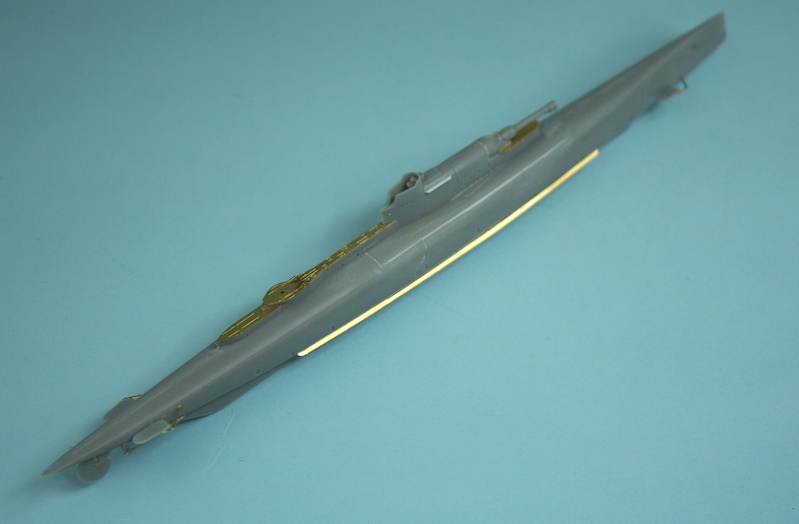
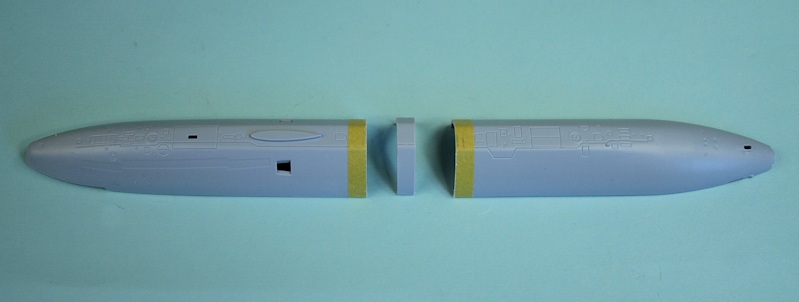
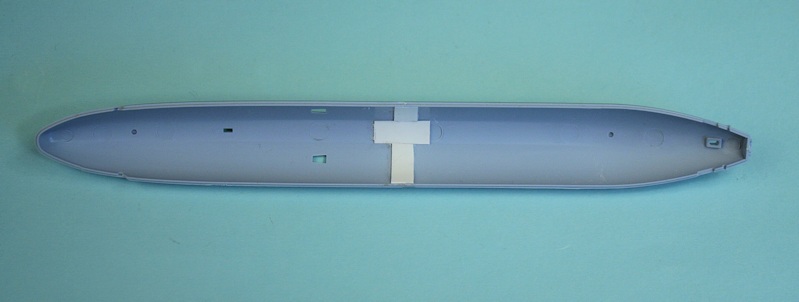
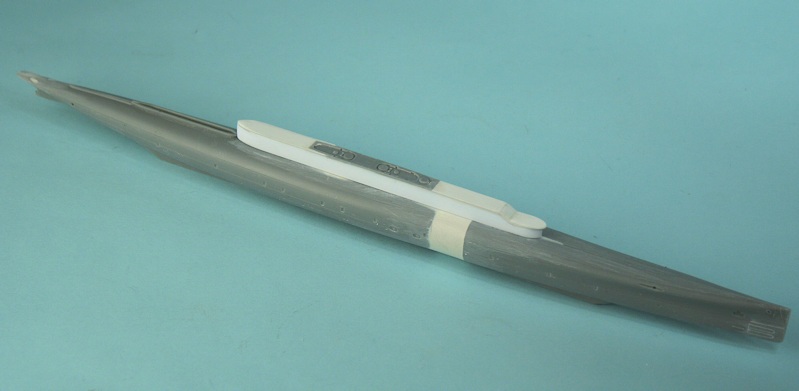
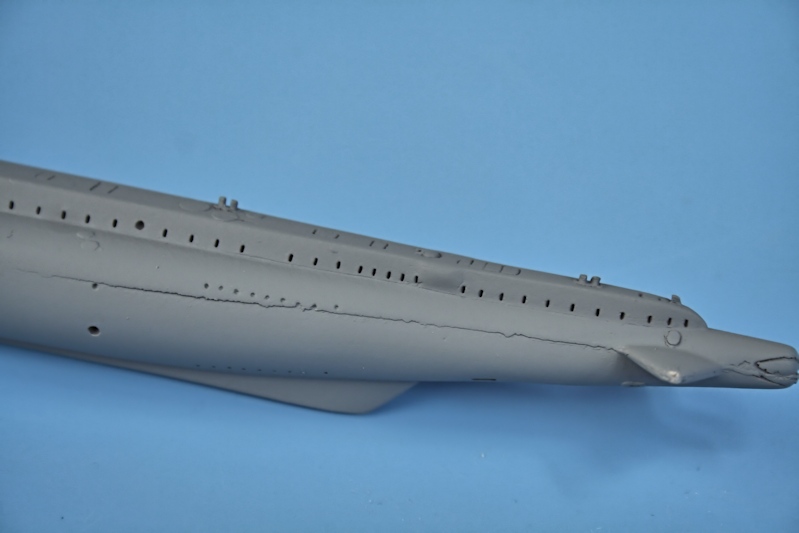
Hull assembled and etched brass added....
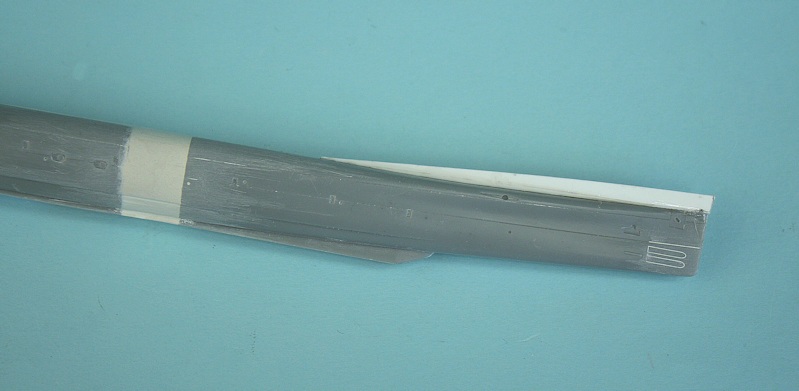
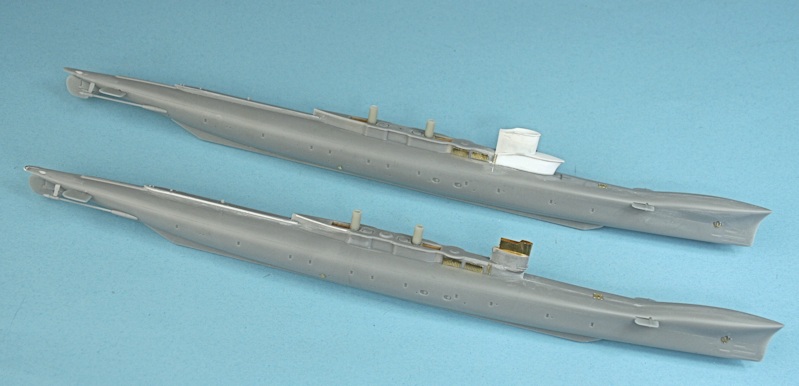
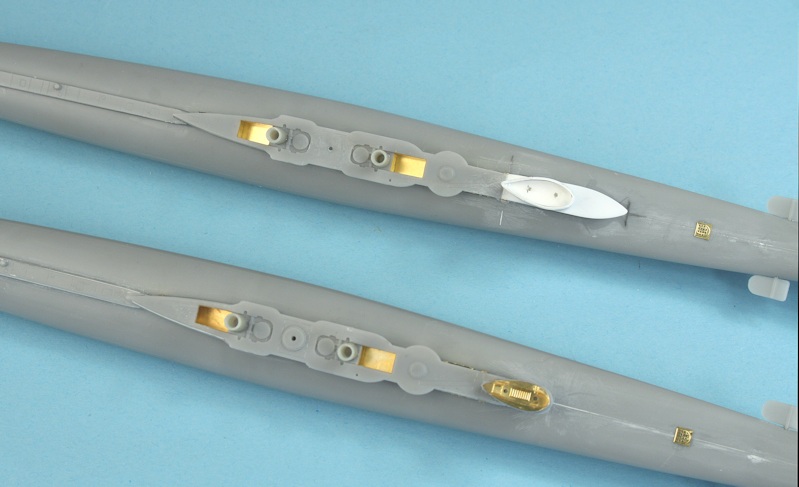
The bilge keels were problematic - being very flexible and awkward to locate straight.
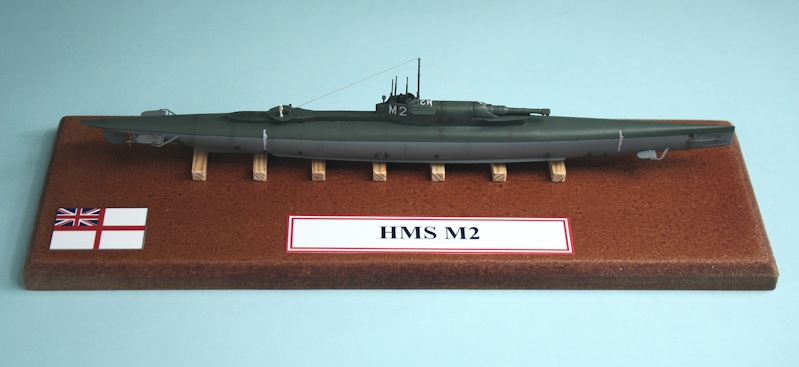
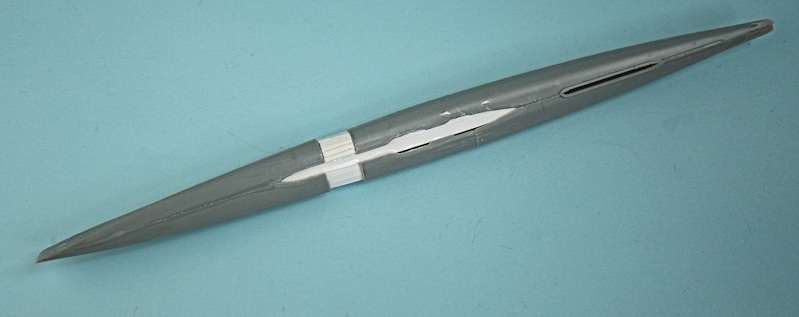
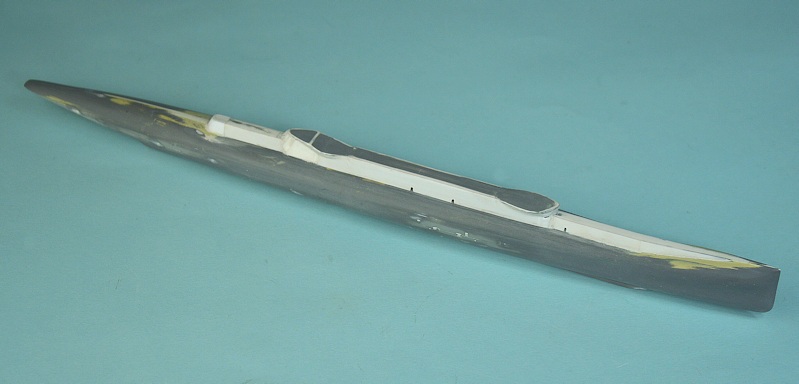
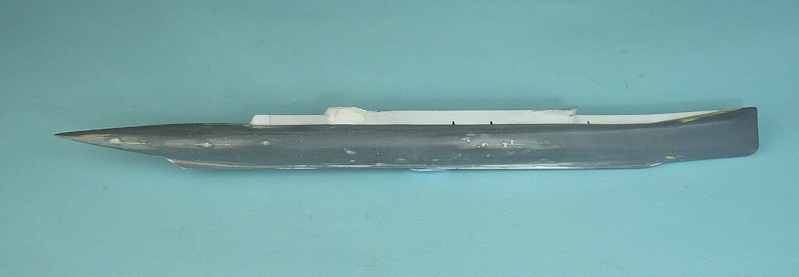
I decided to finish the model as HMS M2 - prior to her conversion into an aircraft carrier.
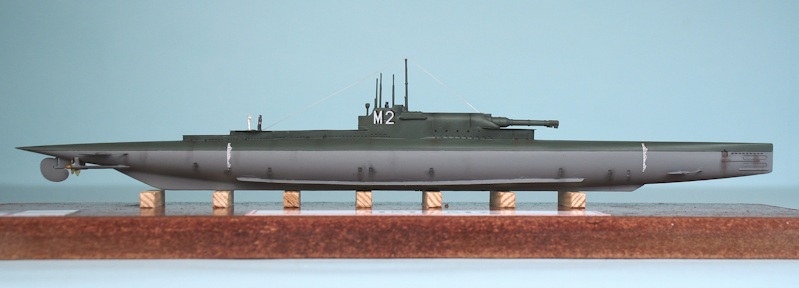
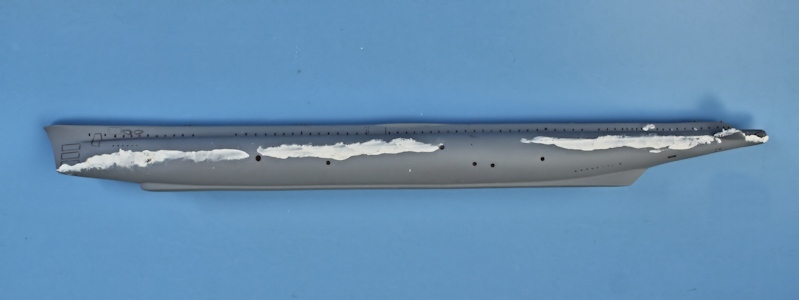
Decals are from the spares box - white on black to get the shadow.
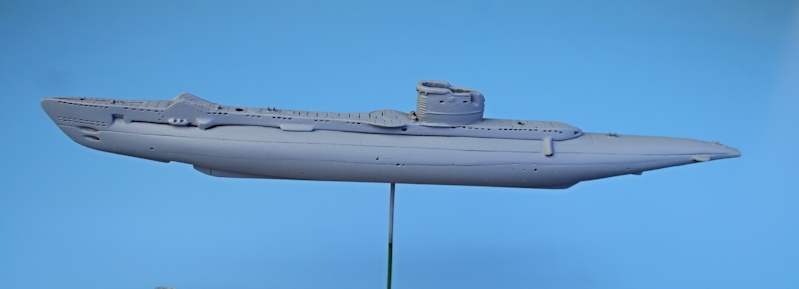
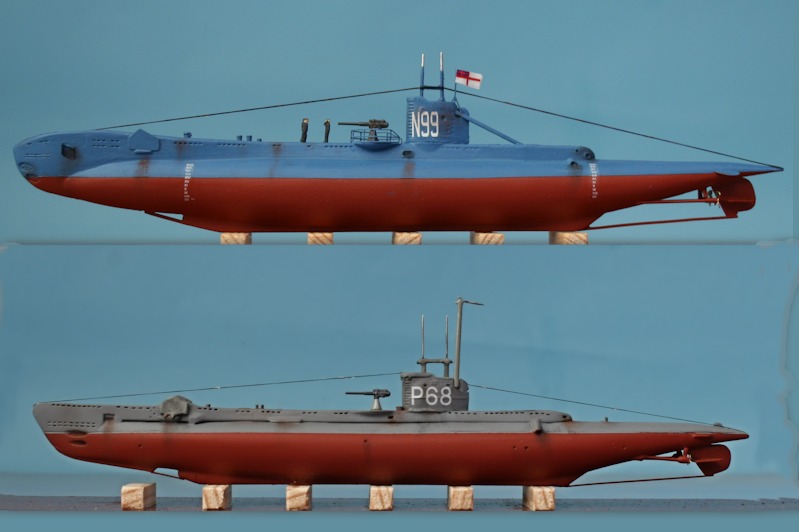
Resin M1 and Micro Mir M2 together.
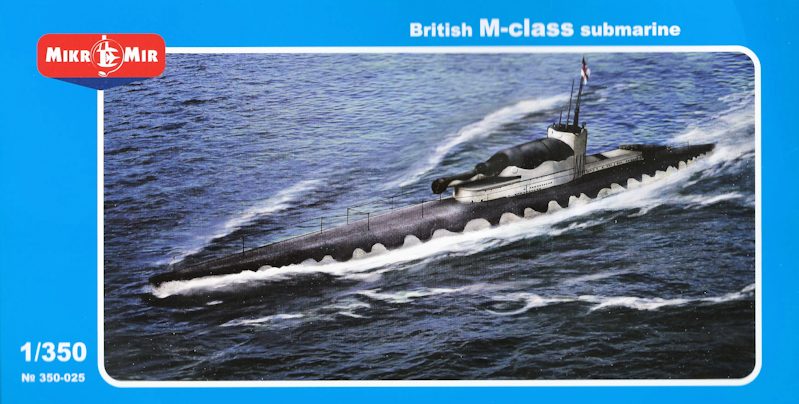
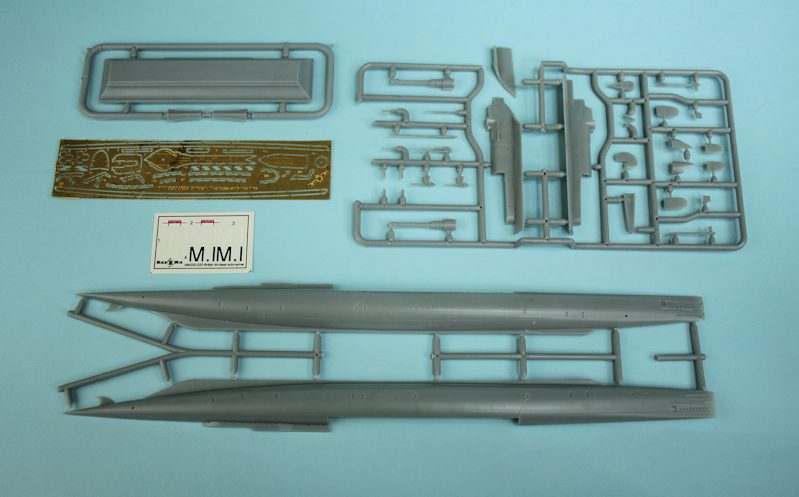
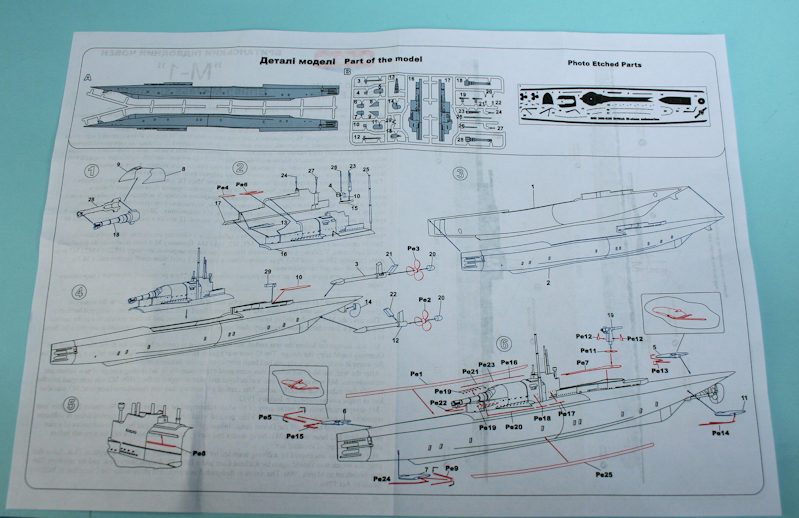
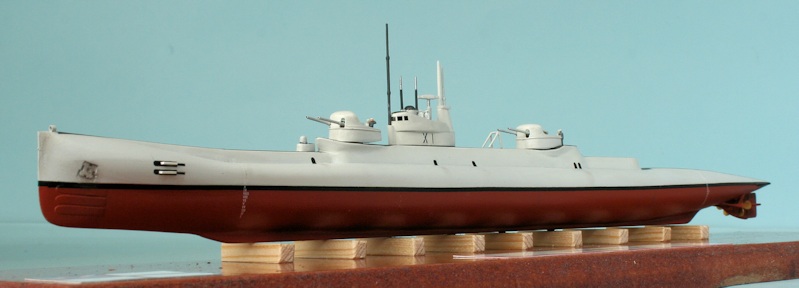
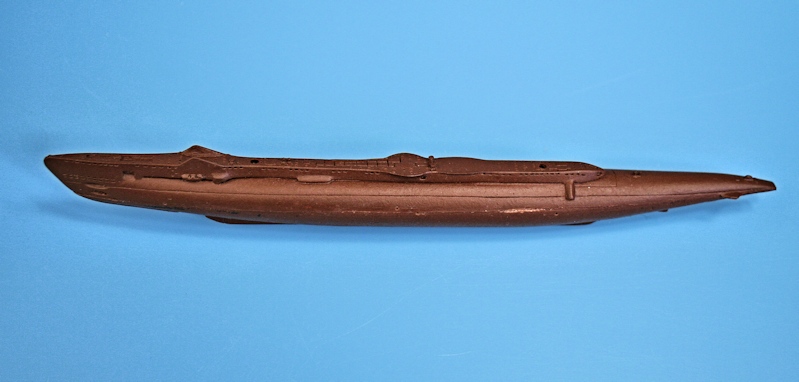
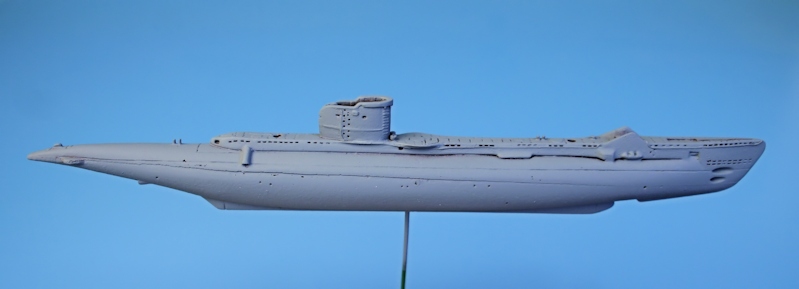
HMS M.1 - Mikro-Mir
Box art.
Kit contents
Construction Diagram
Colour schemes for two versions
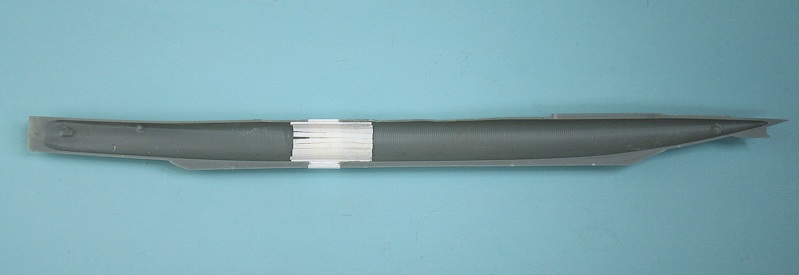
To cater for different versions (M1/M2/M3) the superstructure is a separate part.....
..... which means that there is a join line to fill.
Hull assembled and etched brass added....
The bilge keels were problematic - being very flexible and awkward to locate straight.
Finished Model
I decided to finish the model as HMS M2 - prior to her conversion into an aircraft carrier.
Decals are from the spares box - white on black to get the shadow.
Resin M1 and Micro Mir M2 together.
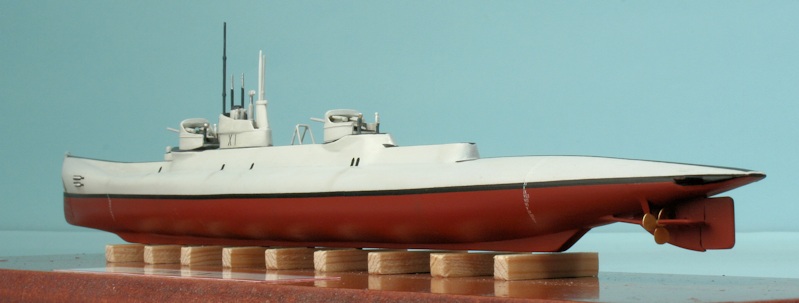
HMS Splendid
HMS Splendid is a Swiftsure Class SSN that preceded the Trafalgar Class
It is converted from the Airfix HMS Trafalgar kit - with the hull shortened by 7mm.
Upper hull halves re-joined.......
.... and strengthened on the inside.
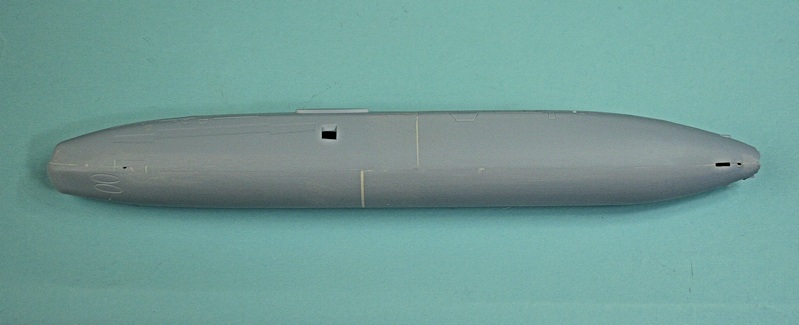
Lower hull halves shortened and attached.
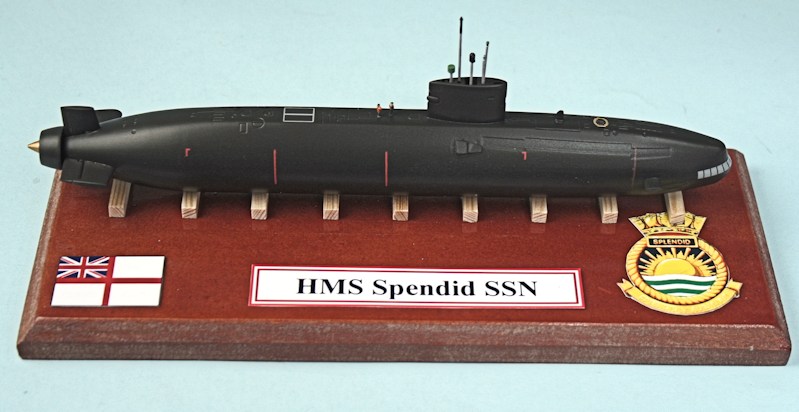
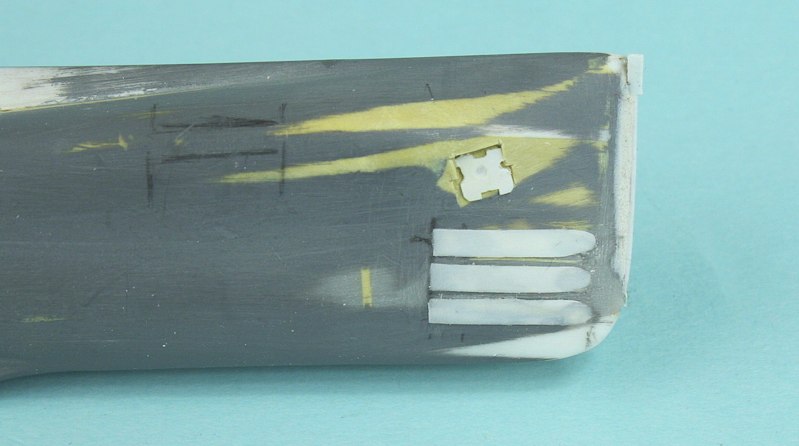
Finished model - the upper rudder is shortened and the single vent below the sail is replaced by two smaller vents.
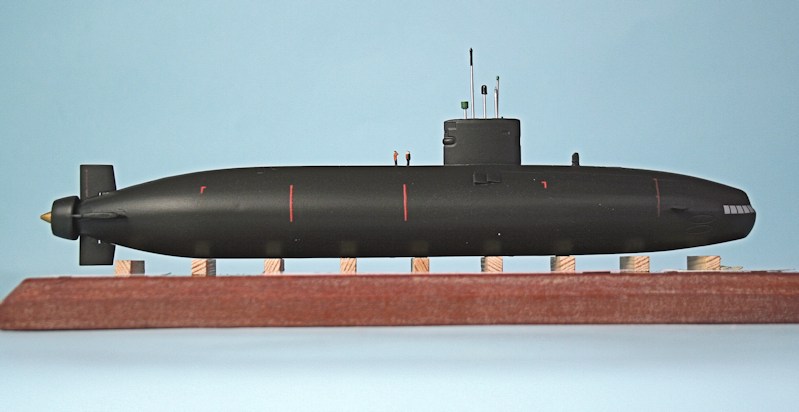
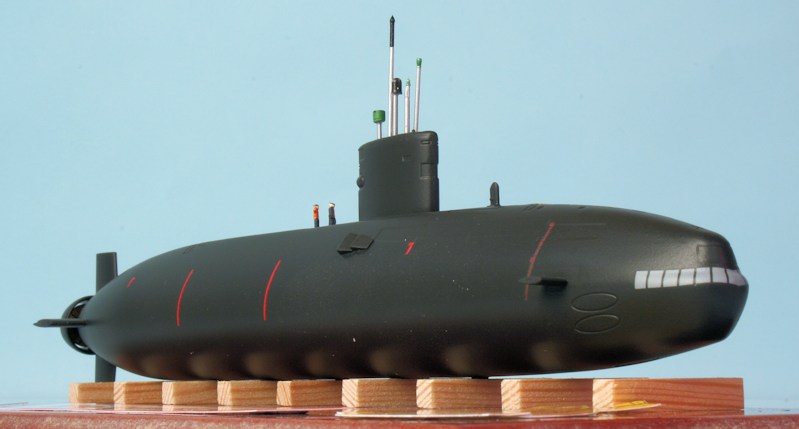
Note the two smaller vents on the hull below the sail.
All the Swiftsure Class boats were fitted with a shrouded propulsor.
Comparison photo of Swiftsure and Trafalgar Class
Return
Box Art.
This is the same kit as the Type XVIIB U-Boat - with a new conning tower.
Instruction sheet and tiny decals.
Finished model - all of 12cm long!
A sailor on deck for a size comparison.
Mikro-Mir box art.
Construction diagram - note the etched parts in red.
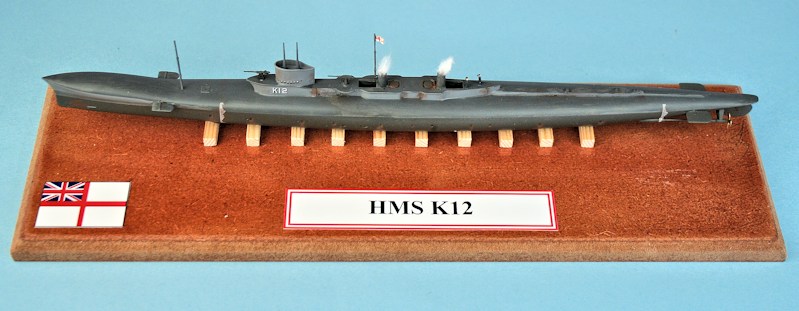
Painting instructions, etched brass and decals for HMS K4 and K5
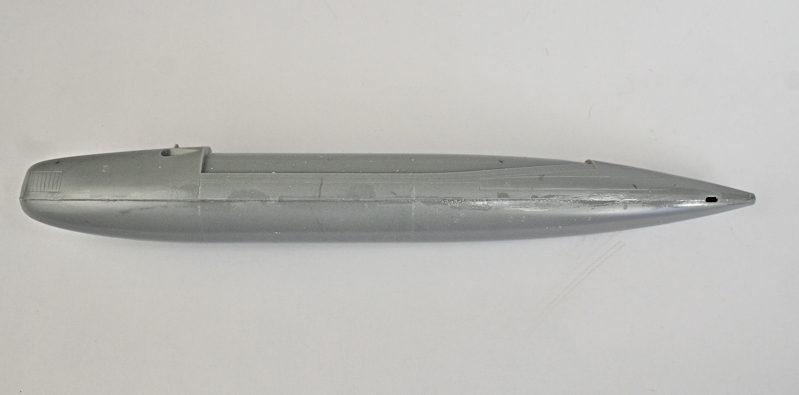
Hull parts - nearly 1 foot in length!
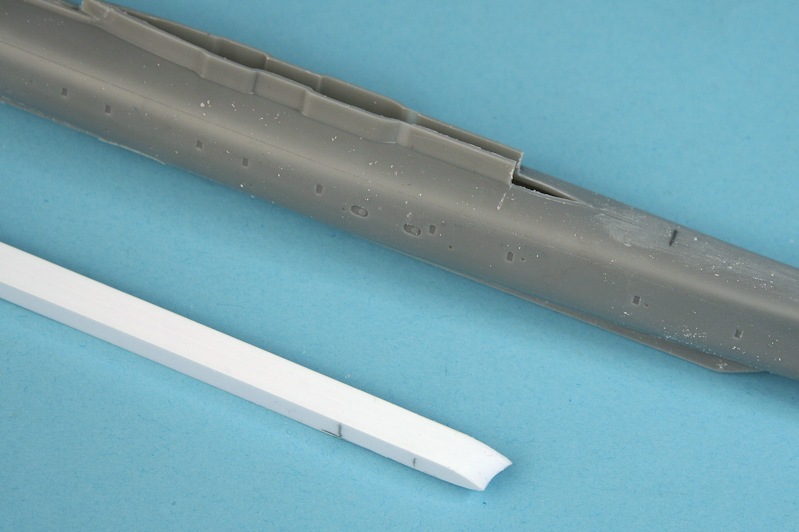
The rest of the injection-moulded parts.
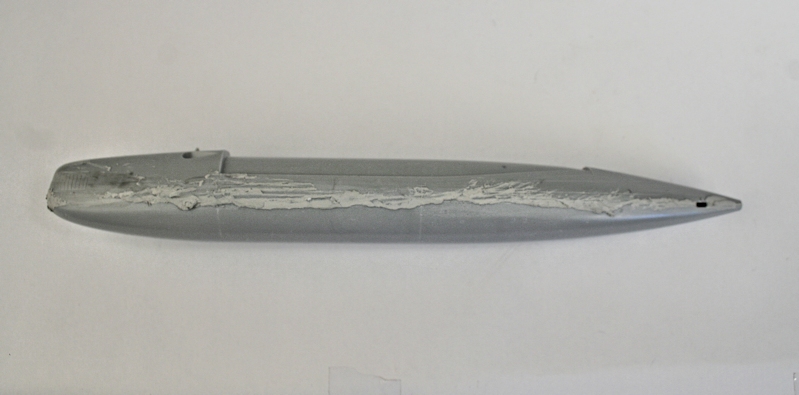
Hull and superstructure assembled - etched brass parts added.
The etched brass rectangles are the covers on the beam torpedo tubes.
This is one of the best kits yet from Mikro-Mir.
Great decals, nice etched brass, delicate injection moulding.
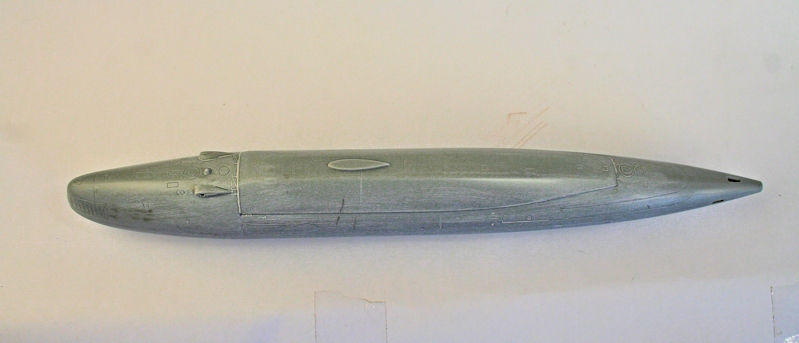
In steam.....
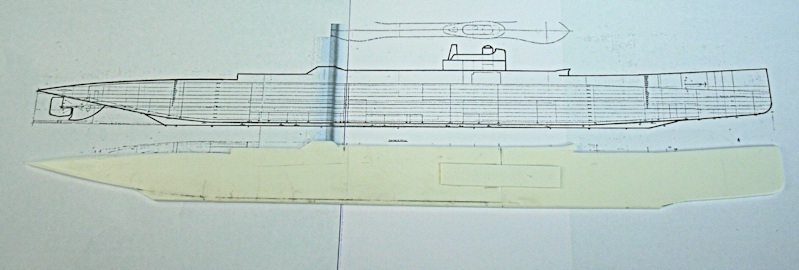
K26 had a 4m longer hull - 114mm in 1/350 scale. Here the Mikro-Mir K4 hull is cut into two sections to get
the right scale length and the upperworks have been removed.
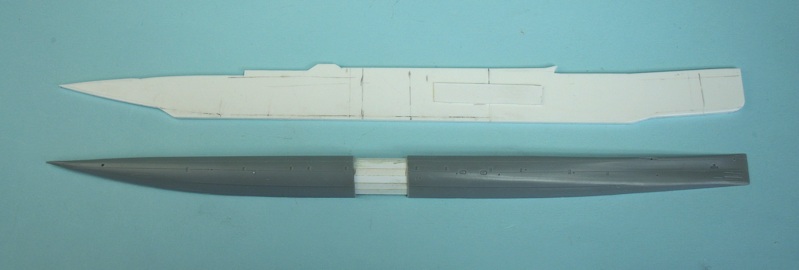
Plastic card strips used to joind the two halves of the hull back together.
View of the hull interior showing the plastic card strips used to join the hull halves.
Gaps filled with plastic card.
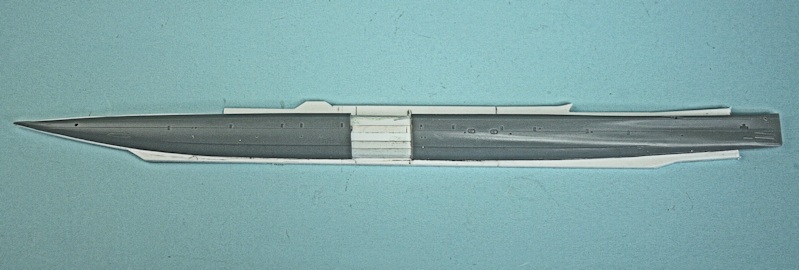
After two sessions of filling and sanding - it still needs a bit more work!
New casing made from square section plastic rod - incorporating the kit funnel moulding.
Temporary test fit.
Plastic card profile for the new raised bows.......
,,,, and the first rough application of Milliput.

The taller, open, bridge is made by wrapping a shaped piece of thin plastic card around the kit part.
New bridge temporarily placed on the casing.
The first sanding down of the Milliput shows that I haven't made shape bulbous enough. Need to add another layer of Milliput!
Another layer of Milliput - to 'bulge' out the top sides. Six torpedo tubes added.
K-26 has a bigger fixed part of the rudder - added from plastic card.
New Milliput sanded to shape - ready for a primer coat.
Doors and railings added to casing. The rear end of the bridge is modified and I'm using the kit 'roof' part as a locating ledge.
Bridge and casing - also ready for a primer coat.
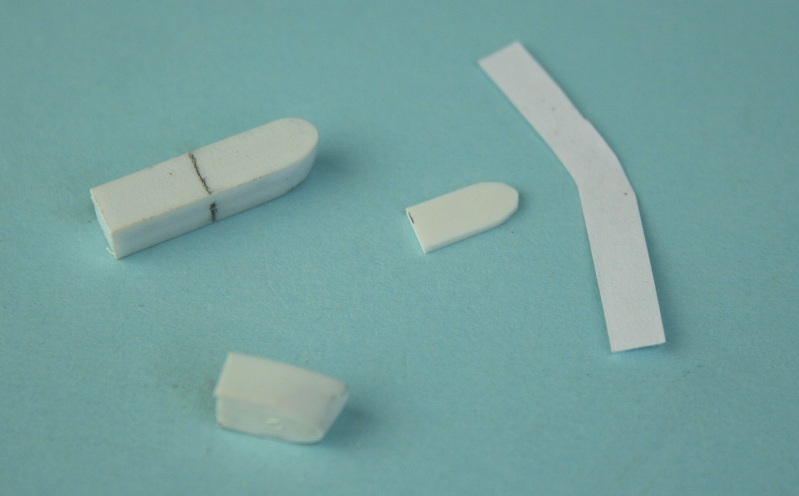
Making the gun emplacements - A shaped former top left, curved paper template at right and shaped floor.
The finished 'tub' is at the bottom.......

... now all I have to do is make 2 more!

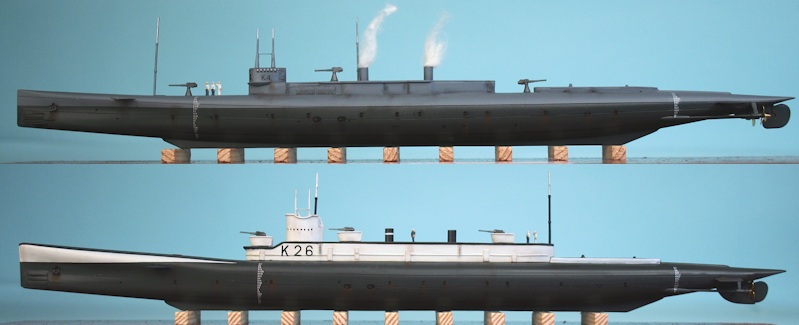
K4 at top, K26 below - not to the same scale! - K26 is 11.4 mm longer
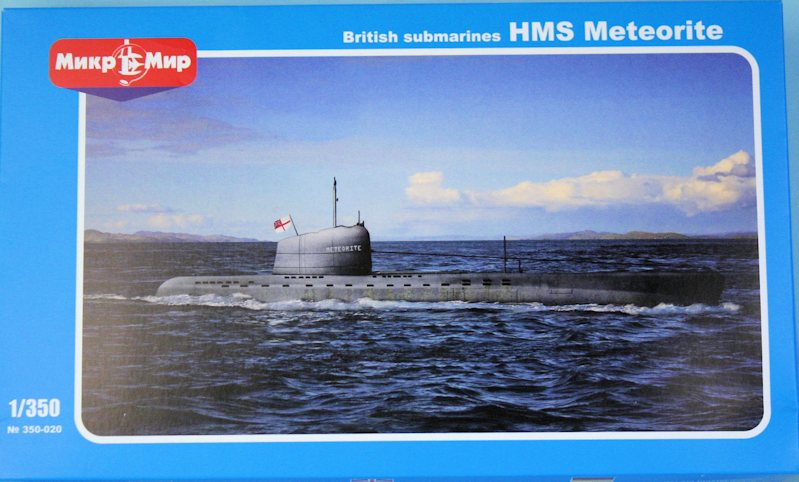
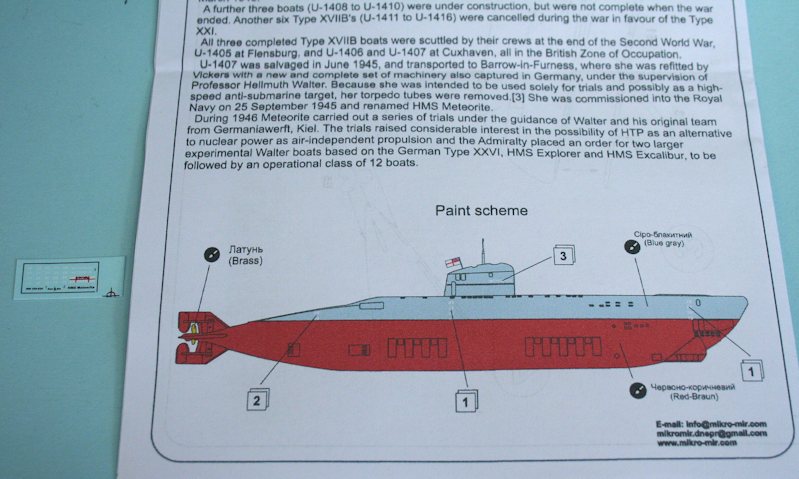
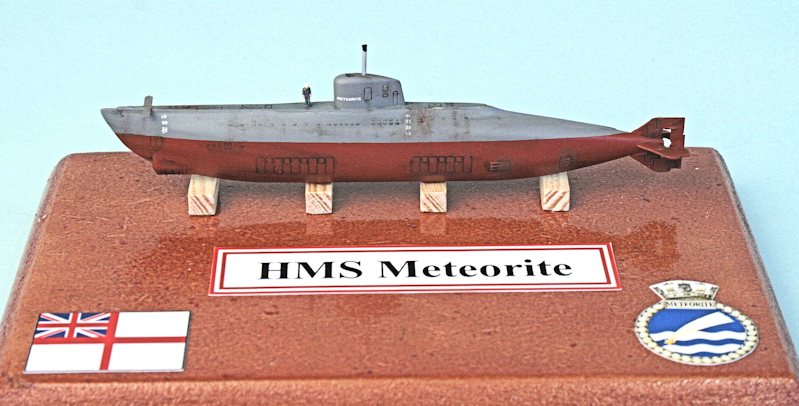
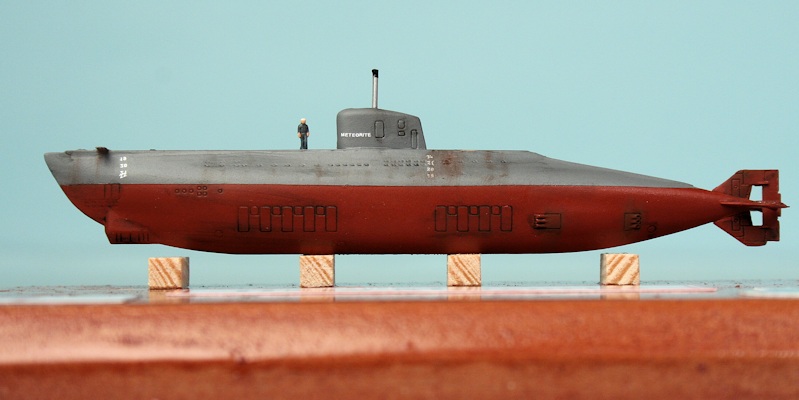
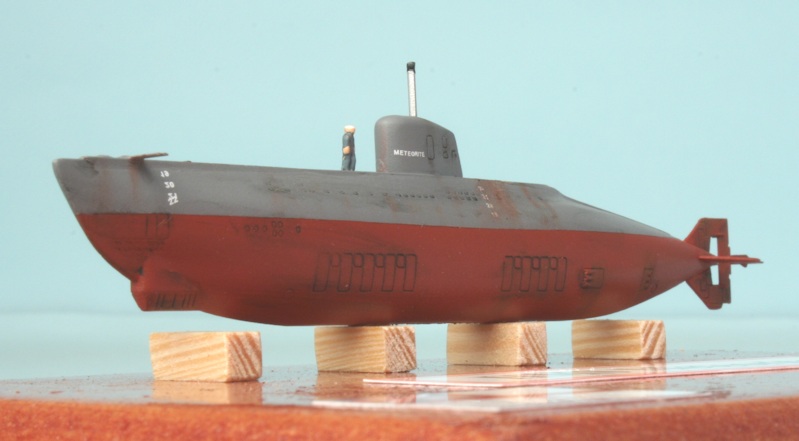
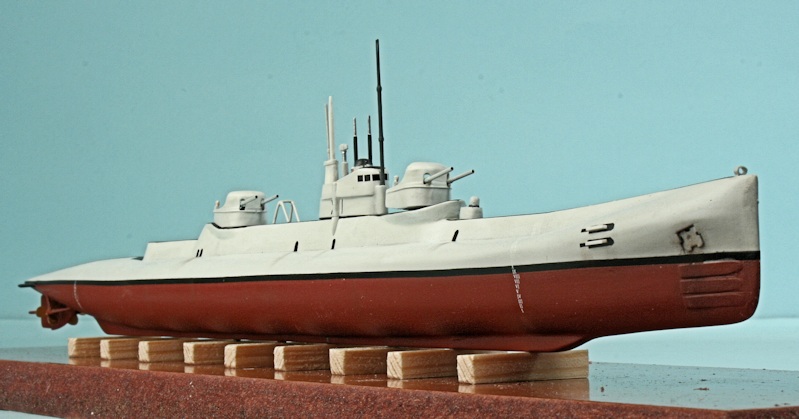
HMS Meteorite
Box Art.
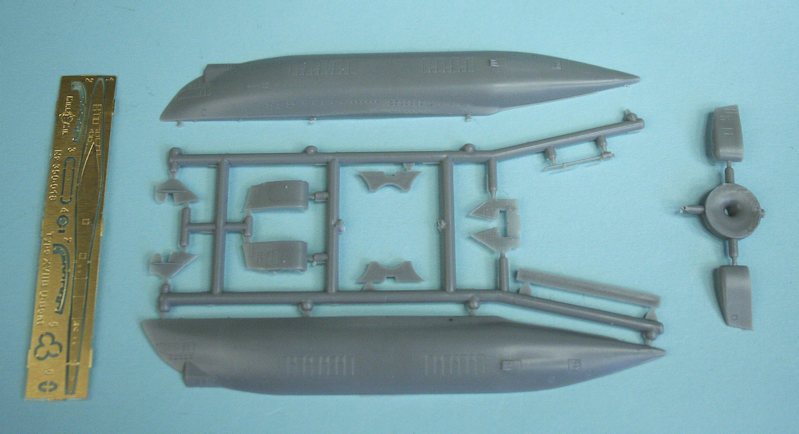
This is the same kit as the Type XVIIB U-Boat - with a new conning tower.
Instruction sheet and tiny decals.
Finished model - all of 12cm long!
A sailor on deck for a size comparison.
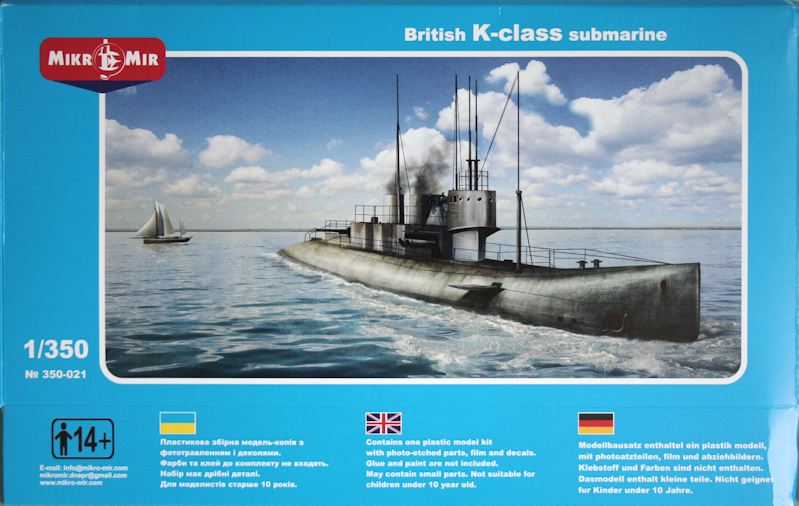
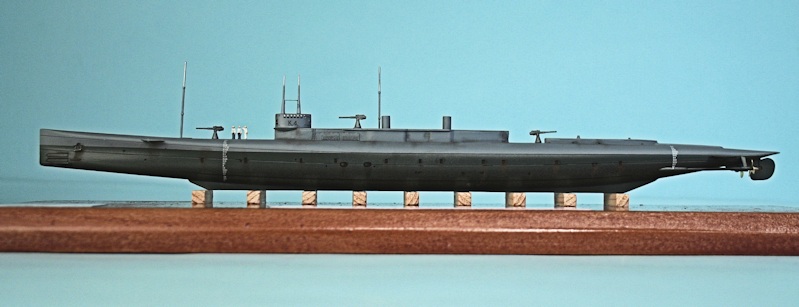
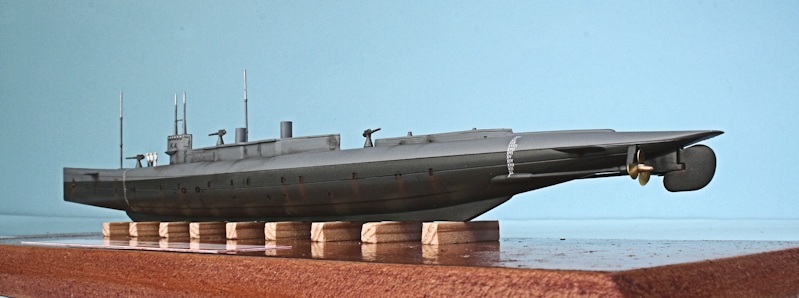
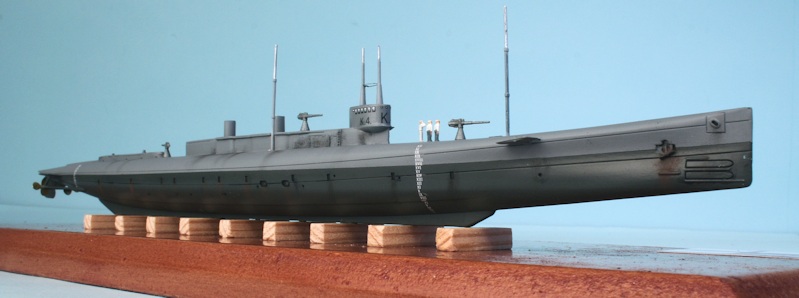
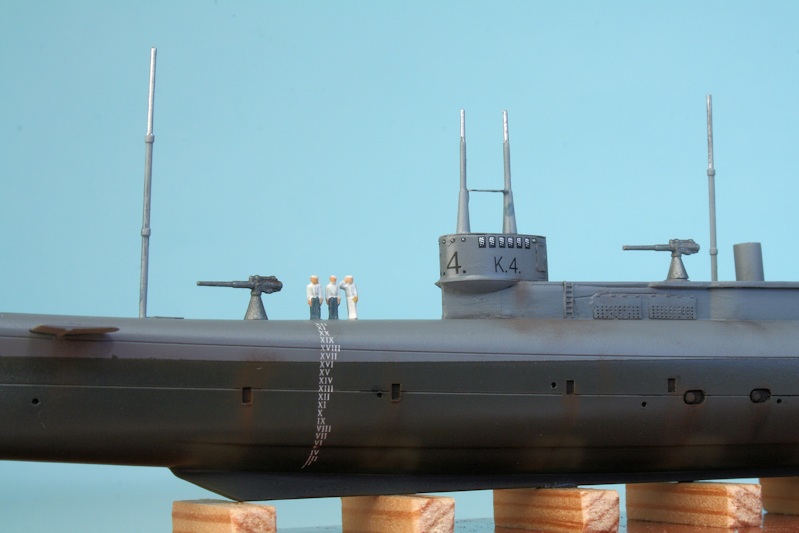
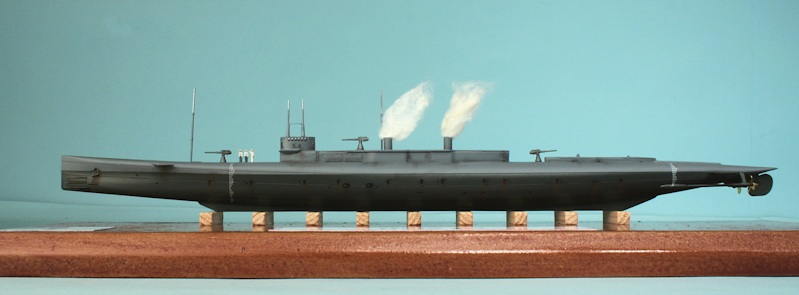
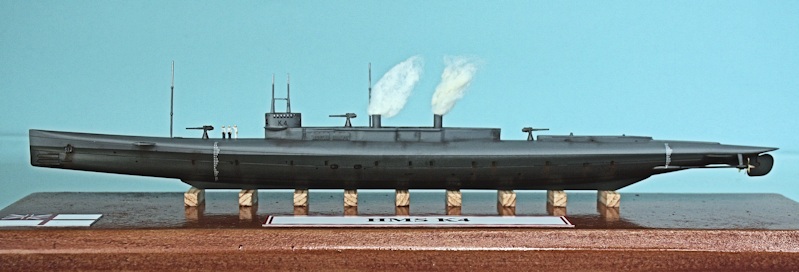
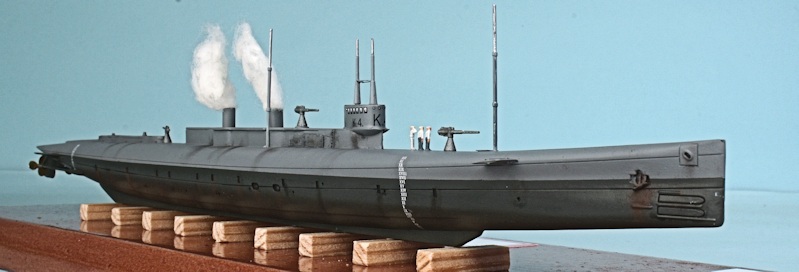
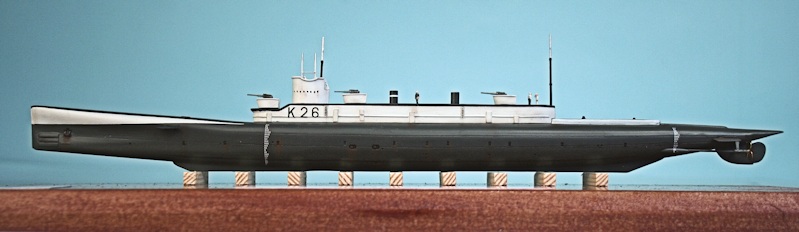
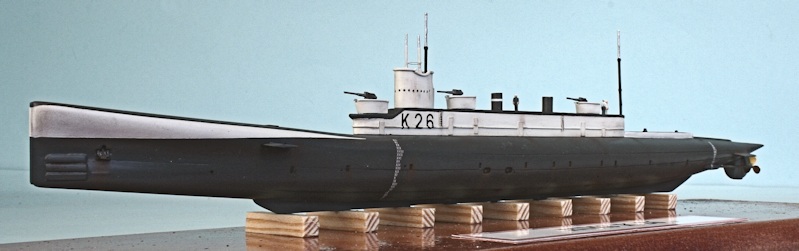
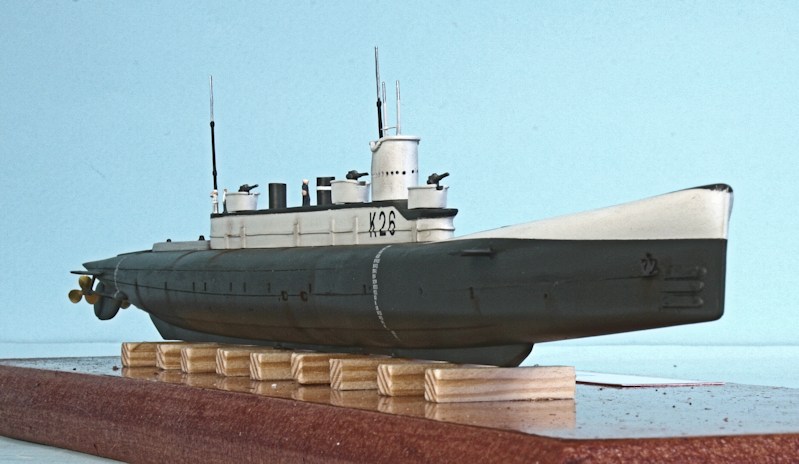
British K-Class Submarine
Mikro-Mir box art.
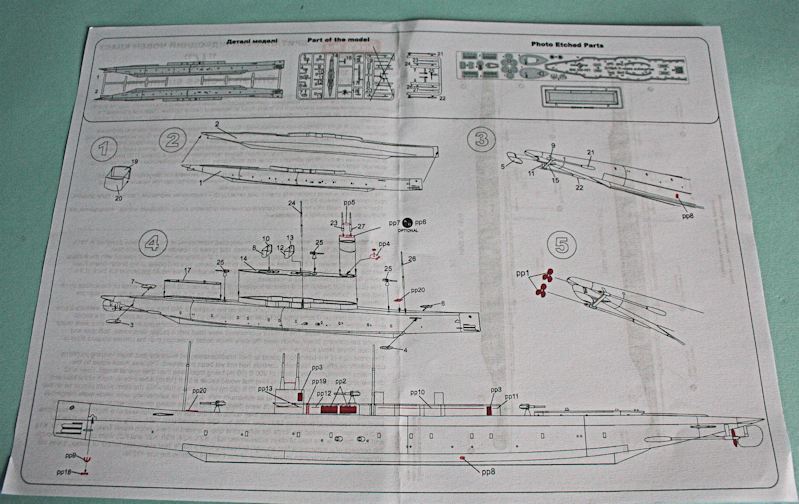
Construction diagram - note the etched parts in red.
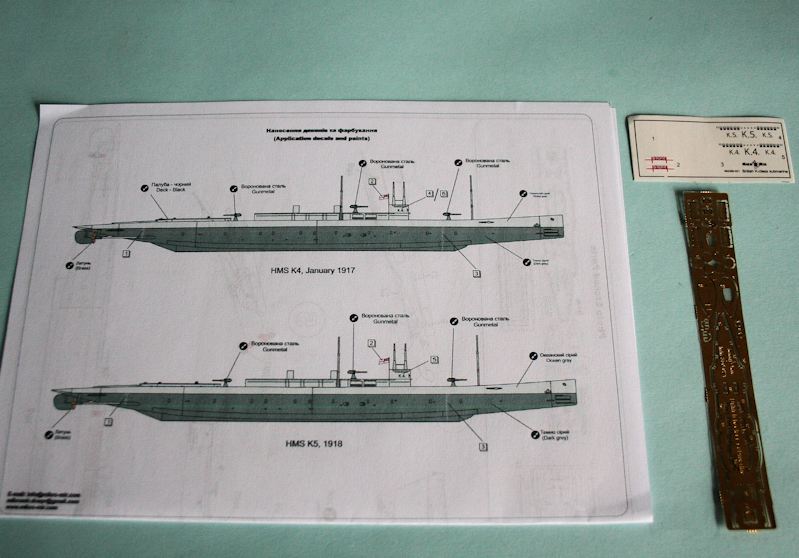
Painting instructions, etched brass and decals for HMS K4 and K5
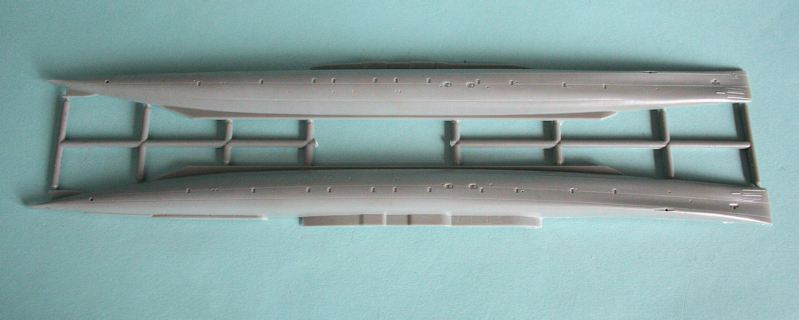
Hull parts - nearly 1 foot in length!
The rest of the injection-moulded parts.
Hull and superstructure assembled - etched brass parts added.
The etched brass rectangles are the covers on the beam torpedo tubes.
Finished Model
This is one of the best kits yet from Mikro-Mir.
Great decals, nice etched brass, delicate injection moulding.
In steam.....
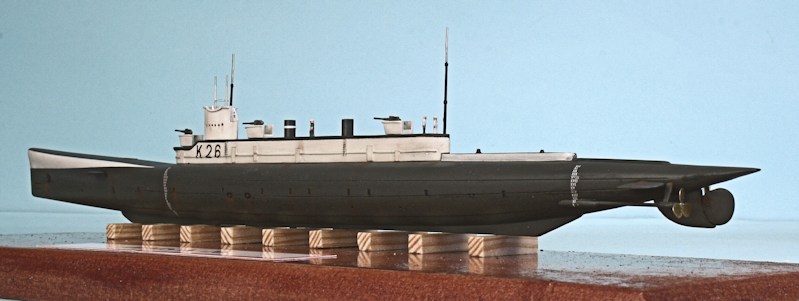
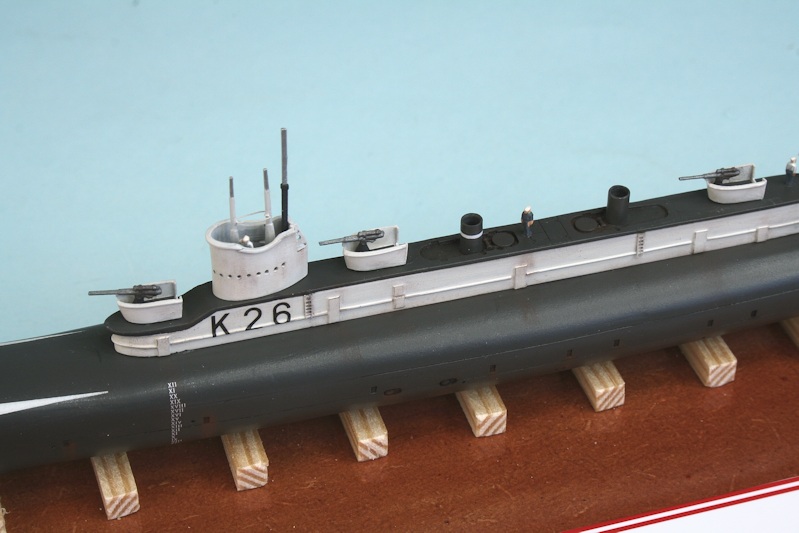
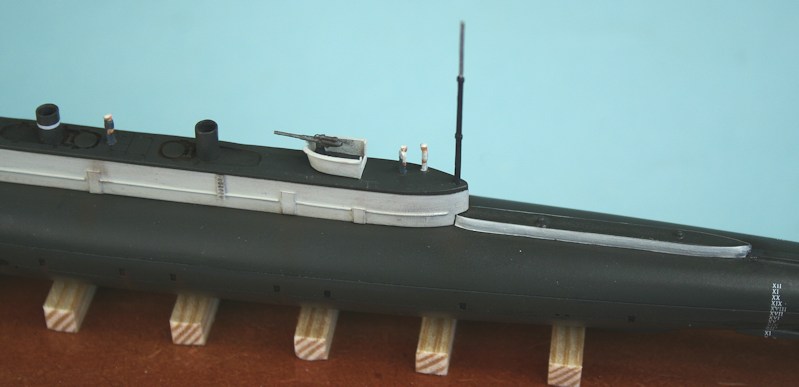
HMS K26
K26 had a 4m longer hull - 114mm in 1/350 scale. Here the Mikro-Mir K4 hull is cut into two sections to get
the right scale length and the upperworks have been removed.
Plastic card strips used to joind the two halves of the hull back together.
View of the hull interior showing the plastic card strips used to join the hull halves.
Gaps filled with plastic card.
After two sessions of filling and sanding - it still needs a bit more work!
New casing made from square section plastic rod - incorporating the kit funnel moulding.
Temporary test fit.
Plastic card profile for the new raised bows.......
,,,, and the first rough application of Milliput.
The taller, open, bridge is made by wrapping a shaped piece of thin plastic card around the kit part.
New bridge temporarily placed on the casing.
The first sanding down of the Milliput shows that I haven't made shape bulbous enough. Need to add another layer of Milliput!
Another layer of Milliput - to 'bulge' out the top sides. Six torpedo tubes added.
K-26 has a bigger fixed part of the rudder - added from plastic card.
New Milliput sanded to shape - ready for a primer coat.
Doors and railings added to casing. The rear end of the bridge is modified and I'm using the kit 'roof' part as a locating ledge.
Bridge and casing - also ready for a primer coat.
Making the gun emplacements - A shaped former top left, curved paper template at right and shaped floor.
The finished 'tub' is at the bottom.......
... now all I have to do is make 2 more!
Finished Model
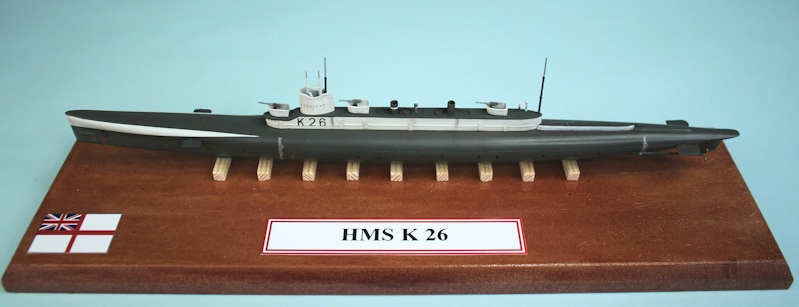
K4 at top, K26 below - not to the same scale! - K26 is 11.4 mm longer
Return
Drawing scanned and sized to 1/350 scale - outline shape cut from 3mm thick white plastic card.

X.1 outline compared to Mikro-Mir K4 kit hull. X.1 is 7m longer and .09m wider.
In 1/350 scale thats 31.65cm long and 2.59 cm wide.
K4 hull lengthened.
K4 hull lengthened and glued to the 3mm card outline of X.1.
Lengthened and widened.
Both halves of the K4 hull attached to the X.1 outline.
Ready for the Milliput.
Decking added......
.... and the first rough application of Milliput.
After the first sanding session......
.... the most important bows are beginning to take shape - its very subtle.
A coat of grey primer helps to see the shape more clearly - almost right.
Adding the casing from plastic card.
Casing fitted - and gaps filled.....
Side profile looks OK.
A quick burst of grey primer ........
....highlights a few areas that still need fettling.
Bridge started - with plastic card wrapped around a piece of wood for the lower section.
The 'roof' is slightly wider to form the upper open bridge....
Upper section added by wrapping thin plastic card around. The forward bridge roof is added using filler.
Rudder, dive planes and propeller guards made from plastic card. Kit prop shafts cut down and fitted.
Torpedo tubes and anchor
Bridge 'furniture'.
Hull painted.
Bridge.
Making the gun turrets - completed one at top.
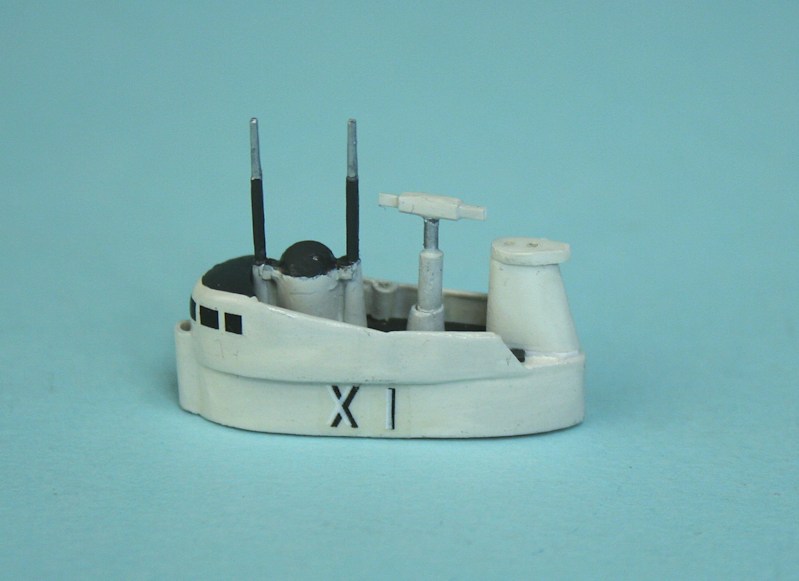
Almost completed briudge.

5.2in guns made from aluminium tubing, plastic rod and card.

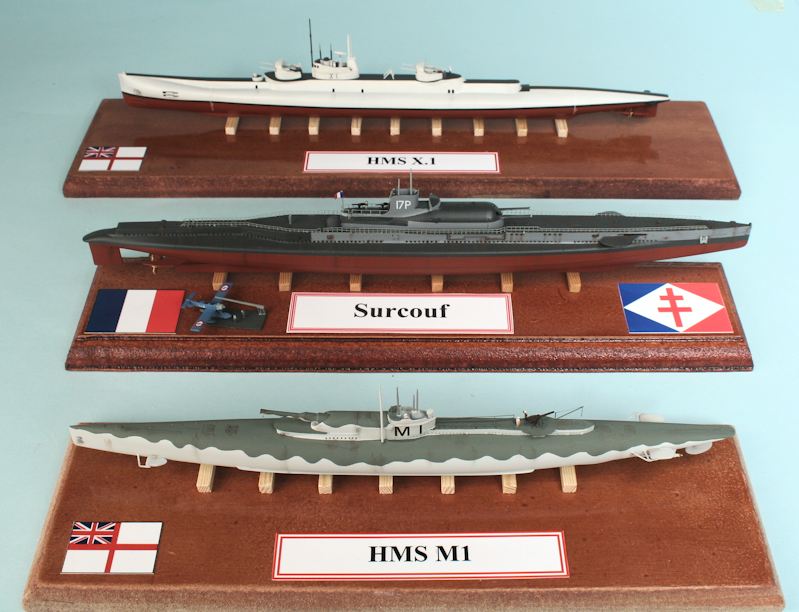
Some other Cruiser Submarines - HMS X.1, Surcouf and HMS M.1.....
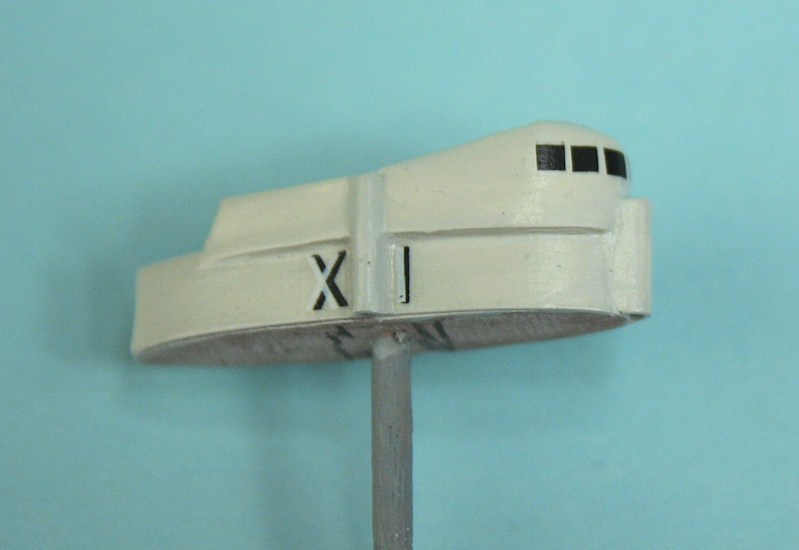
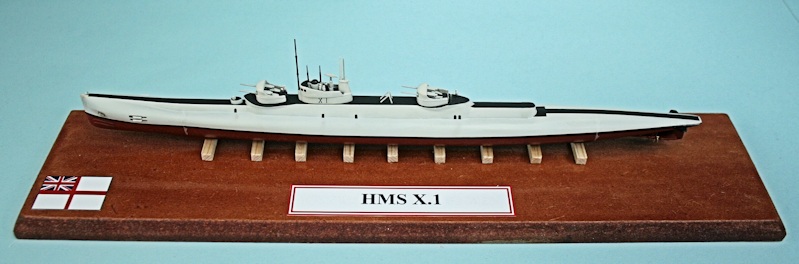
HMS X.1
Drawing scanned and sized to 1/350 scale - outline shape cut from 3mm thick white plastic card.
X.1 outline compared to Mikro-Mir K4 kit hull. X.1 is 7m longer and .09m wider.
In 1/350 scale thats 31.65cm long and 2.59 cm wide.
K4 hull lengthened.
K4 hull lengthened and glued to the 3mm card outline of X.1.
Lengthened and widened.
Both halves of the K4 hull attached to the X.1 outline.
Ready for the Milliput.
Decking added......
.... and the first rough application of Milliput.
After the first sanding session......
.... the most important bows are beginning to take shape - its very subtle.
A coat of grey primer helps to see the shape more clearly - almost right.
Adding the casing from plastic card.
Casing fitted - and gaps filled.....
Side profile looks OK.
A quick burst of grey primer ........
....highlights a few areas that still need fettling.
Bridge started - with plastic card wrapped around a piece of wood for the lower section.
The 'roof' is slightly wider to form the upper open bridge....
Upper section added by wrapping thin plastic card around. The forward bridge roof is added using filler.
Rudder, dive planes and propeller guards made from plastic card. Kit prop shafts cut down and fitted.
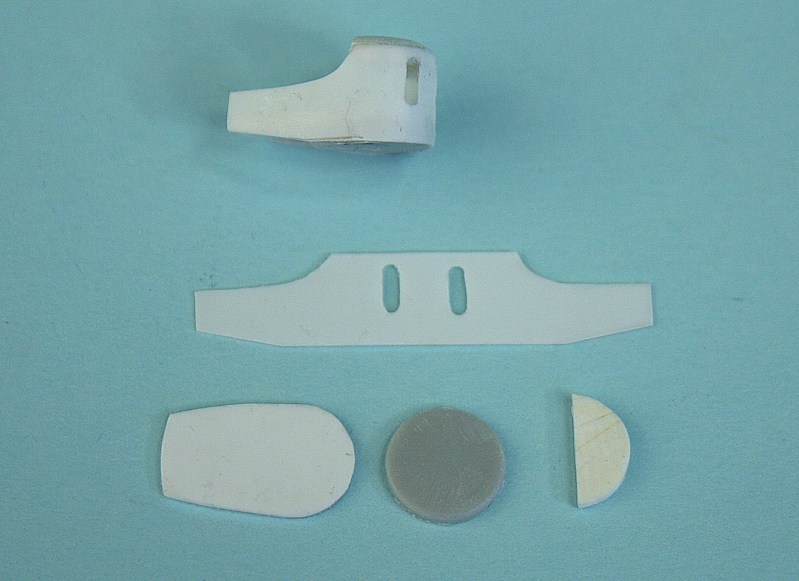
Torpedo tubes and anchor
Bridge 'furniture'.
Hull painted.
Bridge.
Making the gun turrets - completed one at top.
Almost completed briudge.
5.2in guns made from aluminium tubing, plastic rod and card.
Finished Model
Some other Cruiser Submarines - HMS X.1, Surcouf and HMS M.1.....
Return
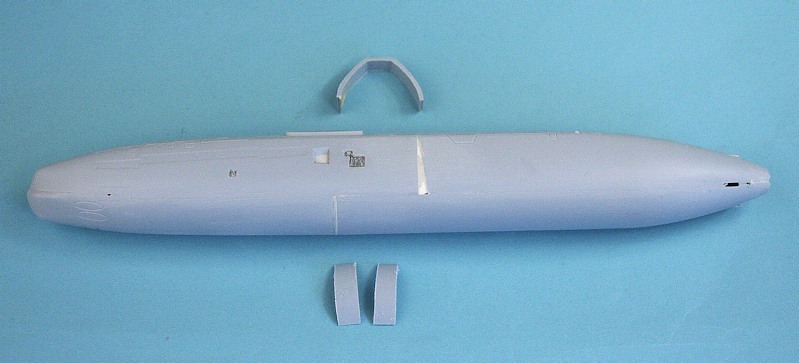
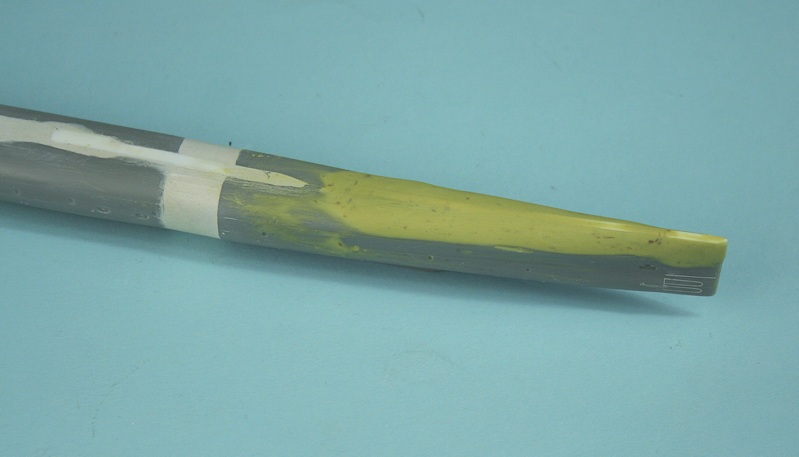
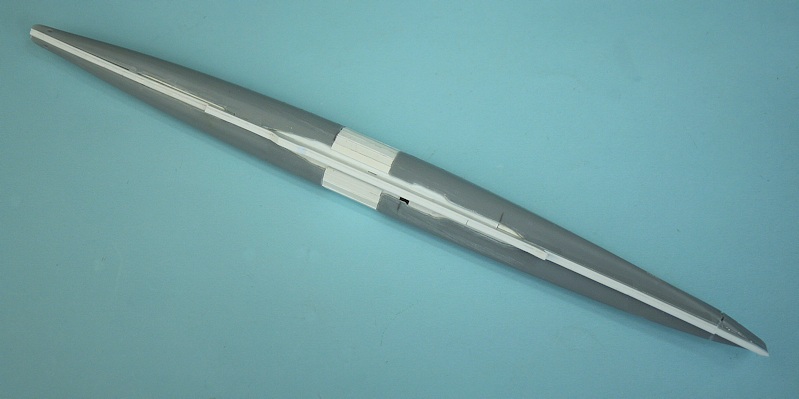
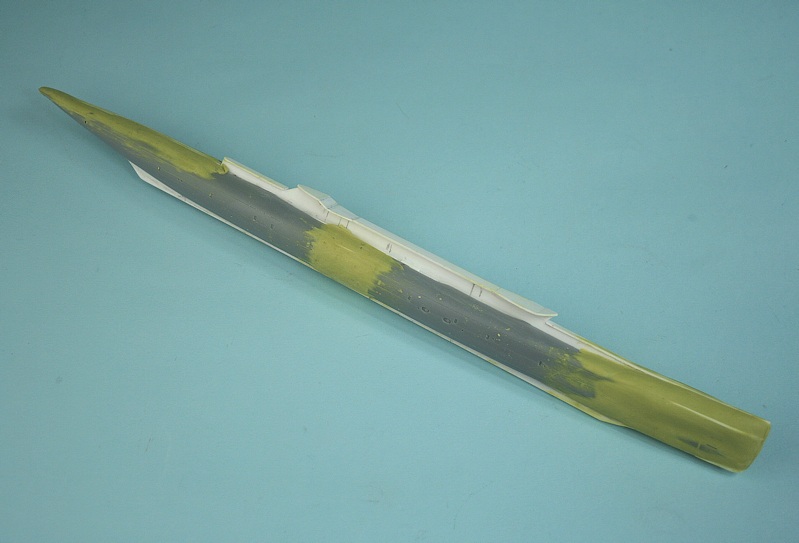
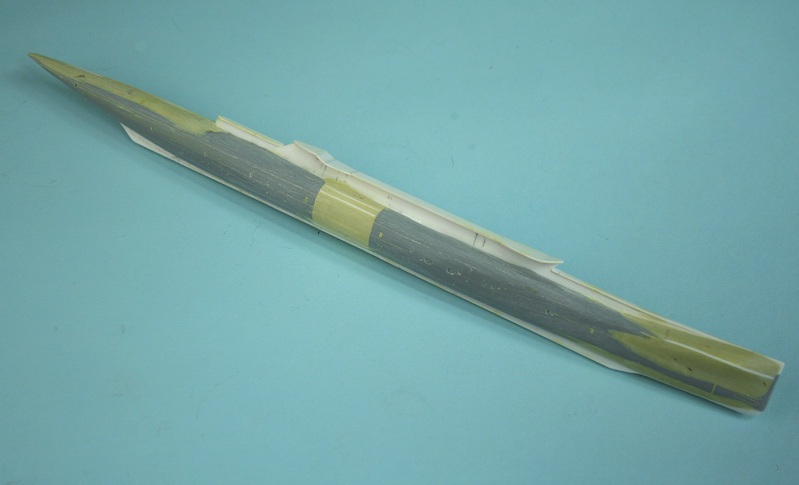
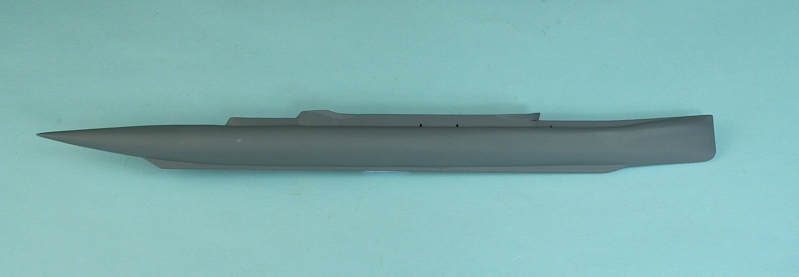
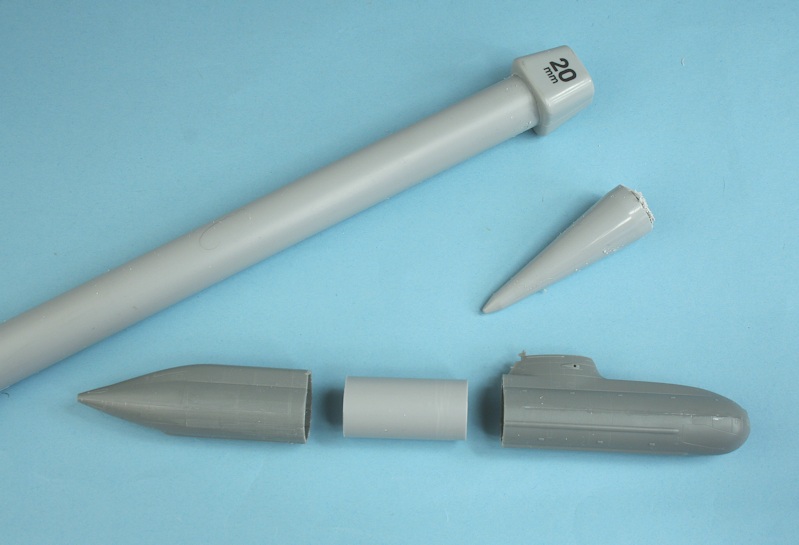
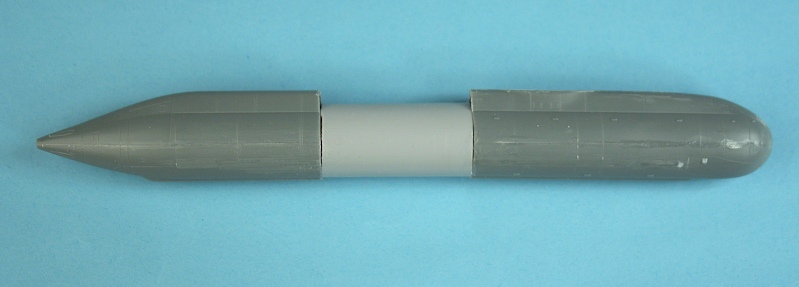
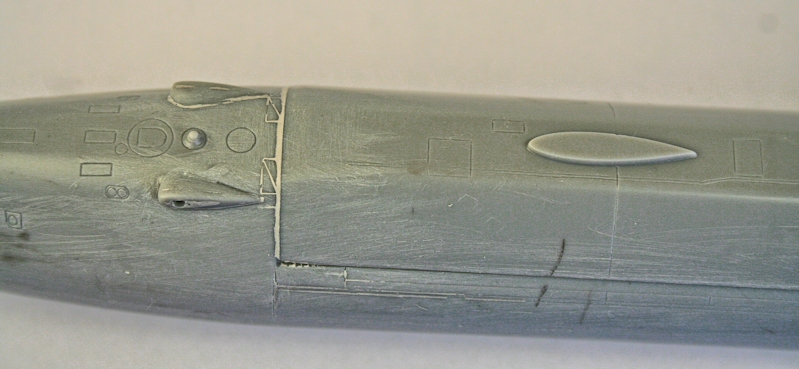
Airfix HMS Trafalgar hull shortened by 7mm
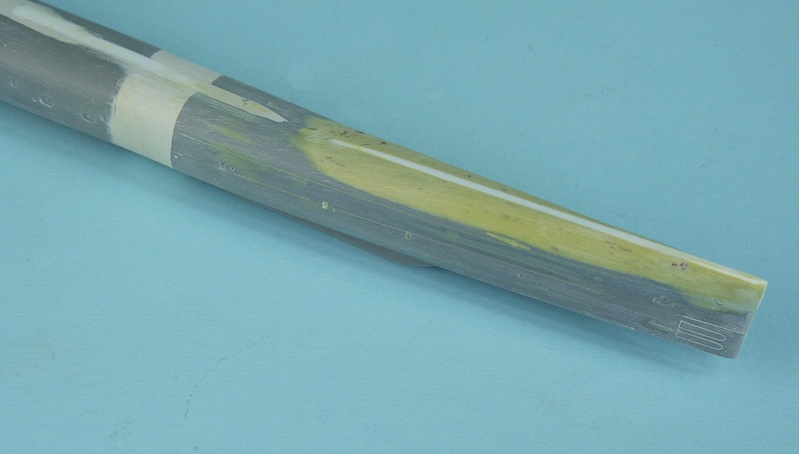
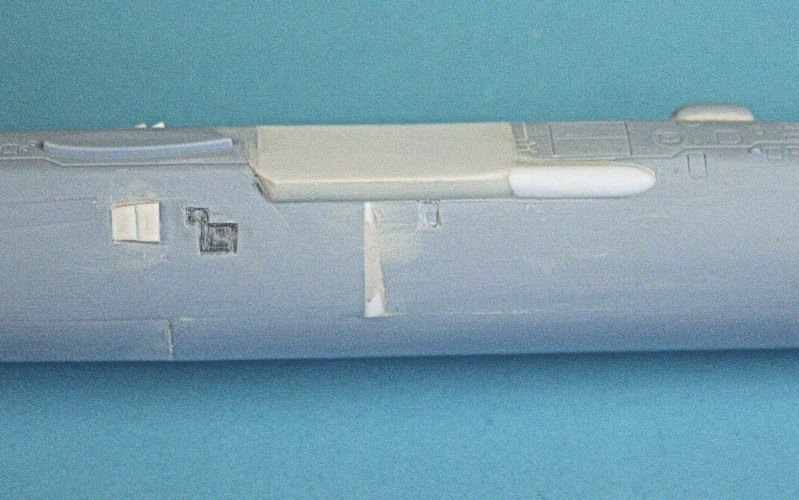
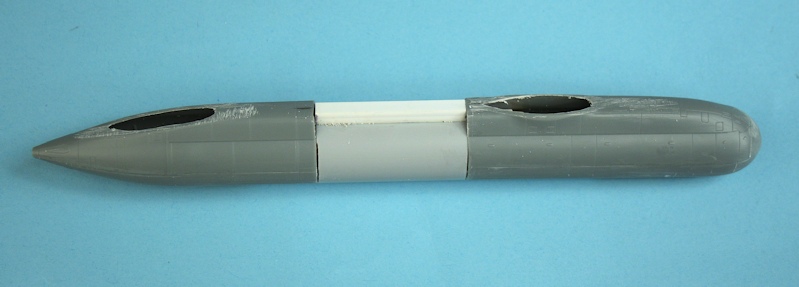
Single baffles replaced with twin baffles - note the recesses gouged into the hull to represent missing tiles.

Recesses in sail for missing tiles
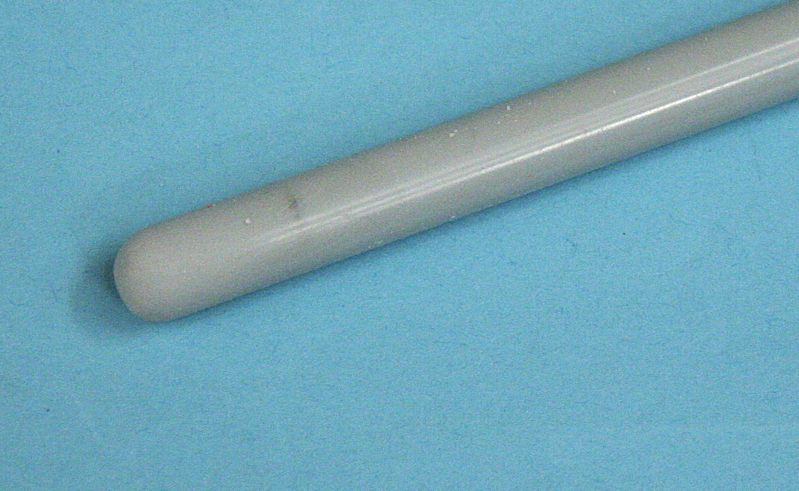
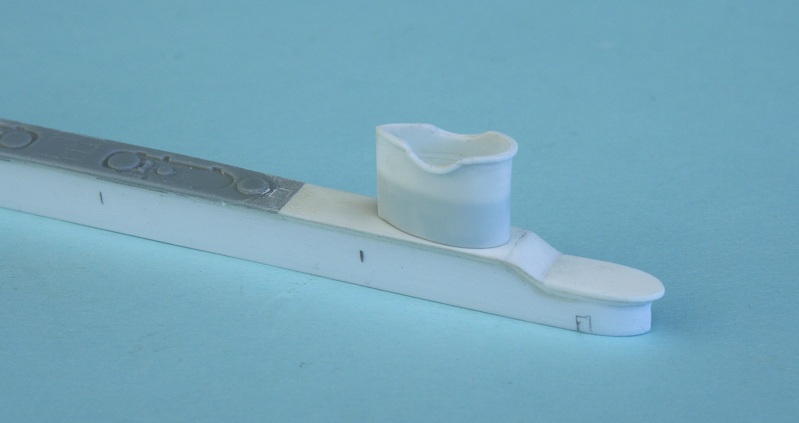
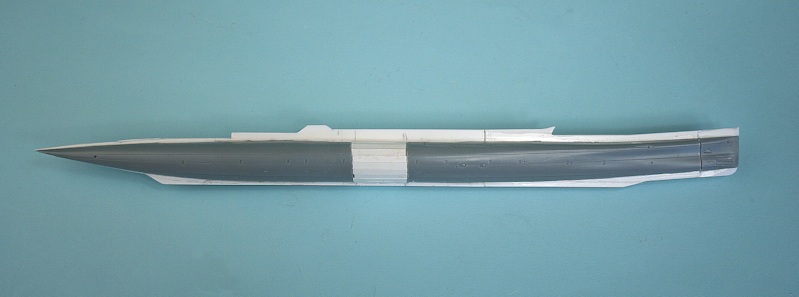
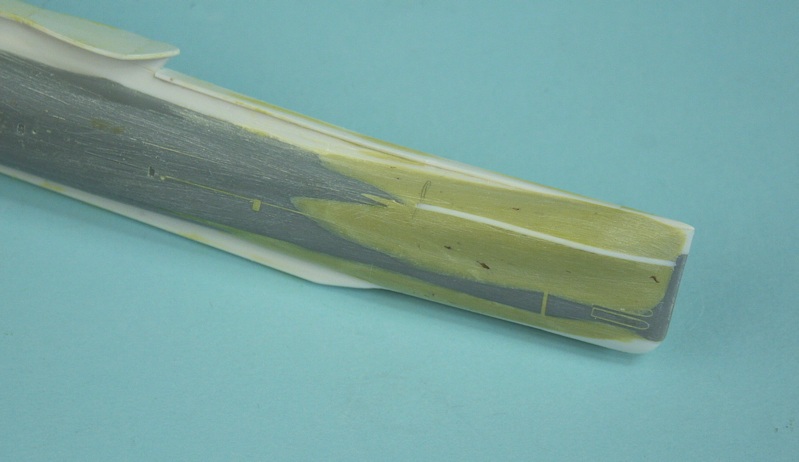
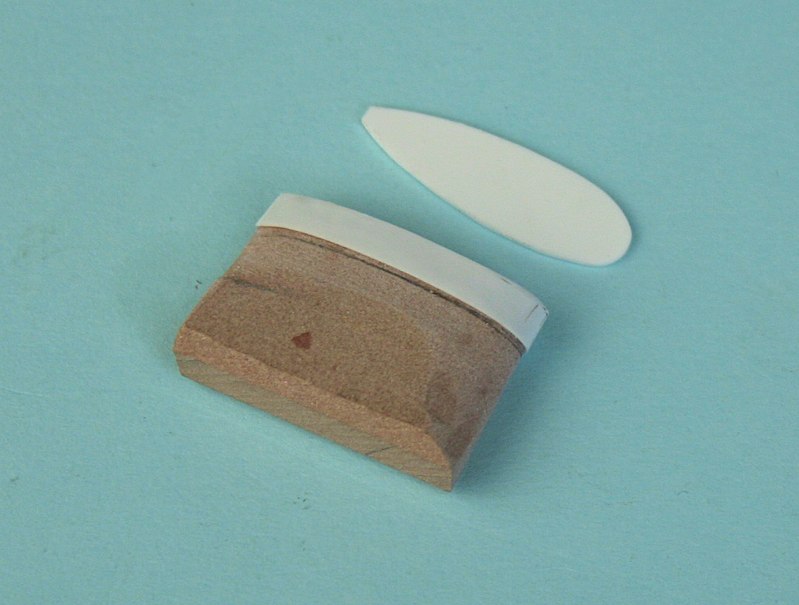
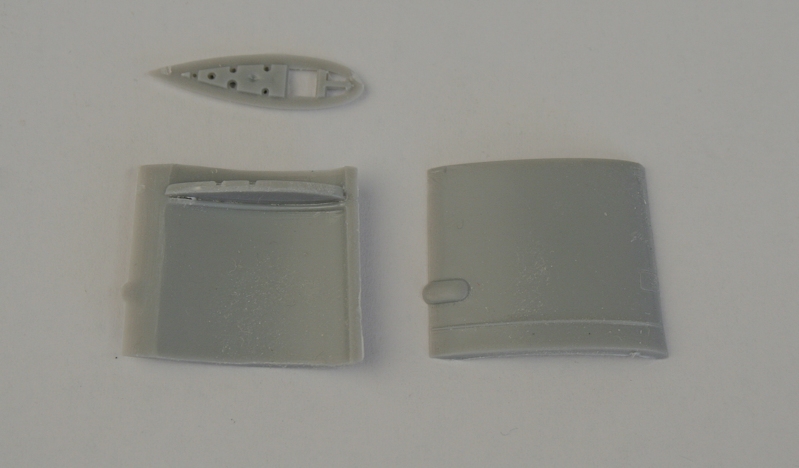
8mm dia plastic knitting needle to make Dry Deck Shelter.
Plastic card used to make the deck extension.
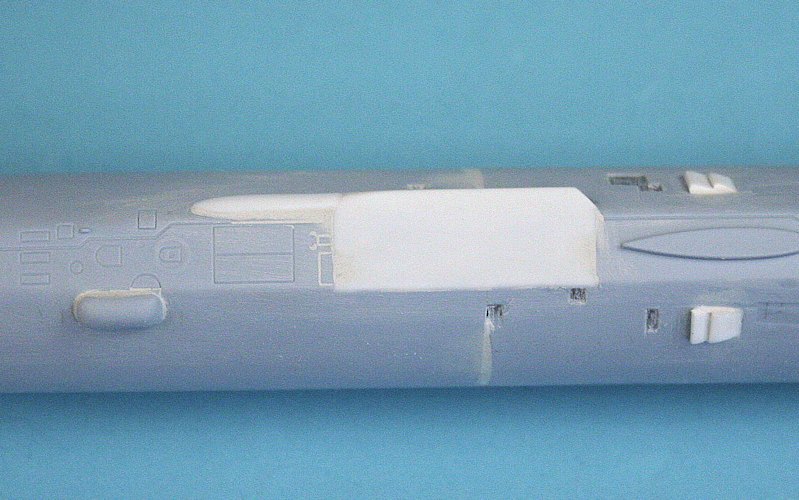
Top view of the deck extension - plus the bathtub-shaped bulge to the rear starboard side.
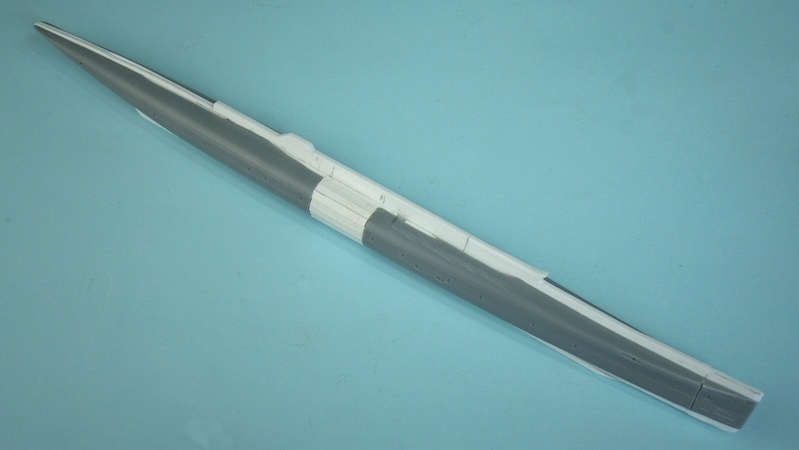
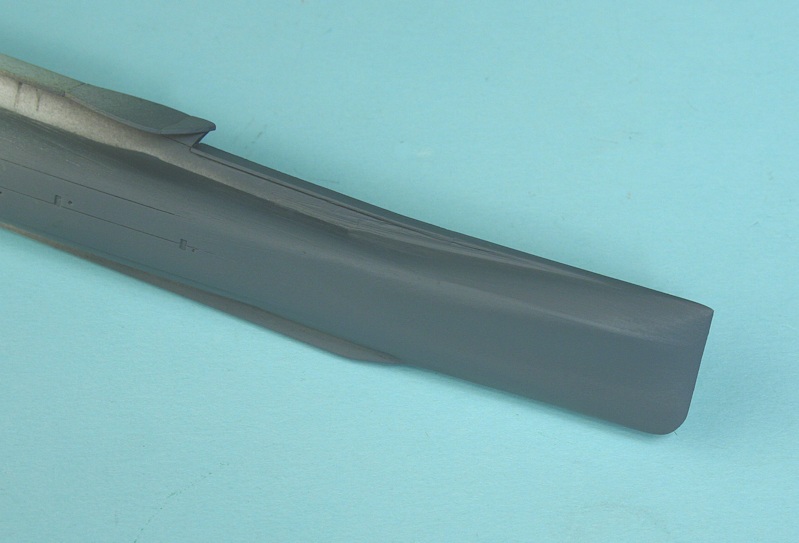
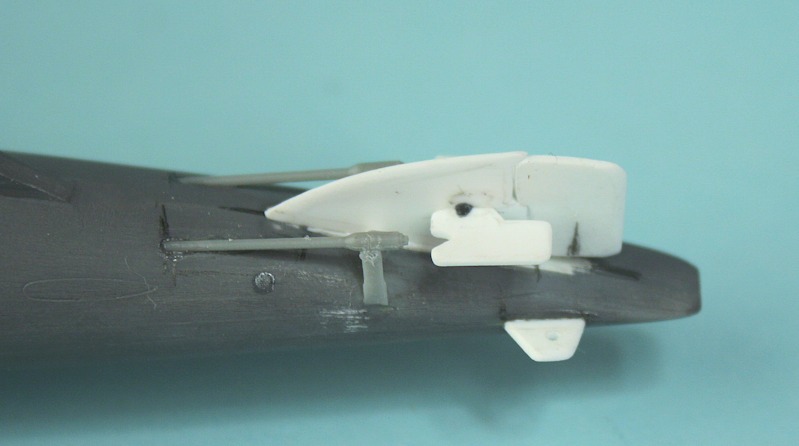
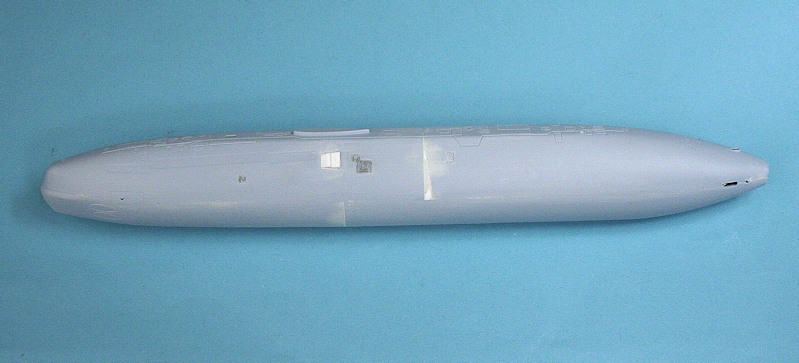
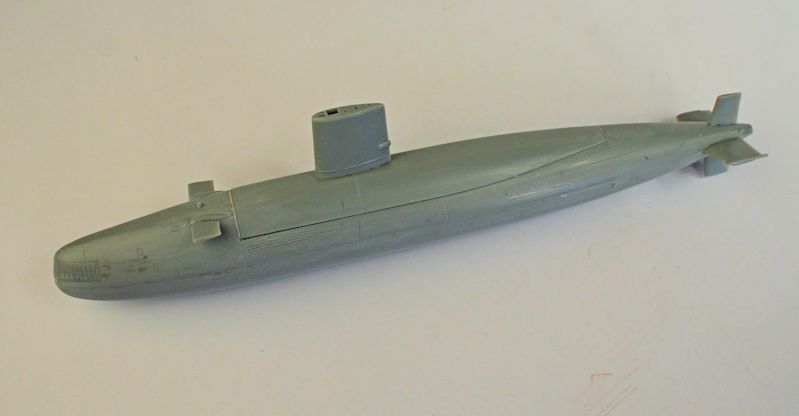
Sail and DDS Blu-Tac'd in place.
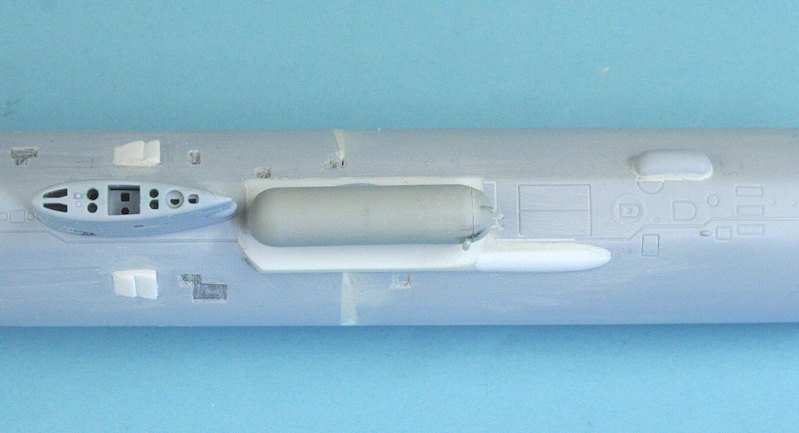
Top view.
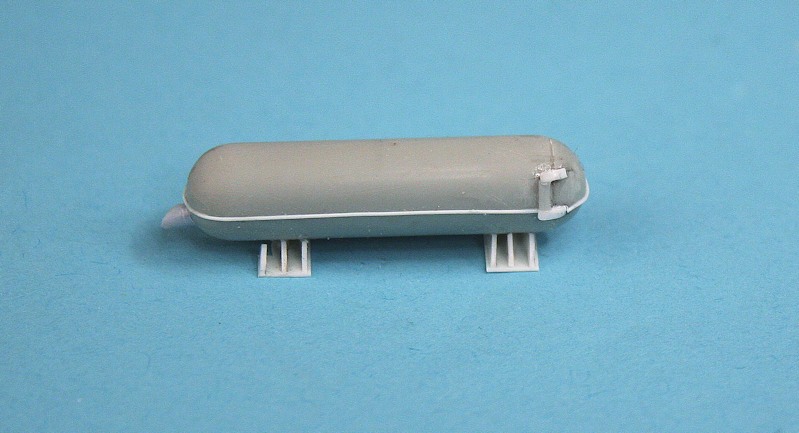
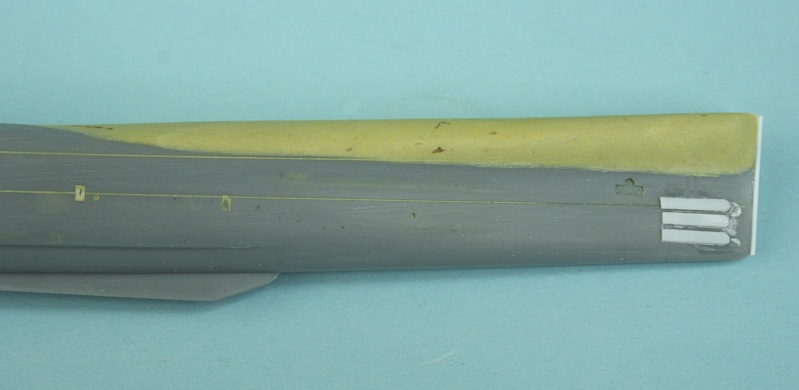
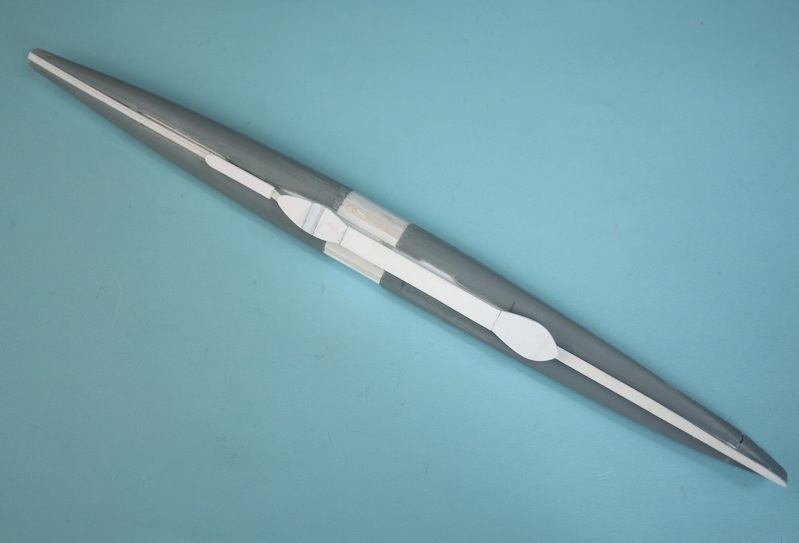
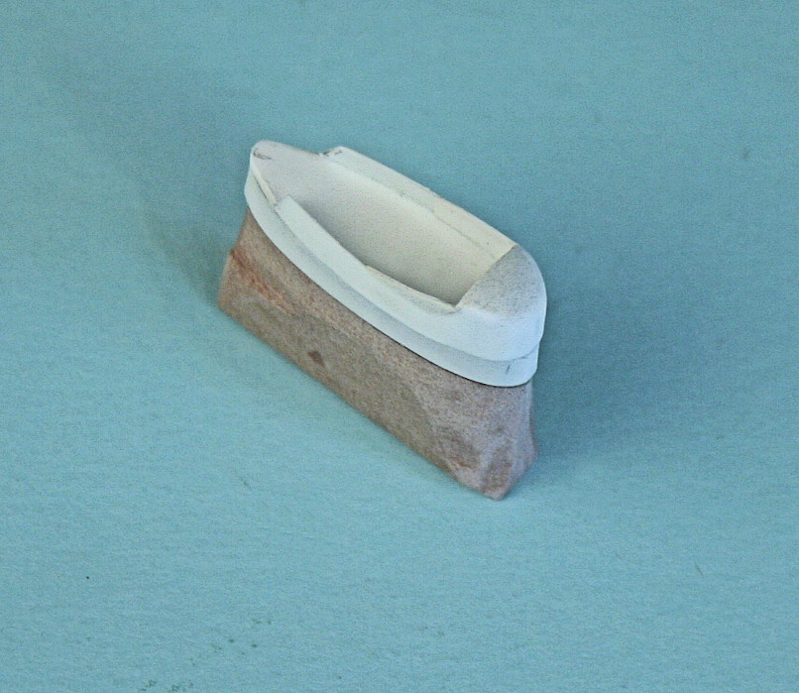
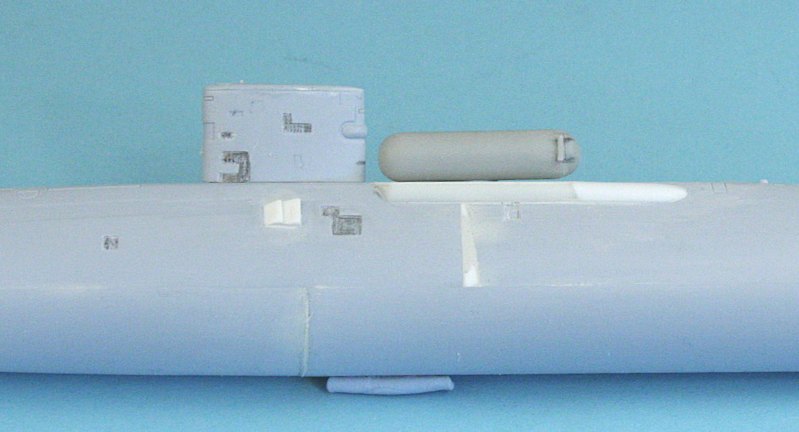
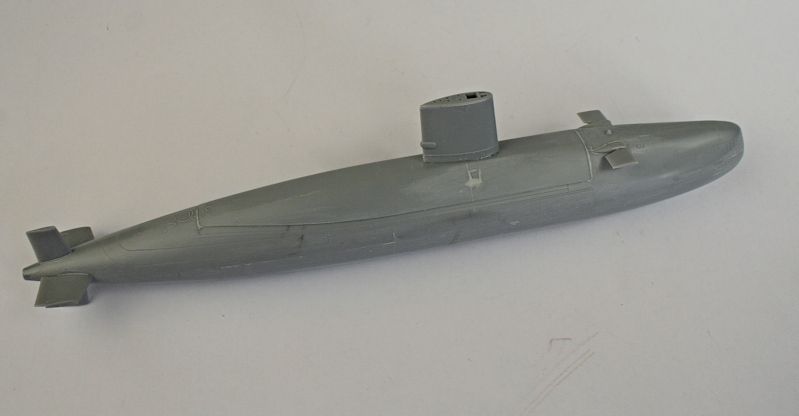
Scratch-built DDS - with handrail and hinges plus support brackets.
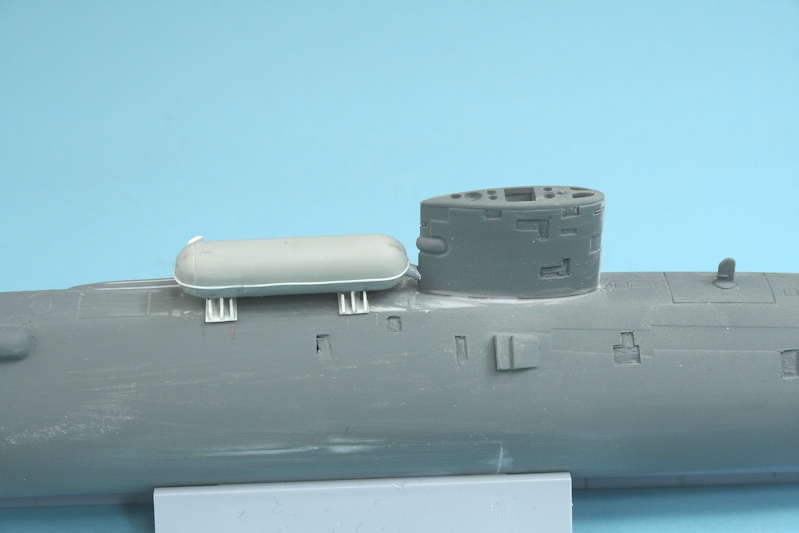
Temporarily in place on primered hull - still more pipes and brackets to add.
Close up showing the DDS on the extended decking.
Return
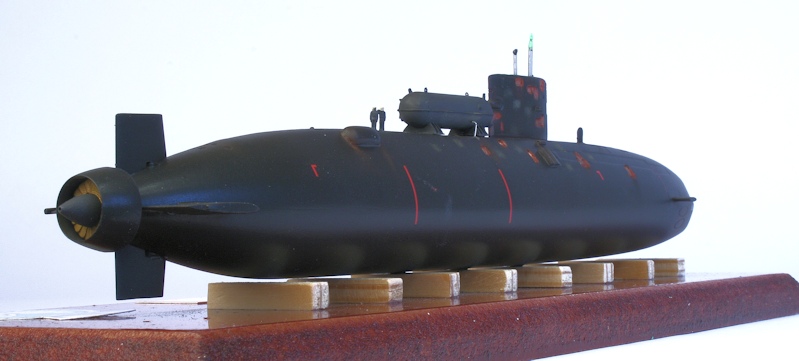
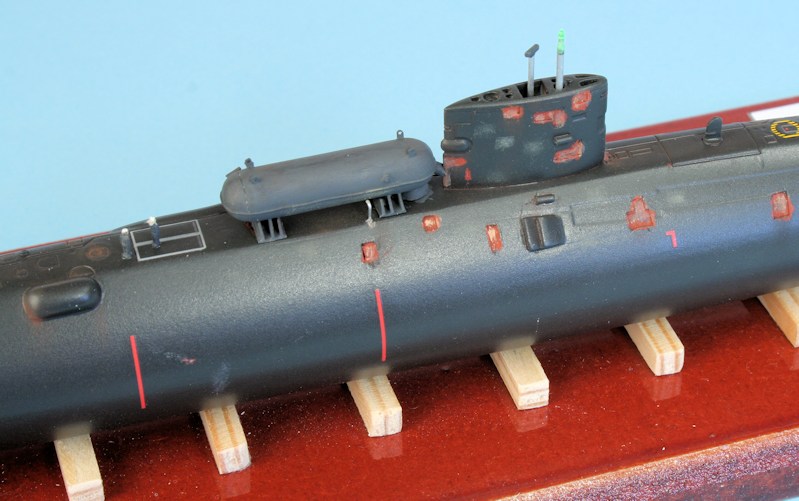
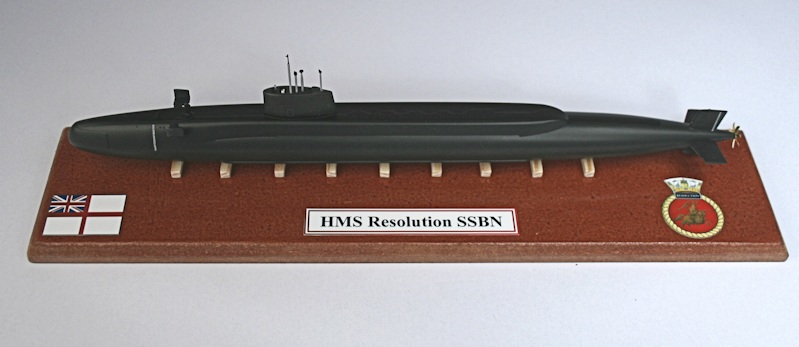
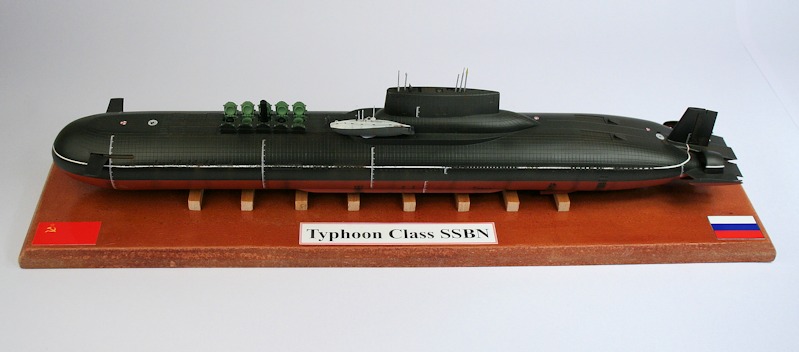
HMS
Resolution - HMS Repluse
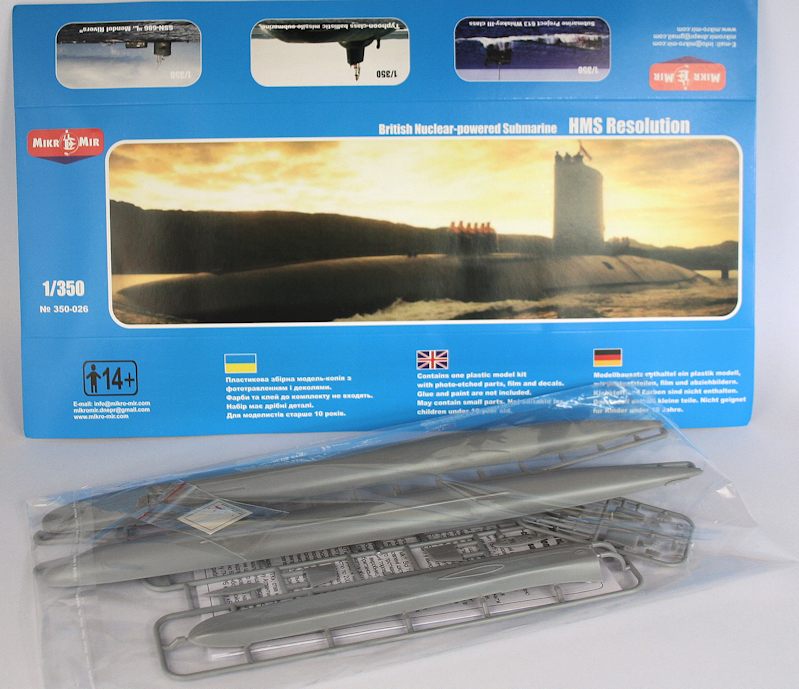
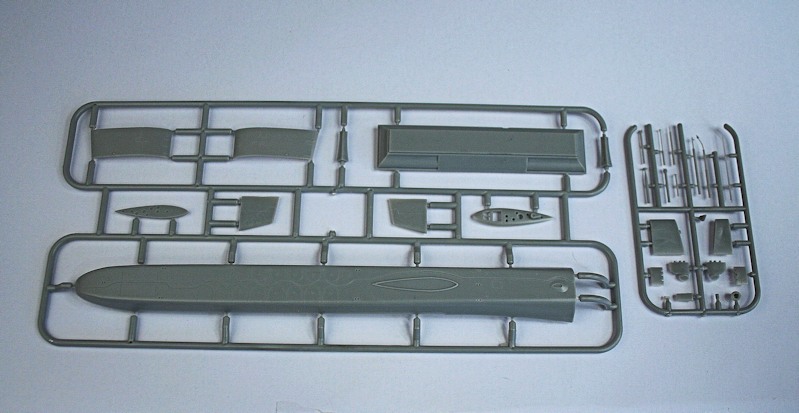
The latest kit from Mikro-Mir - Royal Navy SSBN HMS Resolution
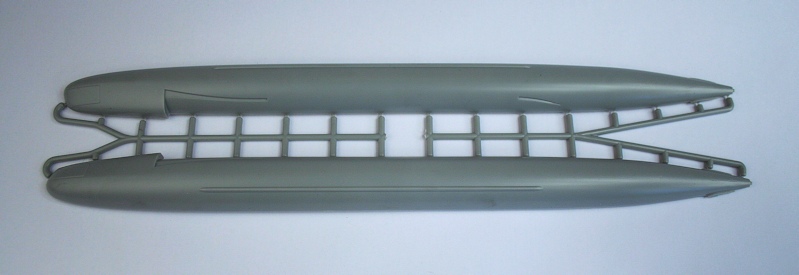
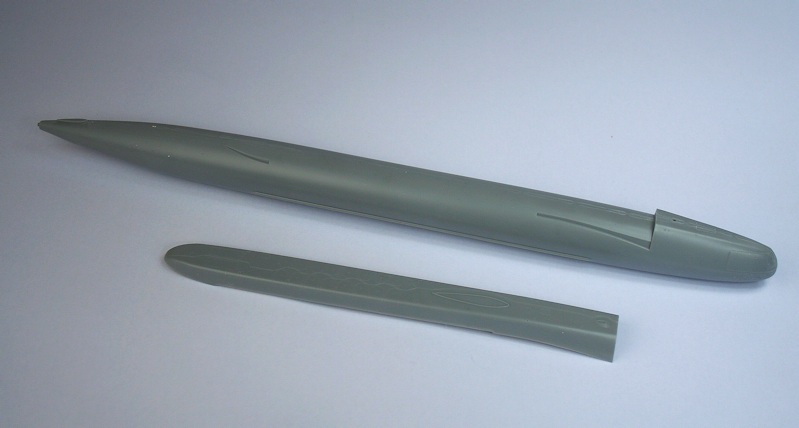
Vertically split hull halves.......
... with separate missile decking.
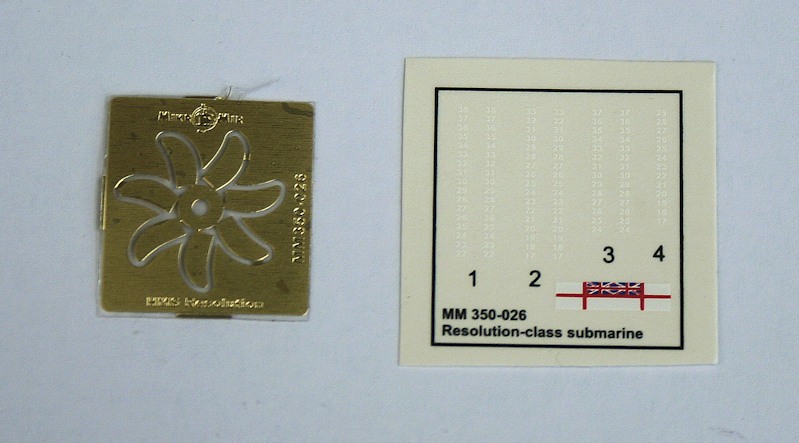
Etched-brass propeller and simple decal sheet.
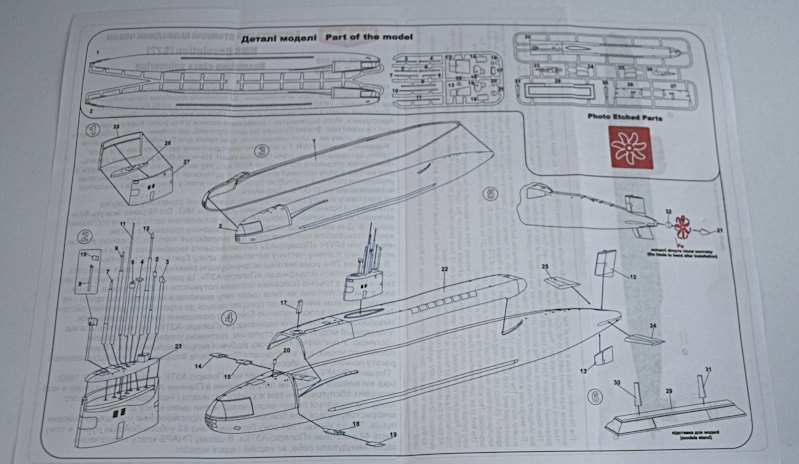
Instruction diagram.
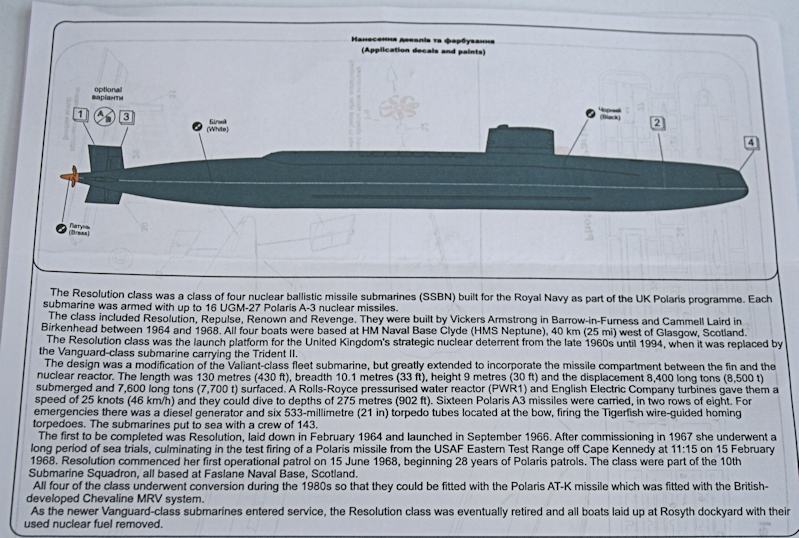
Painting guide - black, black or.... black.
Hull cemented together - upper decking next.
A bit of filler to blend it in.
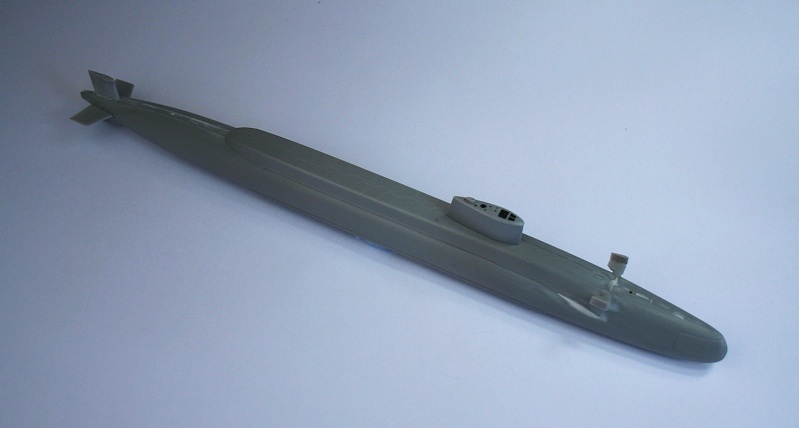
Ready for painting - the 'sail' is not glued on yet.
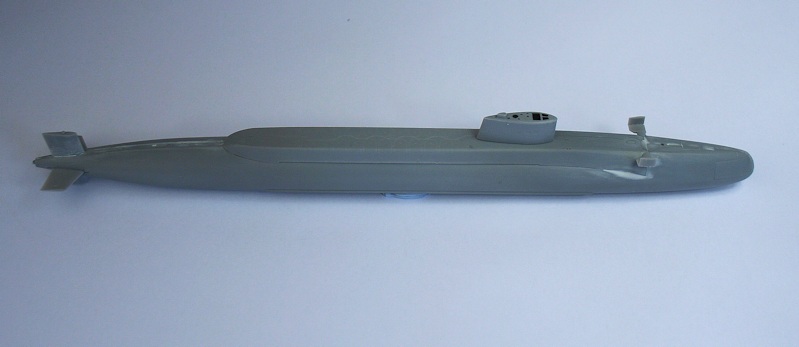
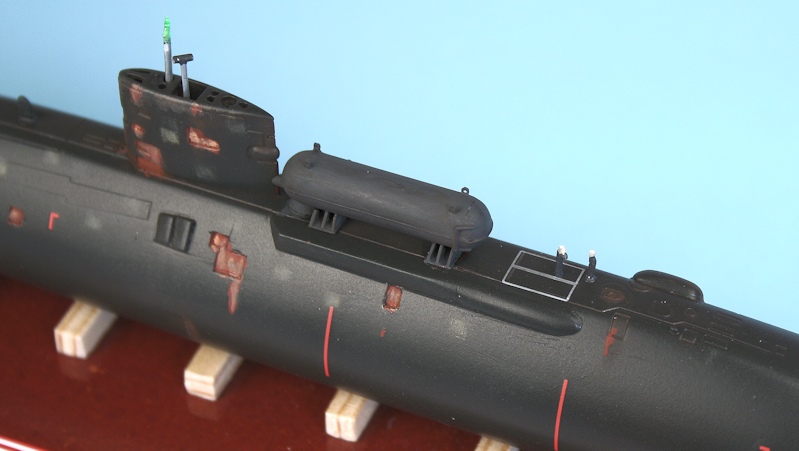
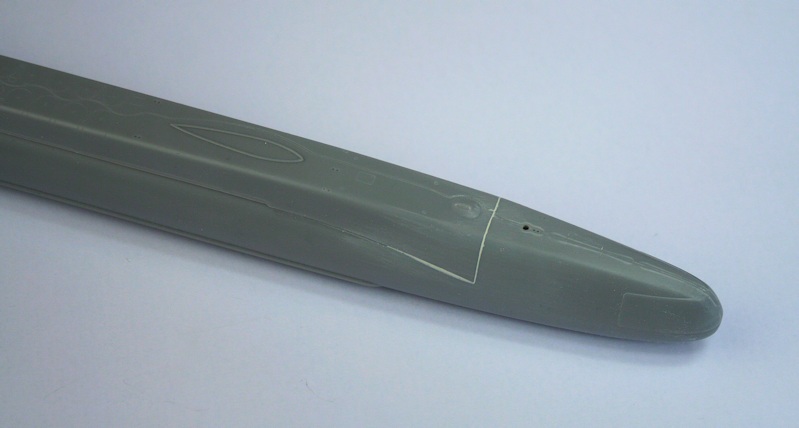
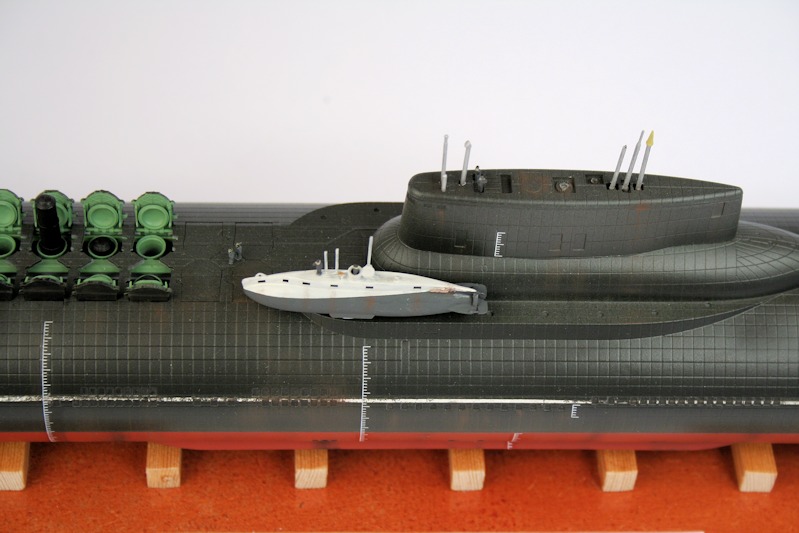
Note the distinctive folding bow planes.
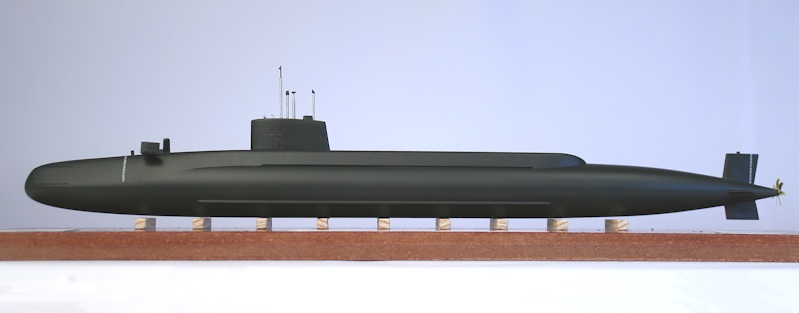
Trying to photograph a 'black' submarine is not easy.....
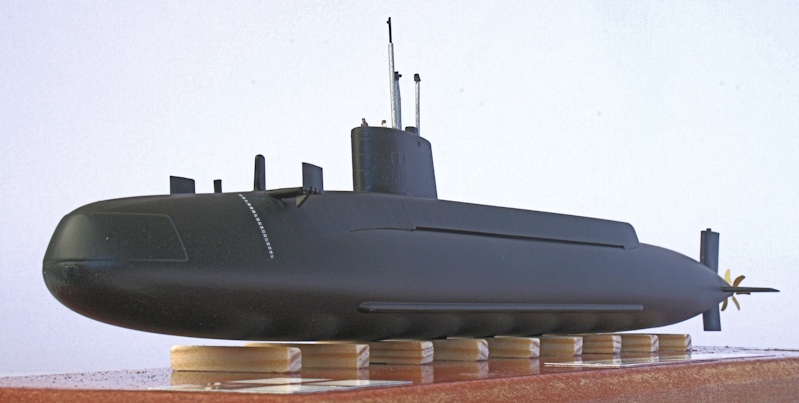
Note the 'folding' bow planes.
The only etched brass in this kit is the seven-bladed propeller.
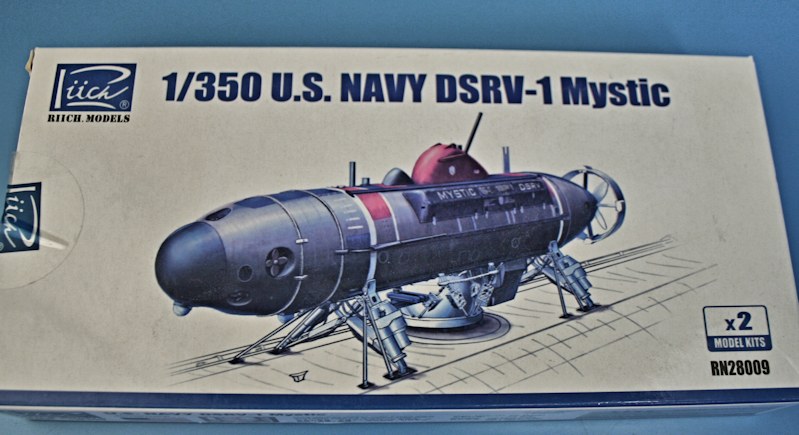
Riich Models DSRV - which has to be converted from 'Mystic' to 'Avalon'.
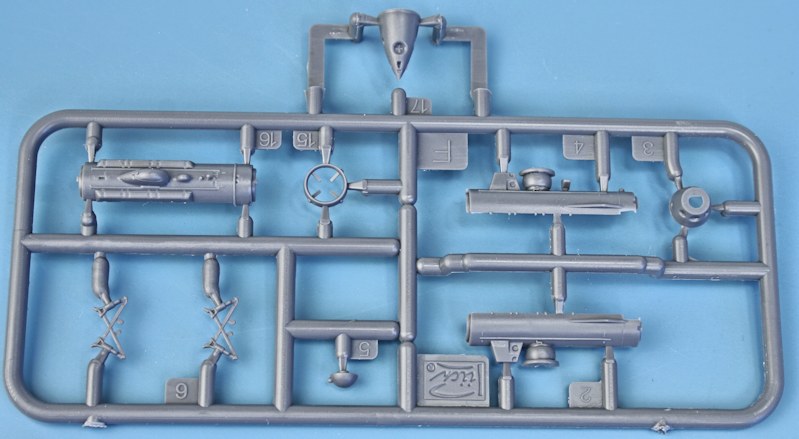
DSRV Parts.

Etched brass parts.

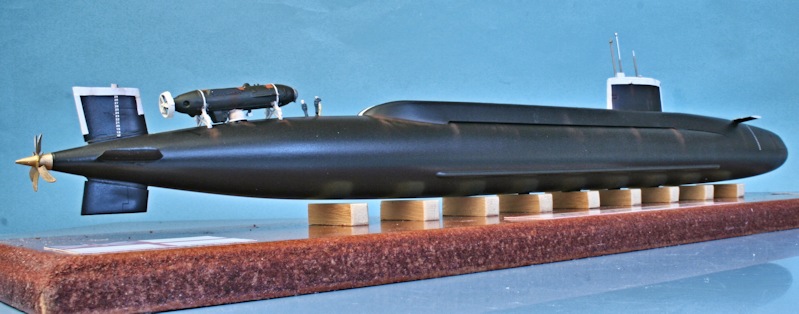
Finished model of HMS Repulse - with DSRV during trials.


10mm plastic knitting needle being carved to shape for the hull.
Hull shaped and plastic card decking added.
Main micro-construction finished.
My eyes hurt!!! - It's only 56mm (2.5in) long.
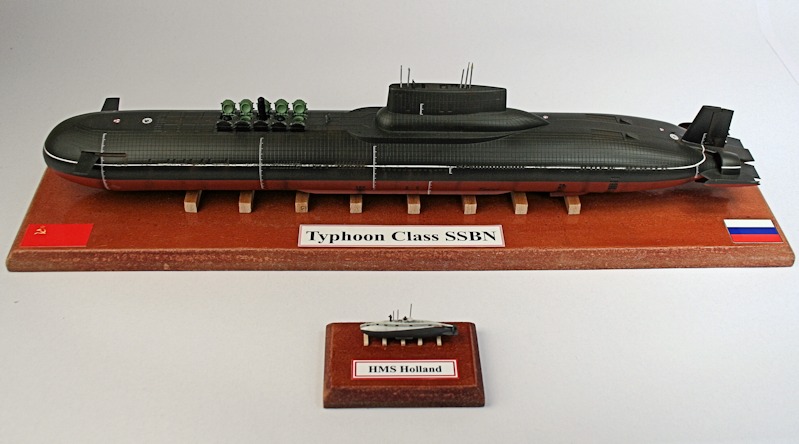
Little and Large - spot the Holland.
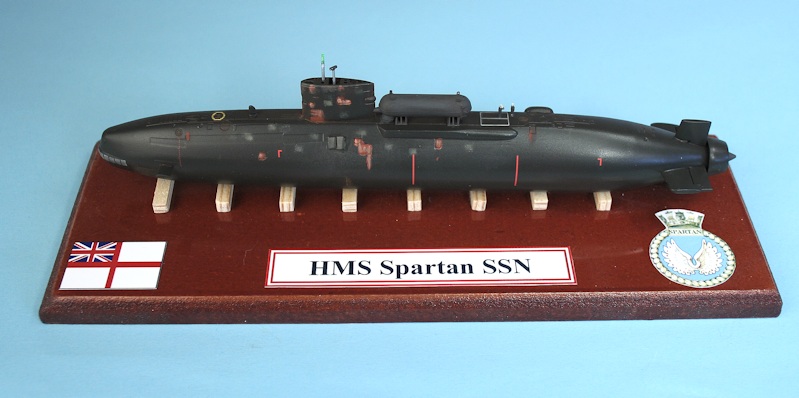
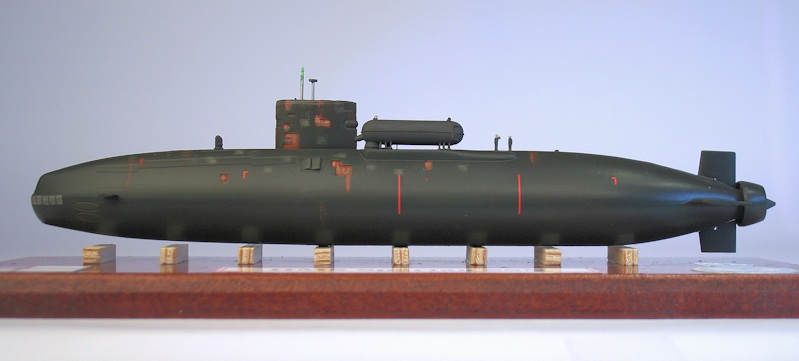
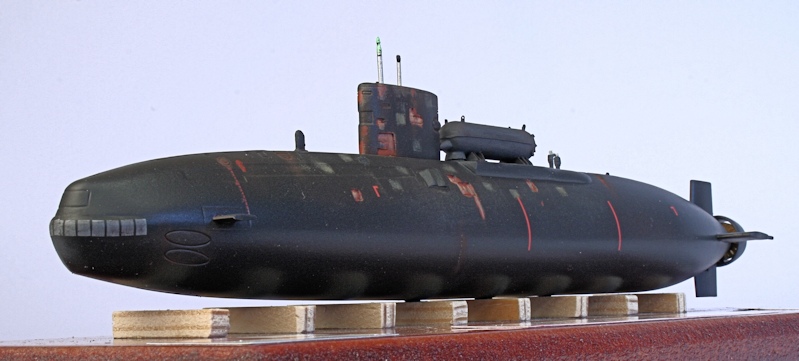
HMS Spartan
Airfix HMS Trafalgar hull shortened by 7mm
Single baffles replaced with twin baffles - note the recesses gouged into the hull to represent missing tiles.
Recesses in sail for missing tiles
8mm dia plastic knitting needle to make Dry Deck Shelter.
Plastic card used to make the deck extension.
Top view of the deck extension - plus the bathtub-shaped bulge to the rear starboard side.
Sail and DDS Blu-Tac'd in place.
Top view.
Scratch-built DDS - with handrail and hinges plus support brackets.
Temporarily in place on primered hull - still more pipes and brackets to add.
Finished Model
Close up showing the DDS on the extended decking.
HMS
Resolution - HMS Repluse
The latest kit from Mikro-Mir - Royal Navy SSBN HMS Resolution
Vertically split hull halves.......
... with separate missile decking.
Etched-brass propeller and simple decal sheet.
Instruction diagram.
Painting guide - black, black or.... black.
Hull cemented together - upper decking next.
A bit of filler to blend it in.
Ready for painting - the 'sail' is not glued on yet.
Note the distinctive folding bow planes.
Finished Model
Trying to photograph a 'black' submarine is not easy.....
Note the 'folding' bow planes.
The only etched brass in this kit is the seven-bladed propeller.
Finished model - HMS Repluse with DSRV.
Riich Models DSRV - which has to be converted from 'Mystic' to 'Avalon'.
DSRV Parts.
Etched brass parts.
Finished model of HMS Repulse - with DSRV during trials.
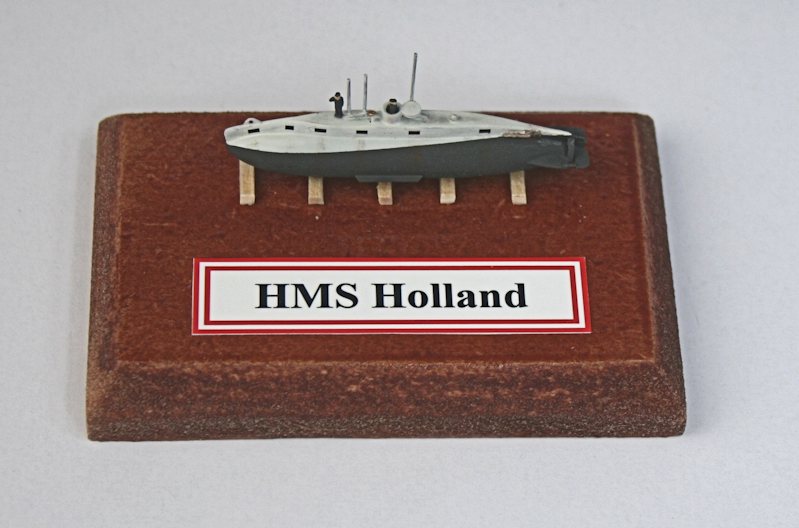
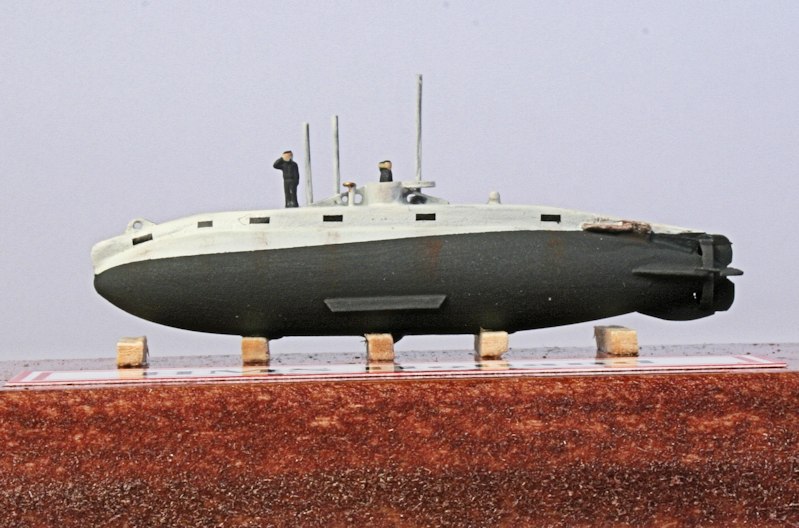
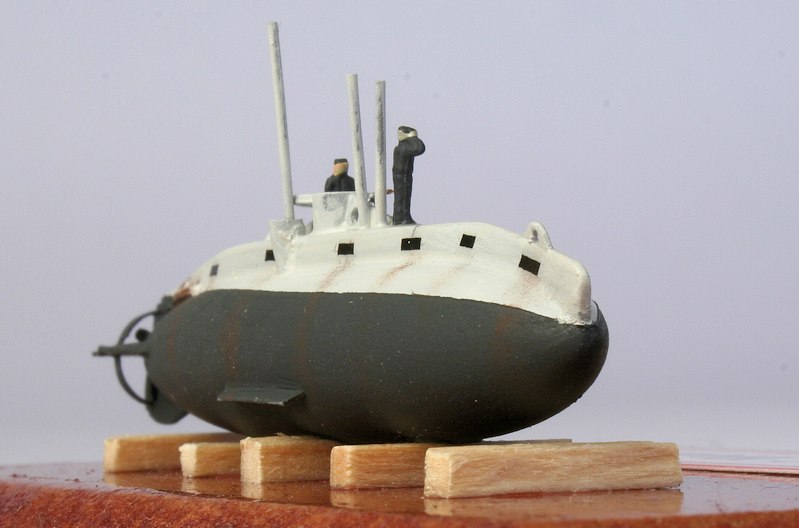
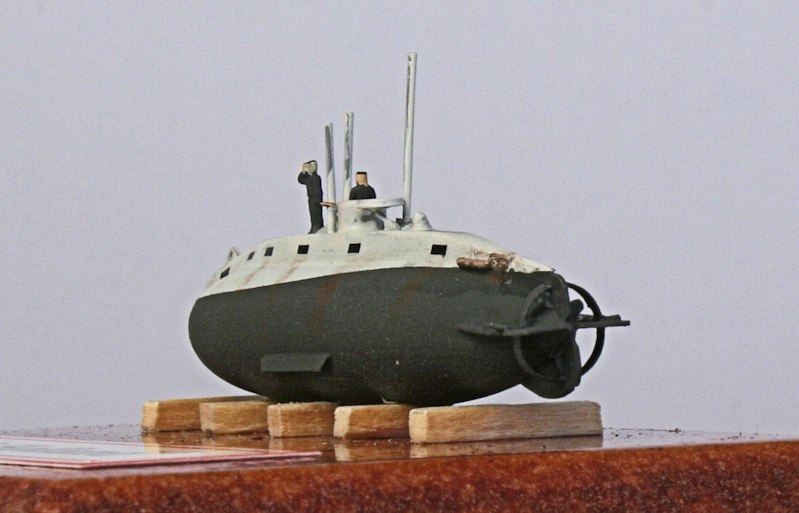
HMS Holland
10mm plastic knitting needle being carved to shape for the hull.
Hull shaped and plastic card decking added.
Main micro-construction finished.
My eyes hurt!!! - It's only 56mm (2.5in) long.
Finished Model
Little and Large - spot the Holland.
Return
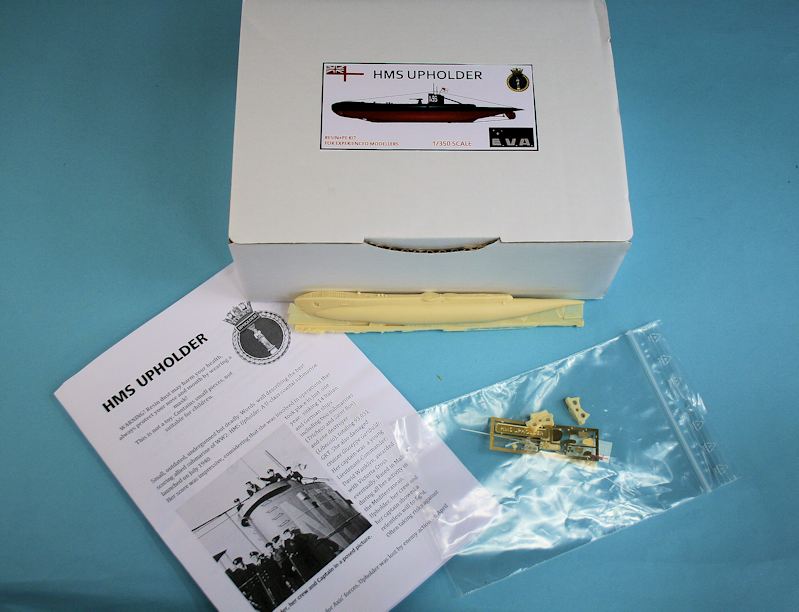
Massive box, tiny contents. E.V.A. resin kit
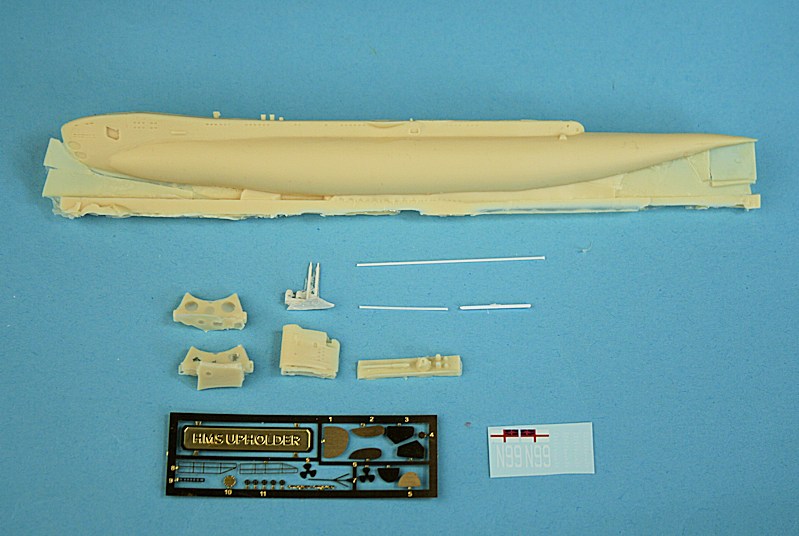
One-piece resin hull, two display stands, bridge and deck gun. Etched brassrudder, diving planes, propeller and railings.
Decal sheet with Penant number and Union Jack.
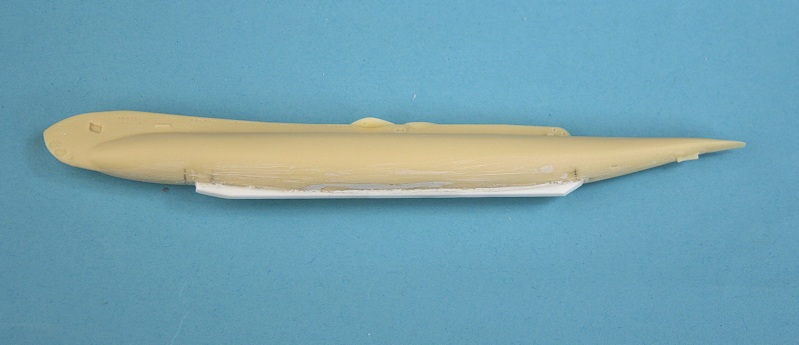
Adding back the keel that was accidently cut off.
Addition of the prop shafts, rudder and rear dive planes.
Ready for a full primer coat.

The old and new.

Hobby Boss German Type 212 used as the starting point....
20MM dia plastic knitting needle used to stretch the hull.
20mm dia plug in place........
The front hole is where the Type 212's sail has been removed - the rear hole is where the sharply angled 'haunches' have been cut down.
A length of square section of plastic bridges the gap - ready for the new decking.
Underside showing the new keel - which still needs rounded end caps.
It's begining to look a bit like HMS Upholder.

Decking added from thick plastic card - sides from thinner plastic.
Time to break out the Milliput.....
Milliput applied - and sanded.
The first primer coat reveals a few issues - but it's looking good.
Three rectangles of thick plastic card glued together - ready to be shaped into the conning tower.
Tamiya tape cut to shape to represent the side sonar panels.

Fin carved to shape and stuck in place - along with the upper and lower rudders.
All primed up....
....and ready for the topcoat.
You can have any colour - as long as it is black!
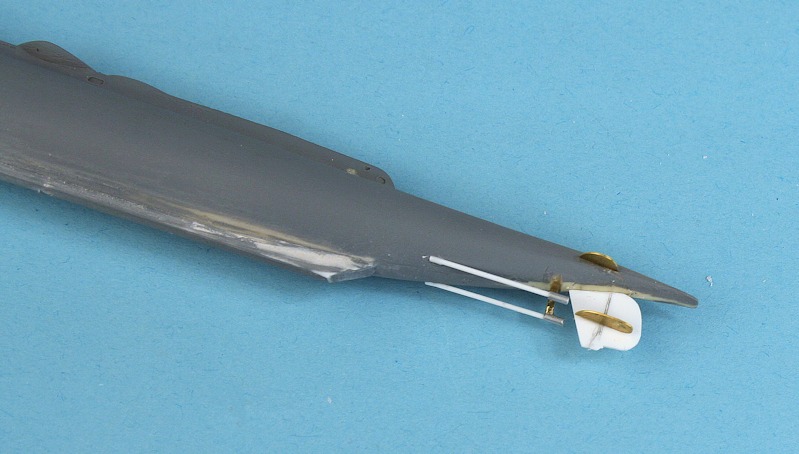
Using a rattle can of Halfords Volvo Dark Grey.
I just have to add the waterline marks, a coat of satin varnish and fit the propeller (taken from the Airfix Trafalgar).
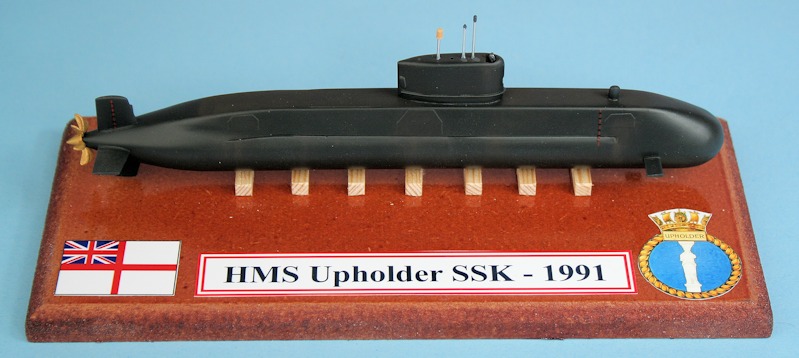

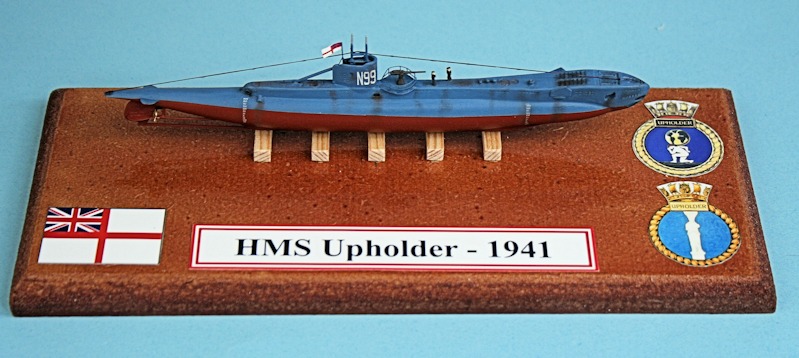
HMS Upholder - 1942
Massive box, tiny contents. E.V.A. resin kit
One-piece resin hull, two display stands, bridge and deck gun. Etched brassrudder, diving planes, propeller and railings.
Decal sheet with Penant number and Union Jack.
Adding back the keel that was accidently cut off.
Addition of the prop shafts, rudder and rear dive planes.
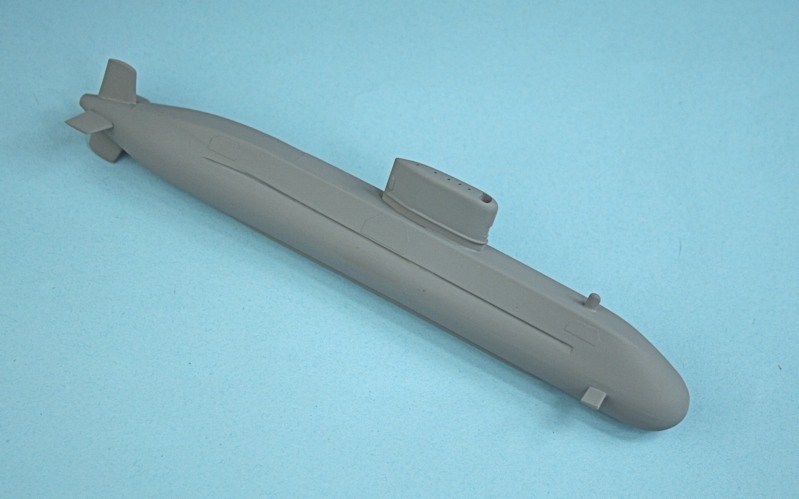
Ready for a full primer coat.
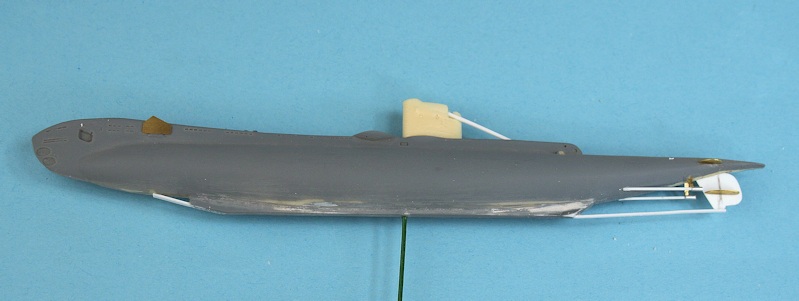
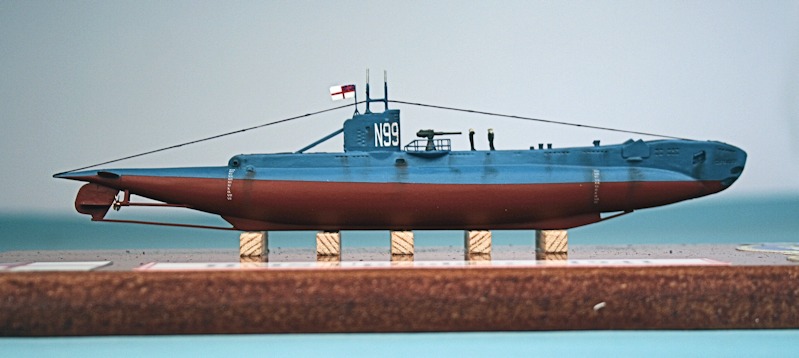
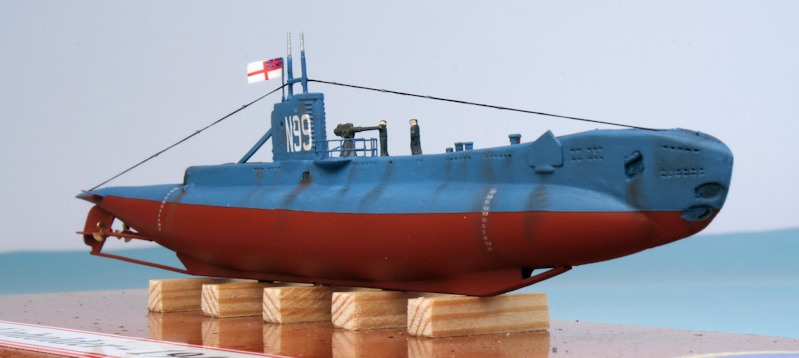
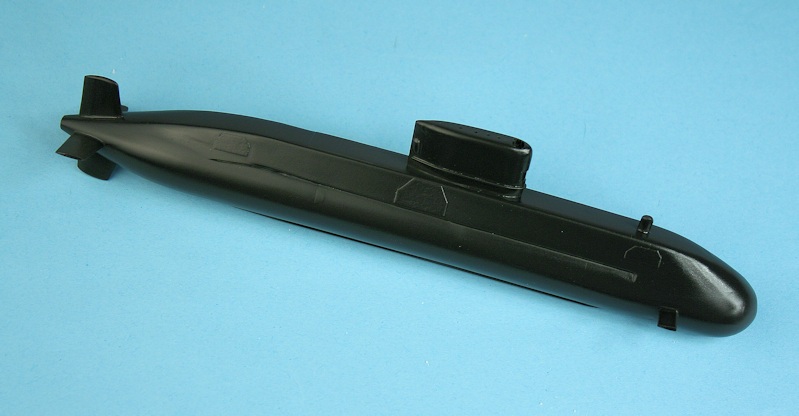
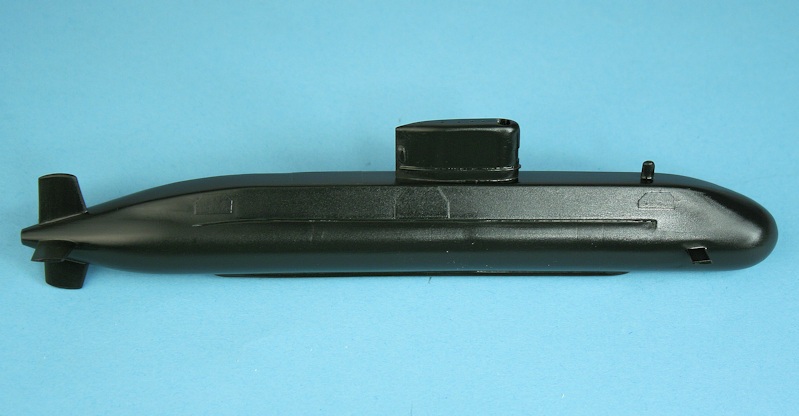
Finished model
The old and new.
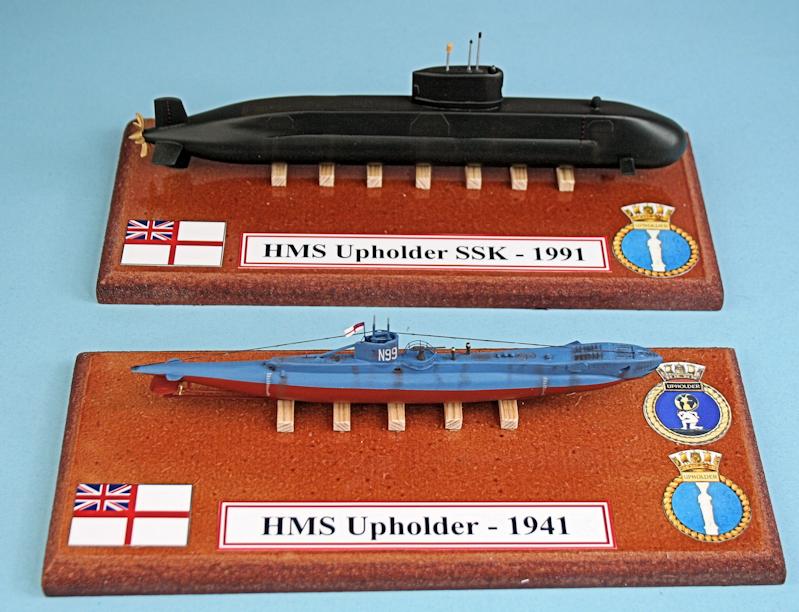
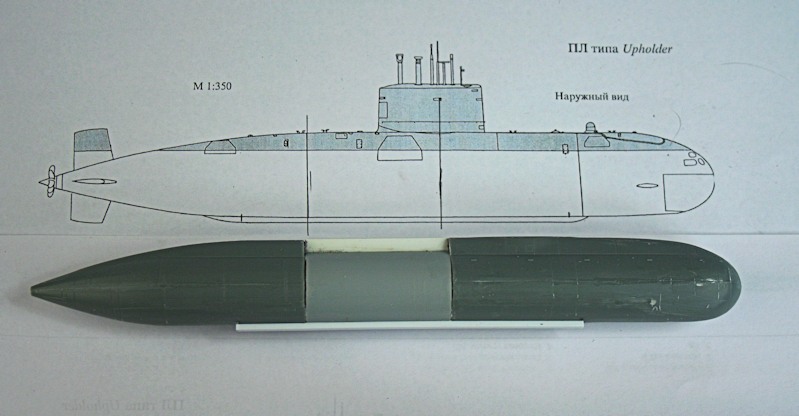
HMS Upholder 1990
Hobby Boss German Type 212 used as the starting point....
20MM dia plastic knitting needle used to stretch the hull.
20mm dia plug in place........
The front hole is where the Type 212's sail has been removed - the rear hole is where the sharply angled 'haunches' have been cut down.
A length of square section of plastic bridges the gap - ready for the new decking.
Underside showing the new keel - which still needs rounded end caps.
It's begining to look a bit like HMS Upholder.
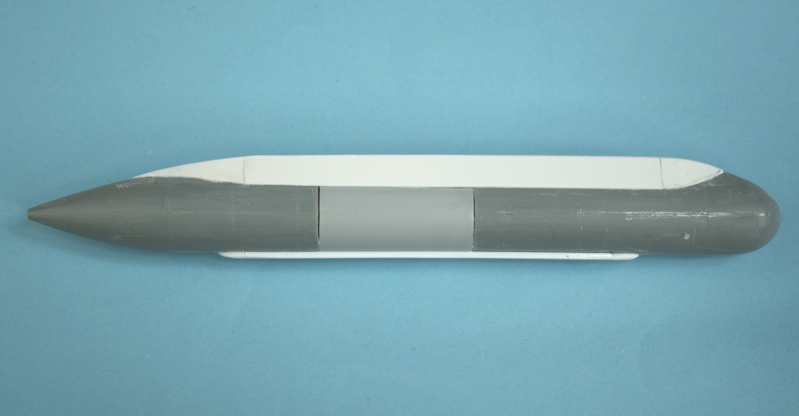
Decking added from thick plastic card - sides from thinner plastic.
Time to break out the Milliput.....
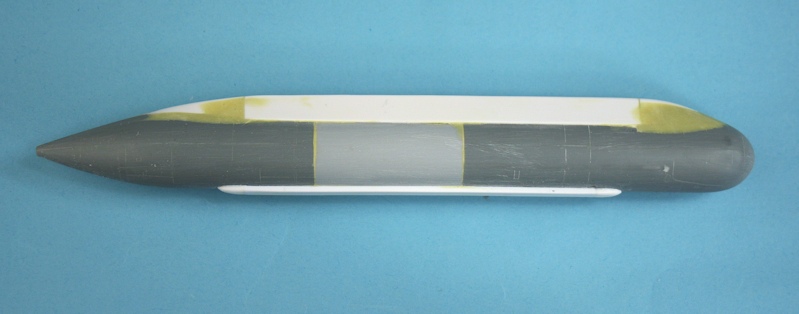
Milliput applied - and sanded.
The first primer coat reveals a few issues - but it's looking good.
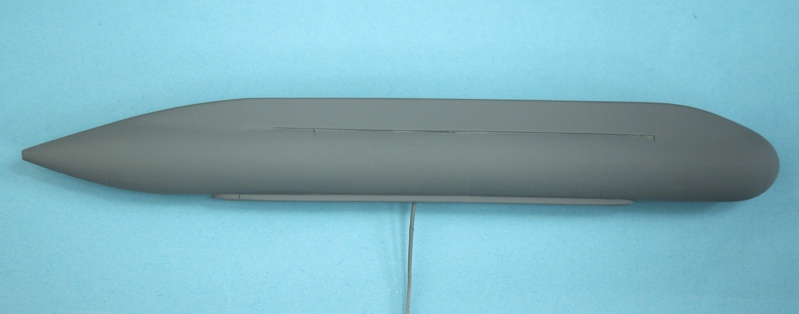
Three rectangles of thick plastic card glued together - ready to be shaped into the conning tower.
Tamiya tape cut to shape to represent the side sonar panels.
Fin carved to shape and stuck in place - along with the upper and lower rudders.
All primed up....
....and ready for the topcoat.
You can have any colour - as long as it is black!
Using a rattle can of Halfords Volvo Dark Grey.
I just have to add the waterline marks, a coat of satin varnish and fit the propeller (taken from the Airfix Trafalgar).
Finished Model
Return
Mikro-Mir excellent box art
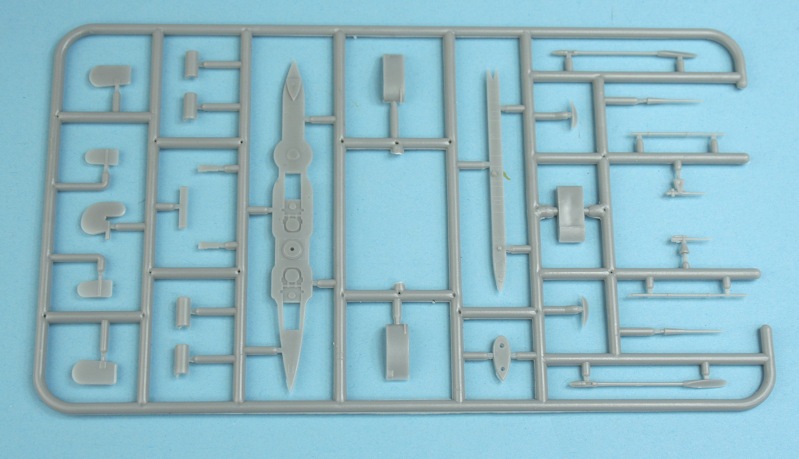
Hull components..........
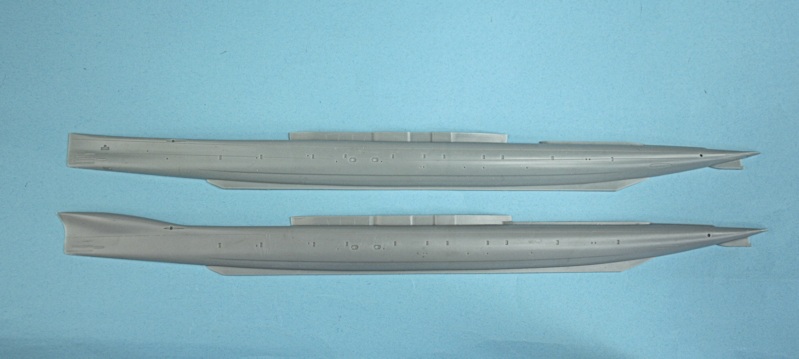
The K-15 hull is brand new - compare with previous HMS K-4 at top.
The superstructure sprue is also new - note the rectangular recess in the main deck.
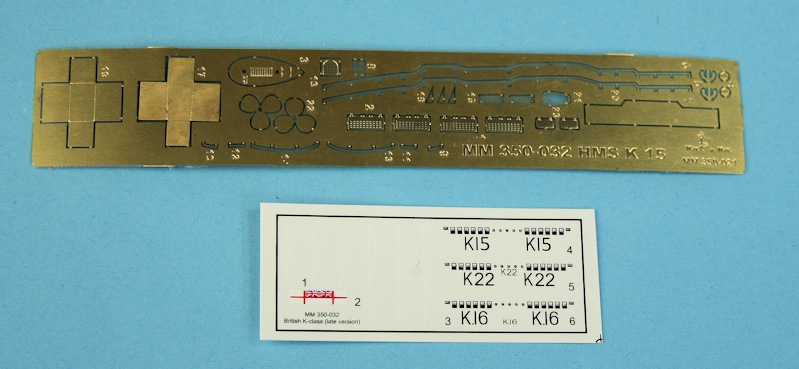
Etched brass and decals - thos cross-shaped brass parts are the recesses for the retracted funnels.
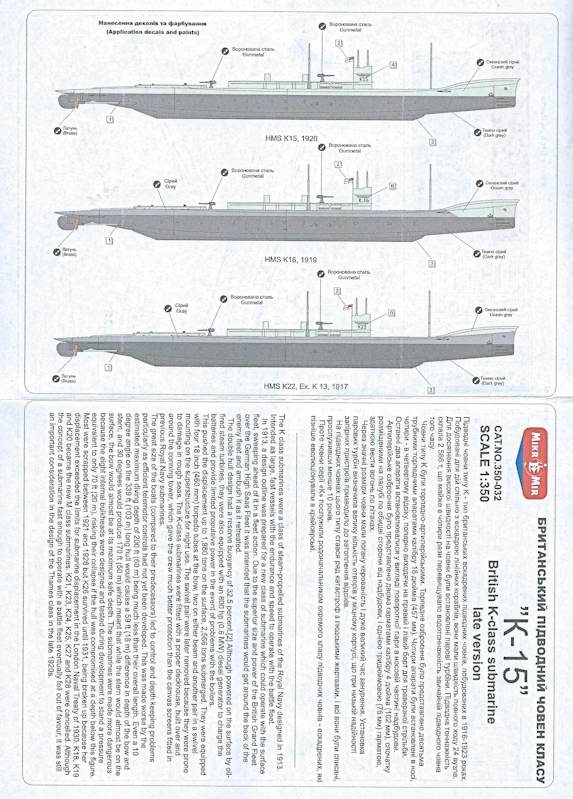
A potted history - and marking/painting guide for 3 subs - HMS K-15, K-16 and K-22 (ex K-13)
Construction diagram.
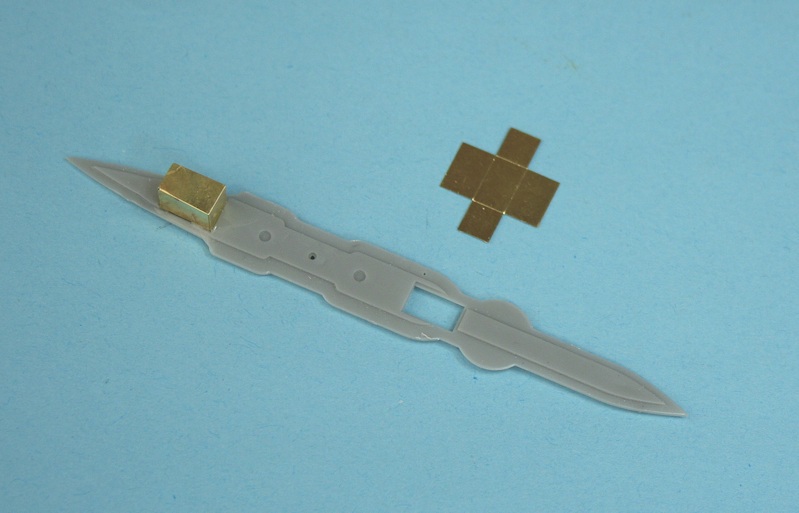
Etched brass for the funnell recesses.
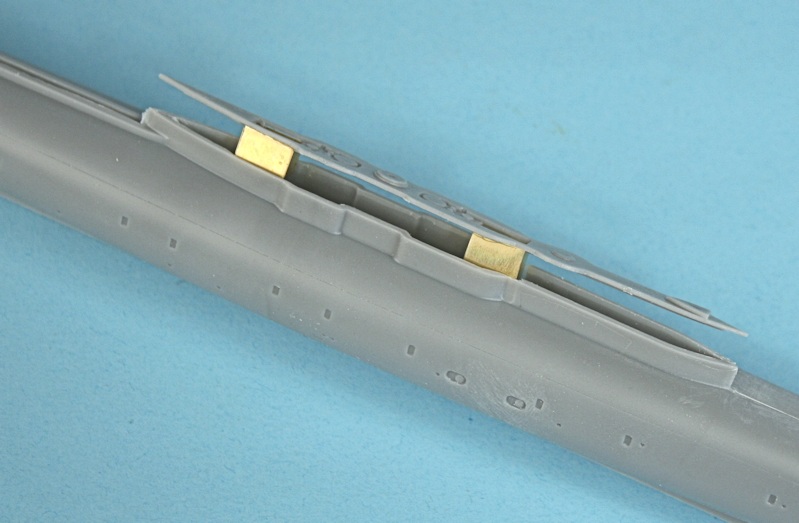
The superstructure sides have to be thinned down to take the etched 'boxes'.
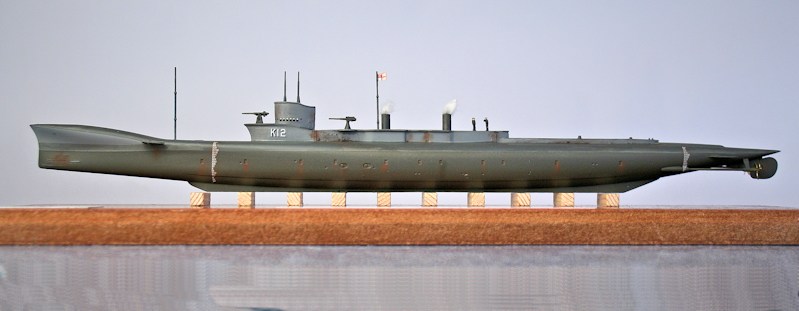
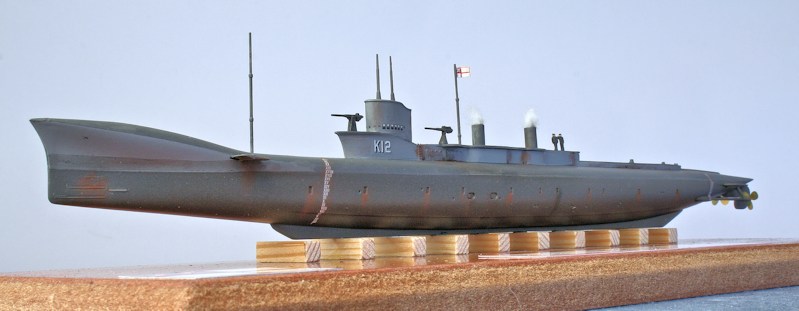
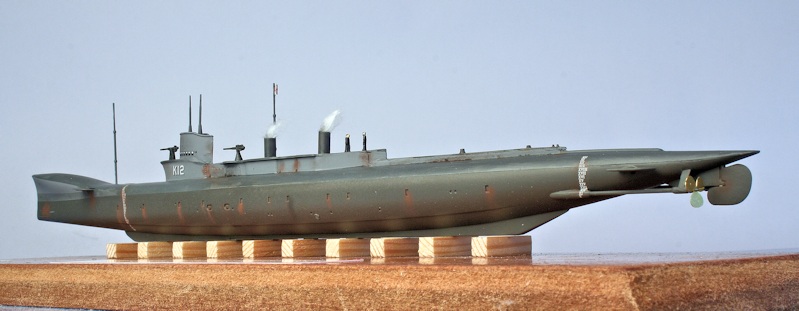
New raised front end for HMS K-12.
Kit bridge compared to scratched K-12 bridge.
HMS K-15, 16 & 22 at front, home-made HMS K-12 at rear.
Ready for the paintshop.
Overhead view showing the revised bridge and foredeck.
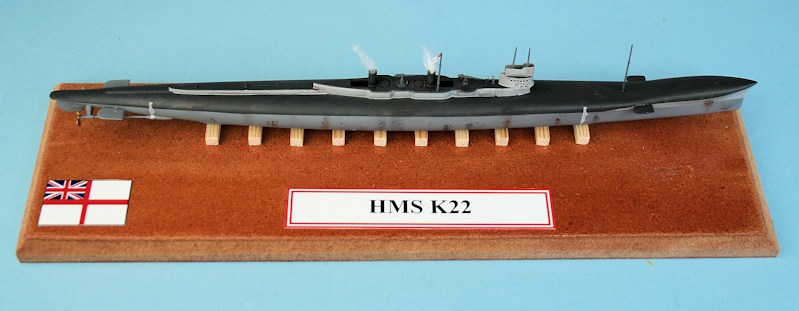
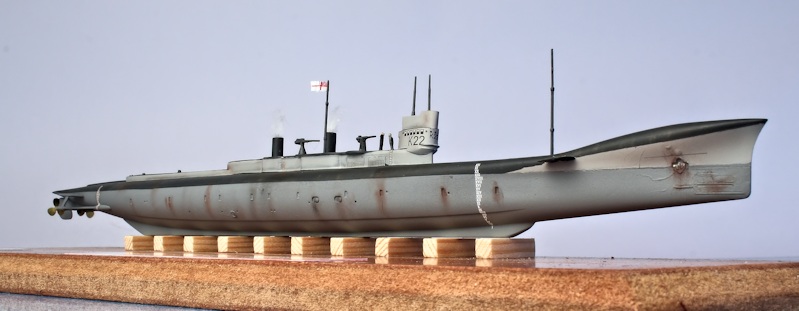
HMS K22 (ex K13).
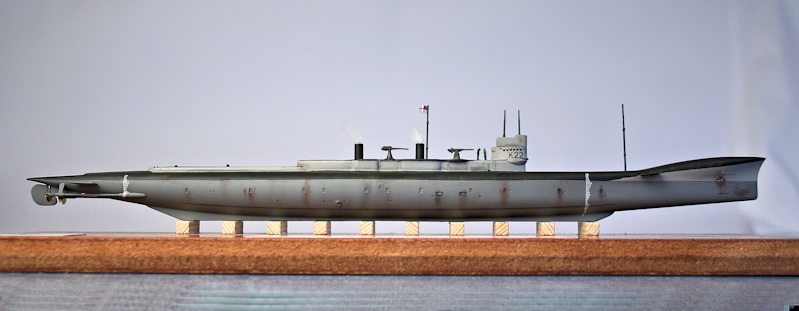
As kitted by MicroMir.
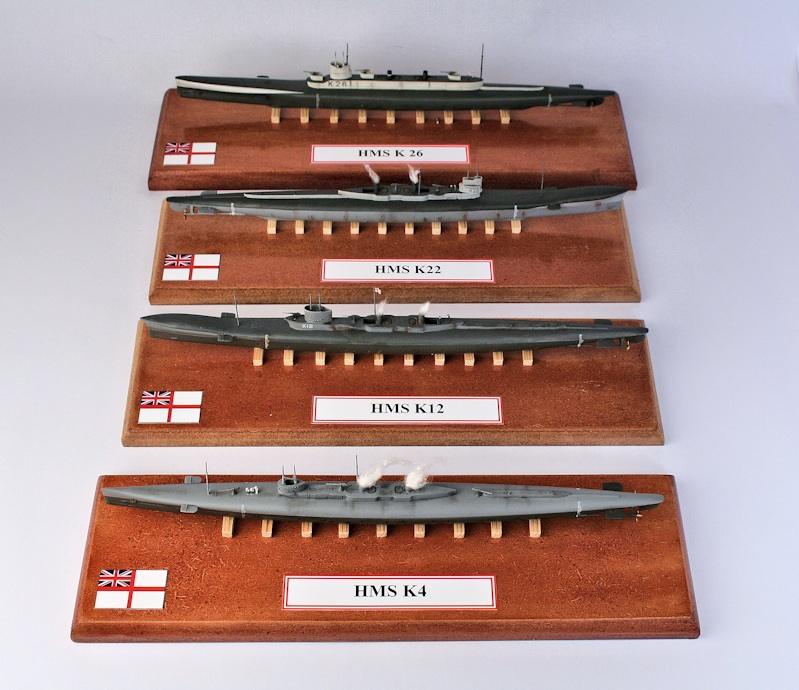
My collection of MikroMir K-Class submarines. K4 & K22 are straight from the box, K12 & K26 are converted.
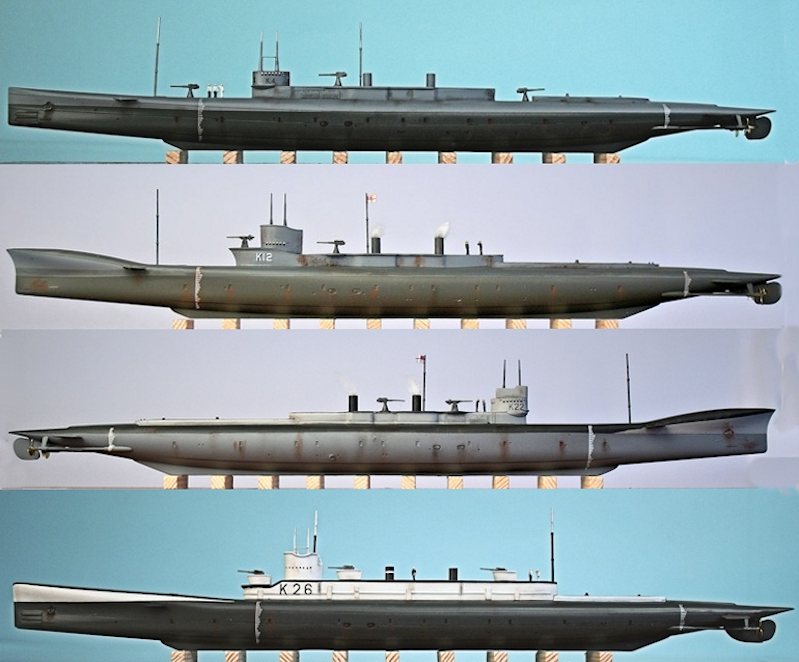
Composite view showing the differences.
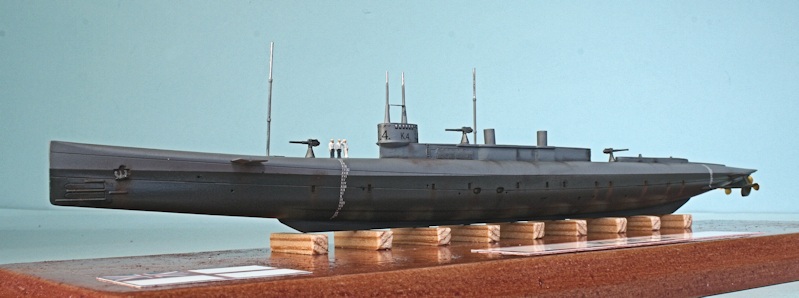
HMS K-15
Mikro-Mir excellent box art
Hull components..........
The K-15 hull is brand new - compare with previous HMS K-4 at top.
The superstructure sprue is also new - note the rectangular recess in the main deck.
Etched brass and decals - thos cross-shaped brass parts are the recesses for the retracted funnels.
A potted history - and marking/painting guide for 3 subs - HMS K-15, K-16 and K-22 (ex K-13)
Construction diagram.
Etched brass for the funnell recesses.
The superstructure sides have to be thinned down to take the etched 'boxes'.
New raised front end for HMS K-12.
Kit bridge compared to scratched K-12 bridge.
HMS K-15, 16 & 22 at front, home-made HMS K-12 at rear.
Ready for the paintshop.
Overhead view showing the revised bridge and foredeck.
Finished Models - as HMS K12 & K22
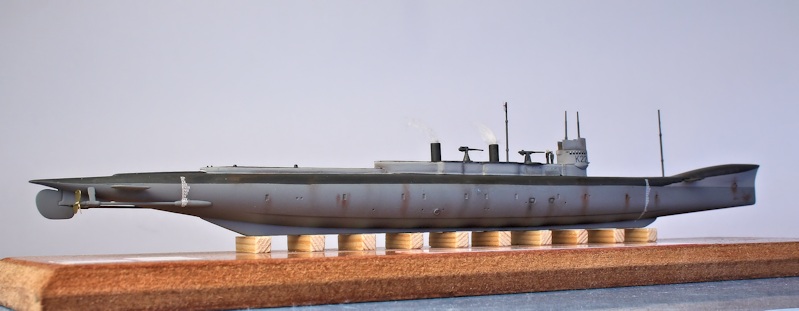
HMS K12 - with raised
foredeck in front of
the bridge.
HMS K22 (ex K13).
As kitted by MicroMir.
My collection of MikroMir K-Class submarines. K4 & K22 are straight from the box, K12 & K26 are converted.
Composite view showing the differences.
Return
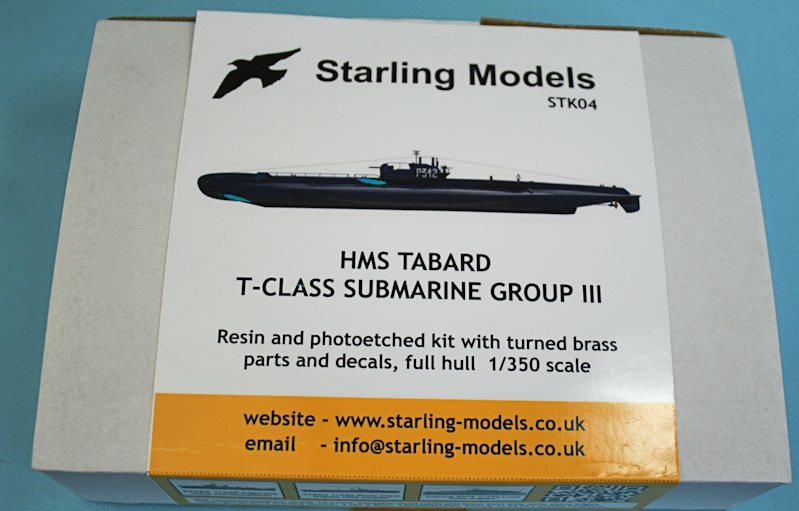
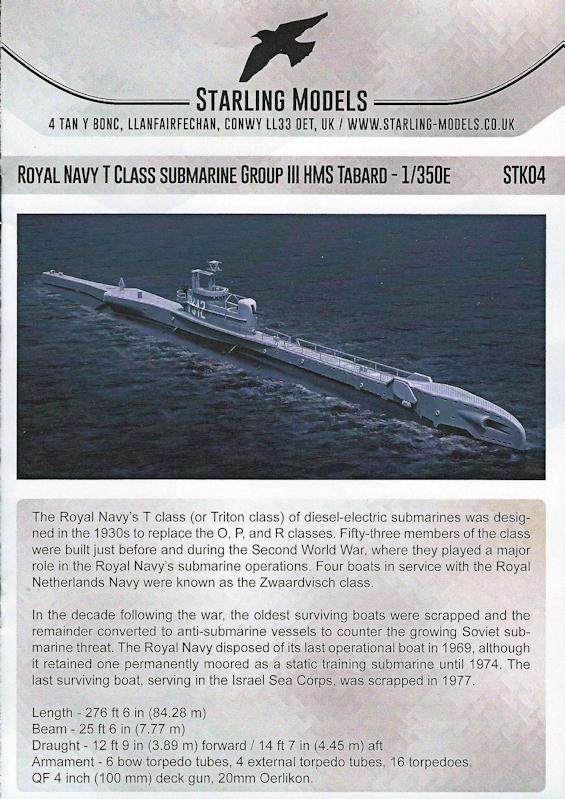
New resin kit from Starling models - the Royal Navy T-Class submarine.
Excellent 8-page instruction booklet.....
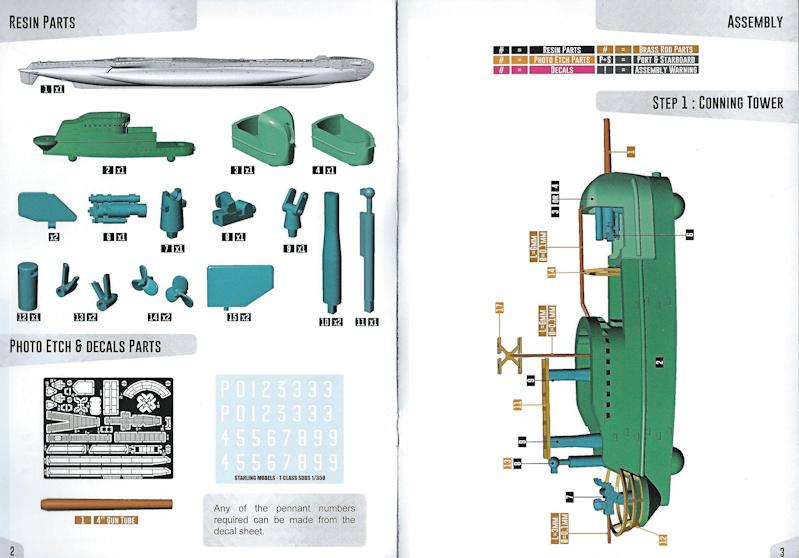
Very detailed instructions. Note the two styles of gun mount.
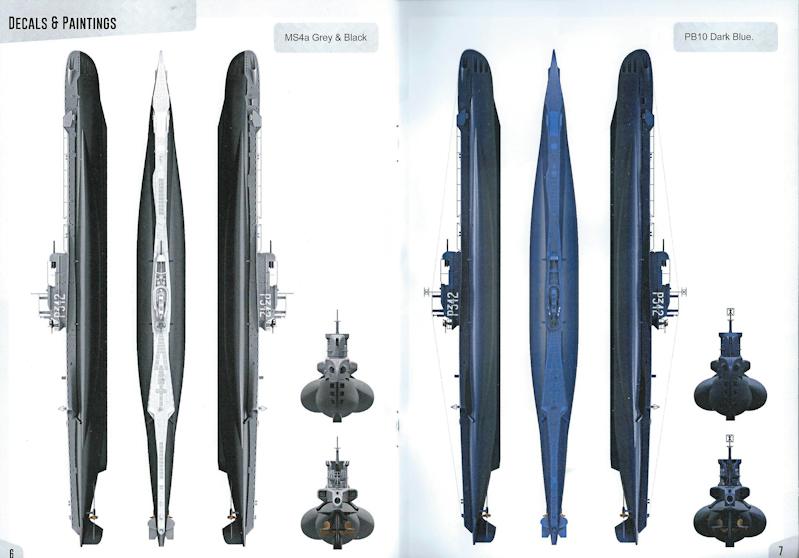
Colour painting guide.
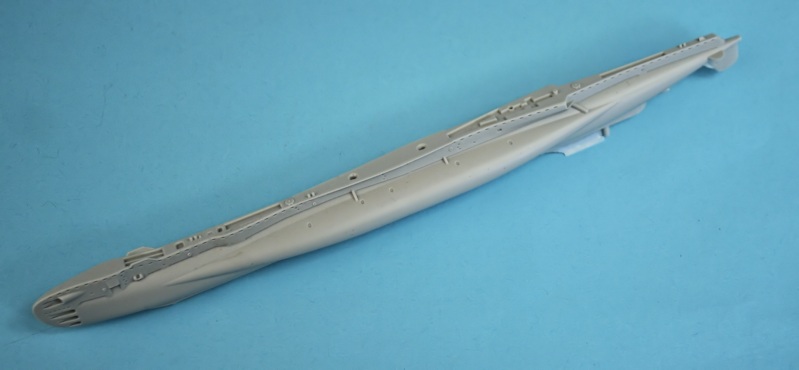
Superbly cast one-piece resin hull - a bit of moulding 'flash' but no trace of any air holes or bubbles.
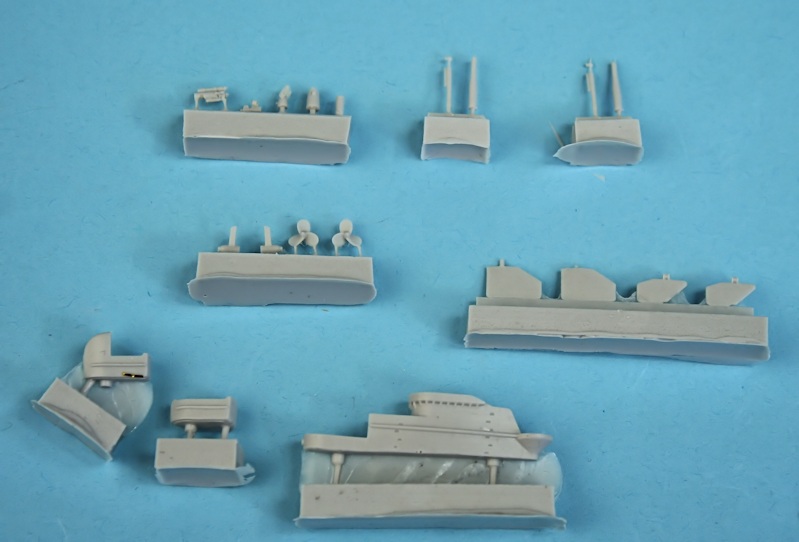
Other resin parts - excellent mouldings.
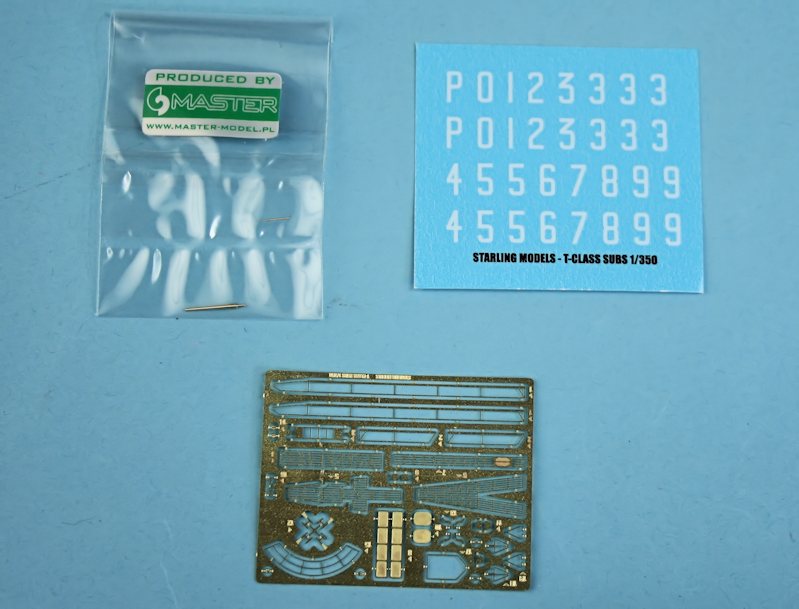
Gun barrels by Mastermodel, etched parts and decals.

Adding the mesh decking - very delicate.
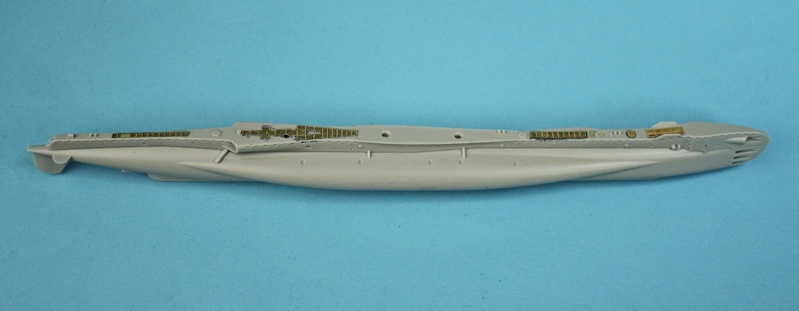
Decking complete.....
Top view showing etched brass deck inserts.
The kit supplies the propeller housings (very delicate castings) - but not the prop shafts......
... which the modeller has to add from thin plastic or brass rod...
BUT the instruction sheet quotes their length as '5mm' - which on measuring turns out to be 11mm!
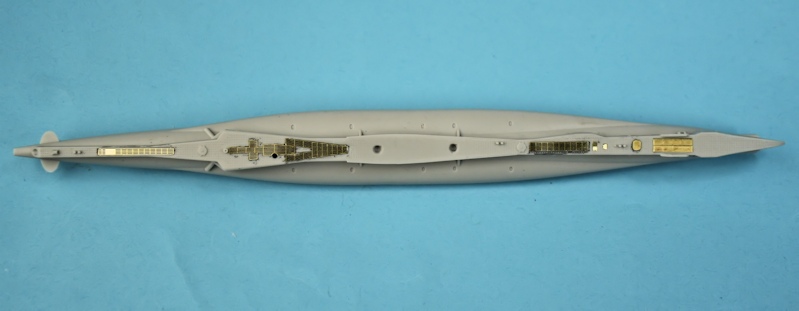
The QF 4in (left) and 20MM Oerlikon are stunning examples of resin casting - with metal gun barrels provided
by Master-Model of Poland. Both barrels are tapered - with the 4in even having a hole at the sharp end!
The instruction sheet is again in error - omitting to point out the mounting pedestals (parts 7 [4in] and 9 [20mm])
The 20mm parts are 8 & 9 - not 7 as shown on the instruction diagram.
First coat of grey primer......
.... showing the great detail provided by the mesh decking.
Painted in Hataki PB10 and decals applied.
Almost finished - awaiting some elastic thread for the rigging/aerials.
One-piece solid resin hull.
A slight moulding seam along the hull - easily fixed.

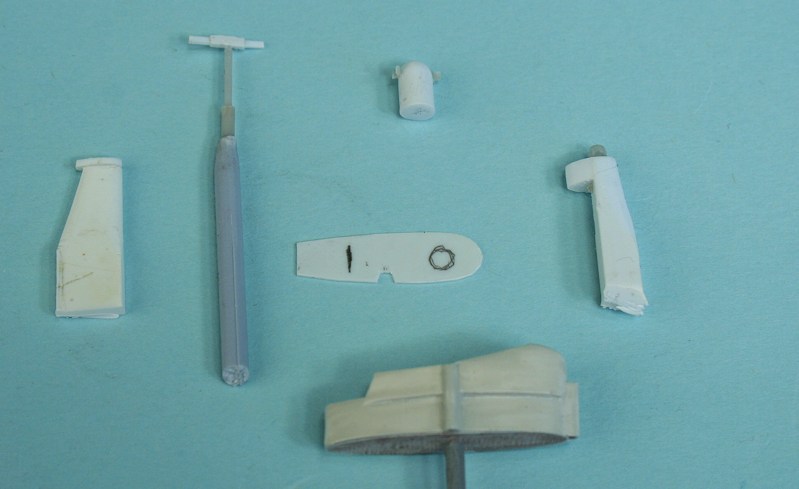
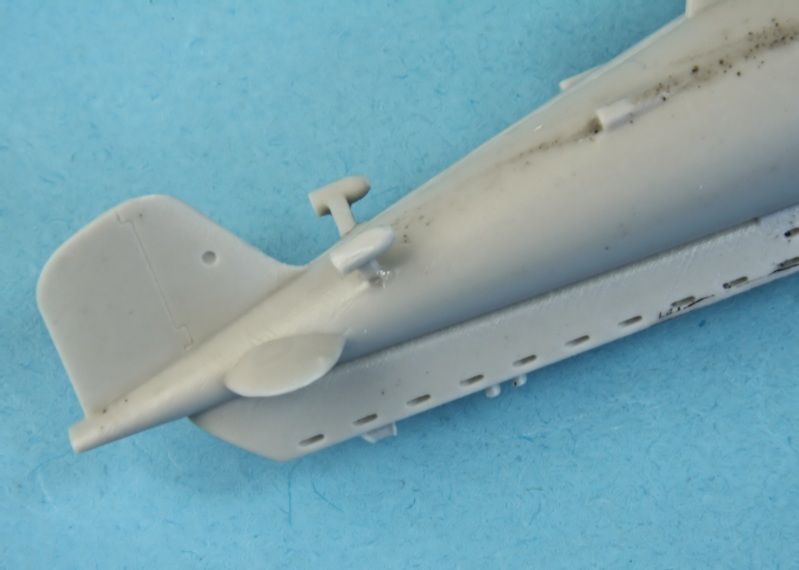
The rest of the parts - conning tower, rear and front diving planes, prop shafts,
propellers, two masts and two styles of sonar dome.
A quick squirt of Halfords Grey Plastic Primer highlights the mould seam along the hull.....
A closer view of the seam on the starboard forward hull side.....
Port rear....
Starboard rear.....
Another view of the stbd front.
Going once......
Going once again......
Going twice.....
Going twice again....
Gone....

Gone twice.
Rear rudder, propshafts, conning tower, forward diving planes and sonar dome attached - under a coat of primer.
Rear end close up.
Ready for its top coat........
..... which can be any colour........
.... as long as it's BLACK !
Sprayed from a rattle can of Halfords Volvo Dark Grey.

Maybe this is why there aren't many kits of RN subs - the boring finish!
Volvo Dark Grey makes a good 'black'.
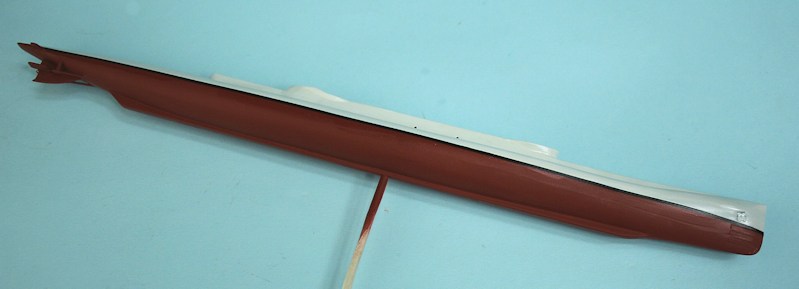
It just needs its hand-painted camouflage now......
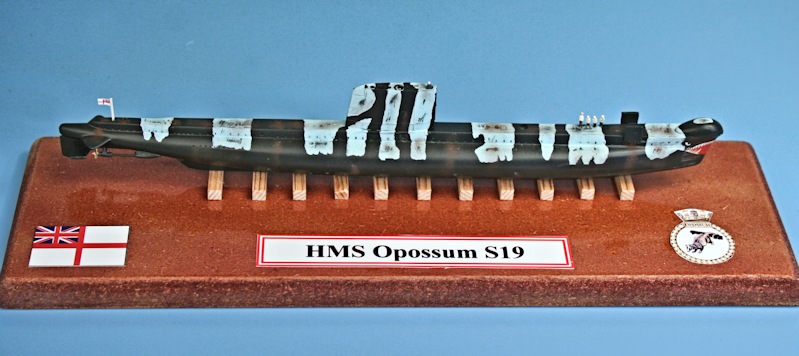
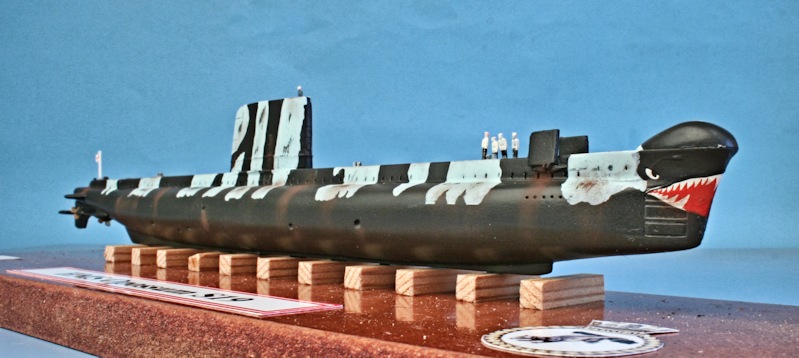
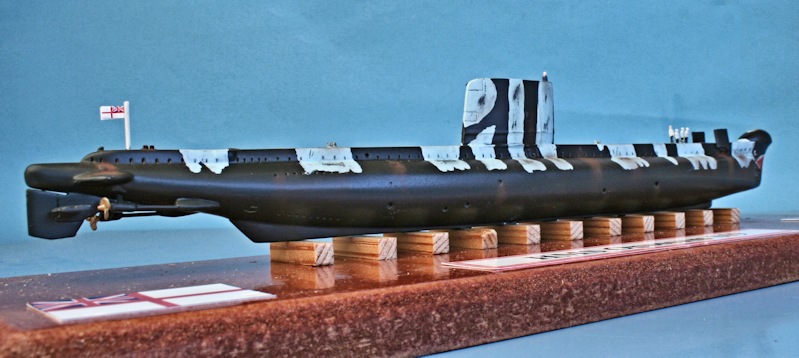
HMS Opossum after her return from the Gulf War.
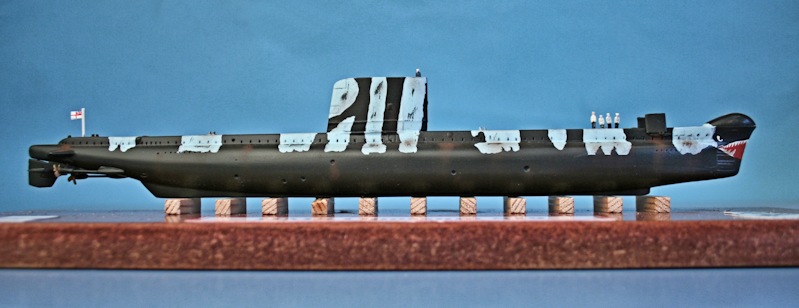
Upper surface camouflage is roughly applied - as is the 'sharkmouth'.
One-piece solid resin hull - with a mould seam down both sides, but easily fixed.
The surface detail is quite good.
The other resin parts - conning tower, periscopes and stanchions, diving planes, deck gun, radio mast, propeller shafts and props.
The first coat of Halford's Grey Plastic Primer highlights the excellent detail work.....
All very well detailed.......
.... but it does highlight the seam running along the middle of the hull.....
The upper straight line is the waterline - the curved seam is below it.
I'm not sure if this is a moulding flaw - or part of the structure?
A couple of sessions of filling and sanding to eliminate that seam....
HMS Venturer - famous as the first submarine in the history of naval warfare
where one submarine intentionally sank another while both were submerged.
The deck gun is from a MikroMir K4 kit.
Pennant number decals are from the spares cache.
Composite image showing HMS Upholder (Group I) top - with HMS Venturer (Group II).
Box art.
Simple instruction sheet and etched brass parts.
Superbly cast resin hull, conning tower and prop boss's.
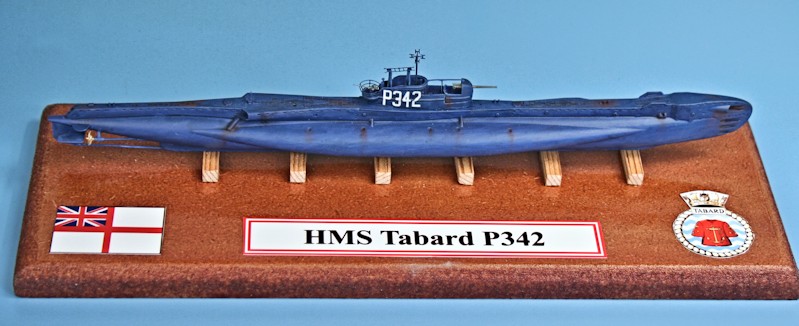
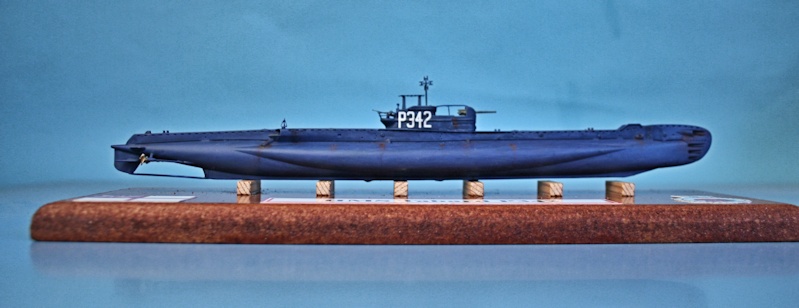
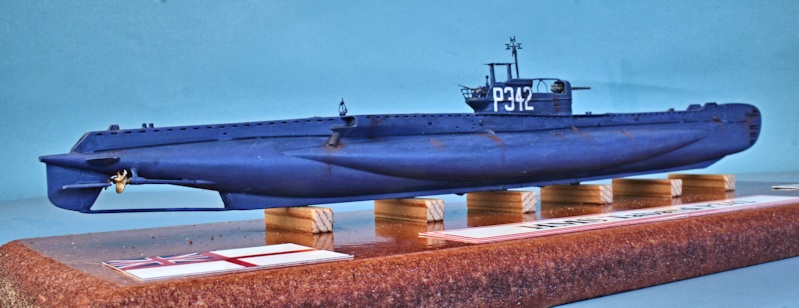
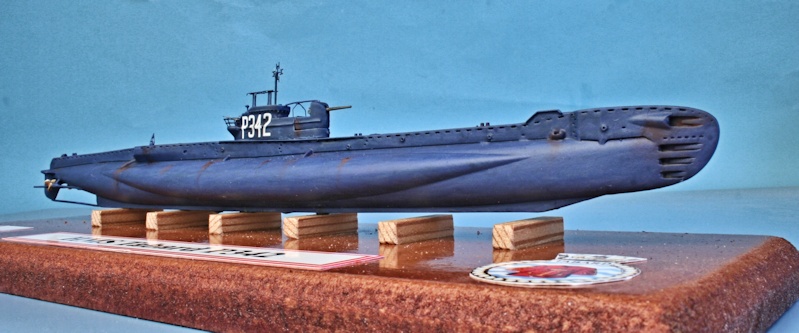
HMS Tabard
New resin kit from Starling models - the Royal Navy T-Class submarine.
Excellent 8-page instruction booklet.....
Very detailed instructions. Note the two styles of gun mount.
Colour painting guide.
Superbly cast one-piece resin hull - a bit of moulding 'flash' but no trace of any air holes or bubbles.
Other resin parts - excellent mouldings.
Gun barrels by Mastermodel, etched parts and decals.
Adding the mesh decking - very delicate.
Decking complete.....
Top view showing etched brass deck inserts.
The kit supplies the propeller housings (very delicate castings) - but not the prop shafts......
... which the modeller has to add from thin plastic or brass rod...
BUT the instruction sheet quotes their length as '5mm' - which on measuring turns out to be 11mm!
The QF 4in (left) and 20MM Oerlikon are stunning examples of resin casting - with metal gun barrels provided
by Master-Model of Poland. Both barrels are tapered - with the 4in even having a hole at the sharp end!
The instruction sheet is again in error - omitting to point out the mounting pedestals (parts 7 [4in] and 9 [20mm])
The 20mm parts are 8 & 9 - not 7 as shown on the instruction diagram.
First coat of grey primer......
.... showing the great detail provided by the mesh decking.
Painted in Hataki PB10 and decals applied.
Almost finished - awaiting some elastic thread for the rigging/aerials.
Return
HMS Oberon
One-piece solid resin hull.
A slight moulding seam along the hull - easily fixed.
The rest of the parts - conning tower, rear and front diving planes, prop shafts,
propellers, two masts and two styles of sonar dome.
A quick squirt of Halfords Grey Plastic Primer highlights the mould seam along the hull.....
A closer view of the seam on the starboard forward hull side.....
Port rear....
Starboard rear.....
Another view of the stbd front.
Going once......
Going once again......
Going twice.....
Going twice again....
Gone....
Gone twice.
Rear rudder, propshafts, conning tower, forward diving planes and sonar dome attached - under a coat of primer.
Rear end close up.
Ready for its top coat........
..... which can be any colour........
.... as long as it's BLACK !
Sprayed from a rattle can of Halfords Volvo Dark Grey.
Maybe this is why there aren't many kits of RN subs - the boring finish!
Volvo Dark Grey makes a good 'black'.
It just needs its hand-painted camouflage now......
Finished Model (as HMS Opossum)
HMS Opossum after her return from the Gulf War.
Upper surface camouflage is roughly applied - as is the 'sharkmouth'.
Return
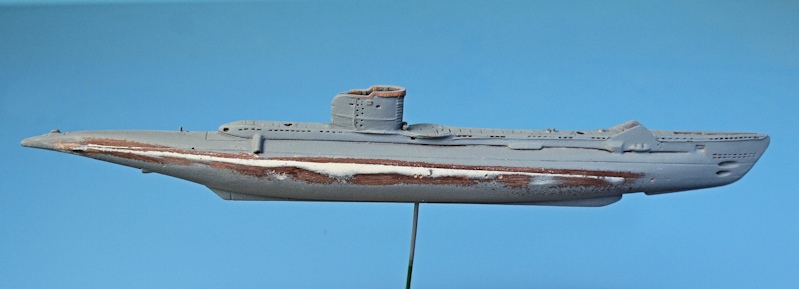
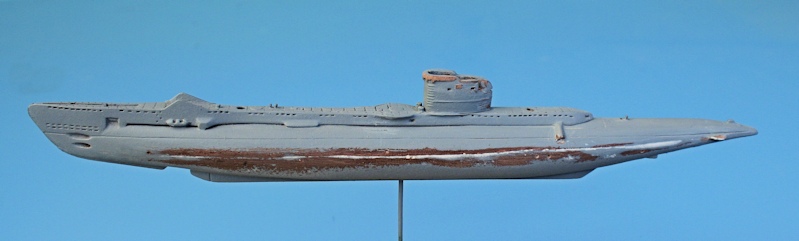
HMS Venturer
One-piece solid resin hull - with a mould seam down both sides, but easily fixed.
The surface detail is quite good.
The other resin parts - conning tower, periscopes and stanchions, diving planes, deck gun, radio mast, propeller shafts and props.
The first coat of Halford's Grey Plastic Primer highlights the excellent detail work.....
All very well detailed.......
.... but it does highlight the seam running along the middle of the hull.....
The upper straight line is the waterline - the curved seam is below it.
I'm not sure if this is a moulding flaw - or part of the structure?
A couple of sessions of filling and sanding to eliminate that seam....
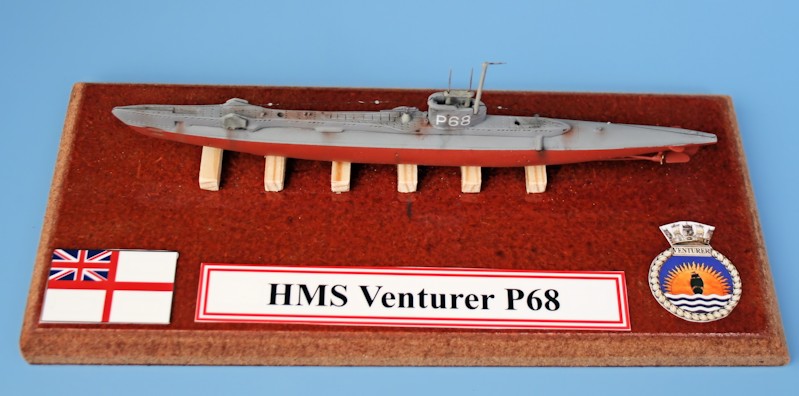
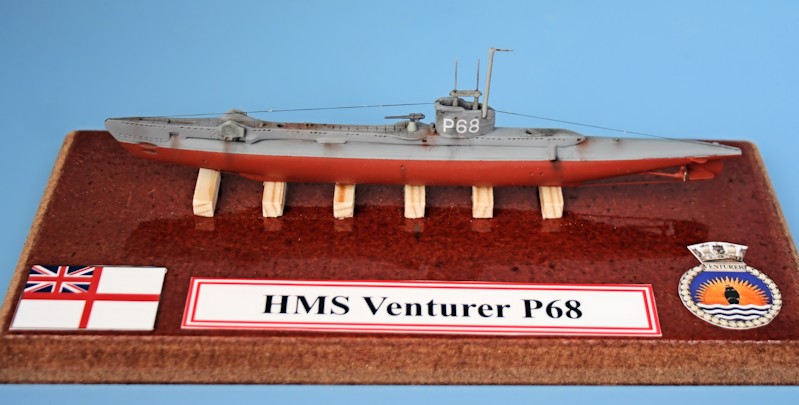
Finished Model
HMS Venturer - famous as the first submarine in the history of naval warfare
where one submarine intentionally sank another while both were submerged.
The deck gun is from a MikroMir K4 kit.
Pennant number decals are from the spares cache.
Composite image showing HMS Upholder (Group I) top - with HMS Venturer (Group II).
Return
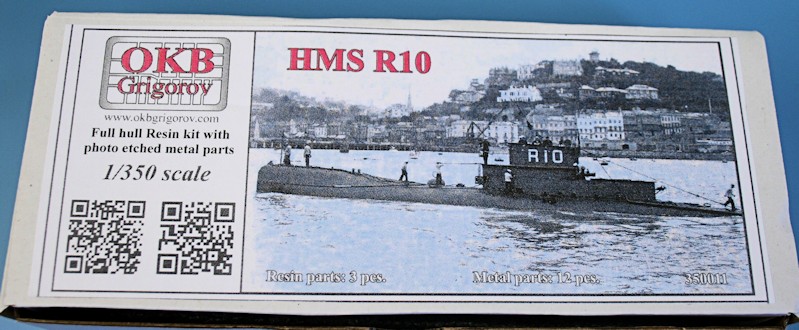
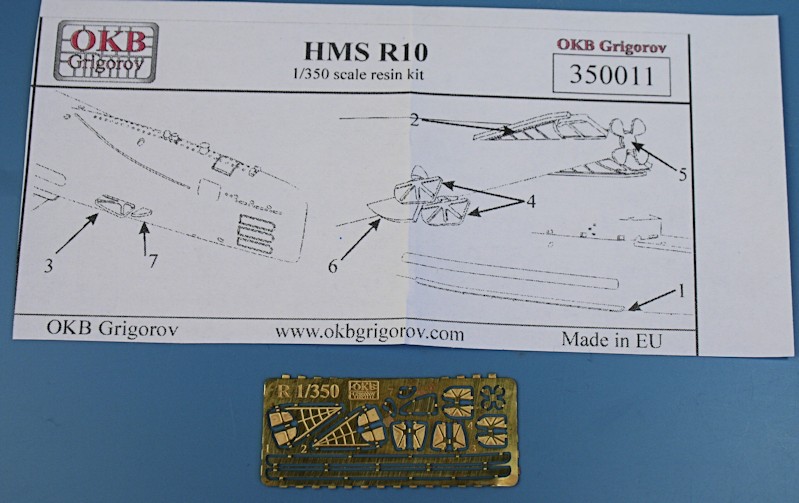
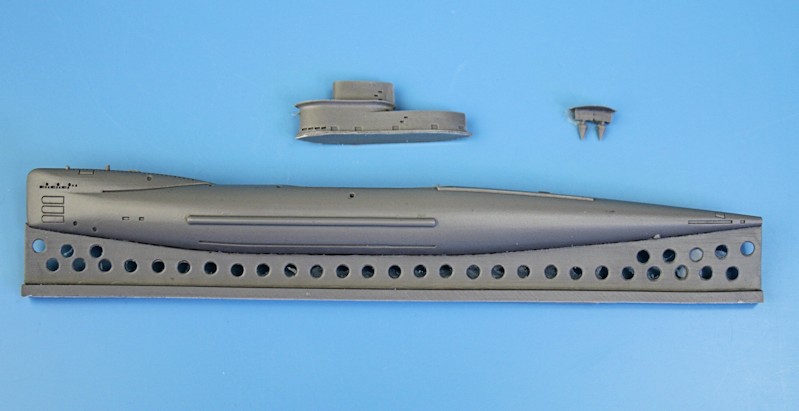
HMS R10
Box art.
Simple instruction sheet and etched brass parts.
Superbly cast resin hull, conning tower and prop boss's.
Return
Mikro-Mir Boxart - note the patriotic slogan.
First page of the instruction sheet.
Second sheet.
Decal sheet (note the skull and crossbones) and etched-brass propeller.

Upper and lower hull.
The rest of the parts.
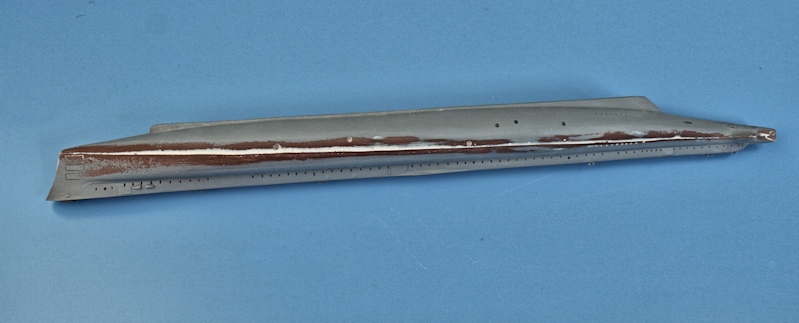
White plastic card to make a 'lip' - to make the joint stronger.
Top and bottom hull halves joined.......
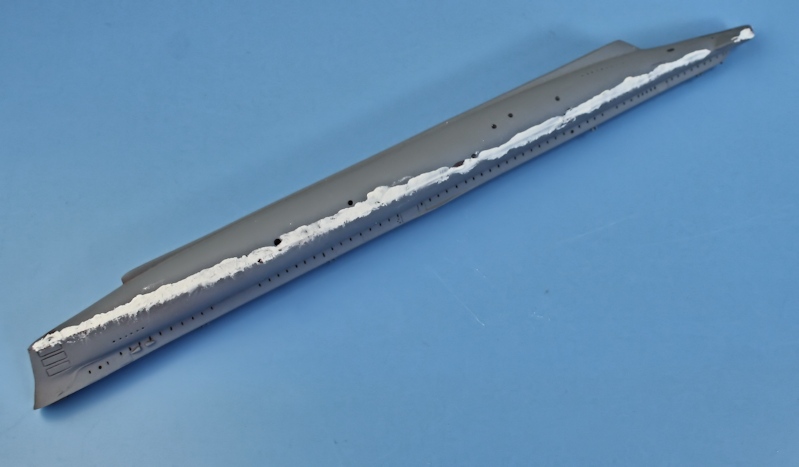
..... and filled with putty.
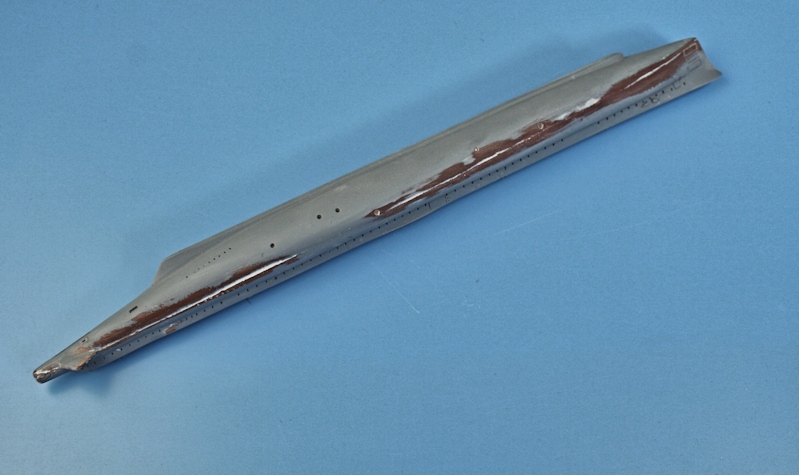
Filler sanded down.....
Closeup of the front join - and the separate forward diving plane 'shoulders'.
Sail/conning tower parts - complete with inner decking.
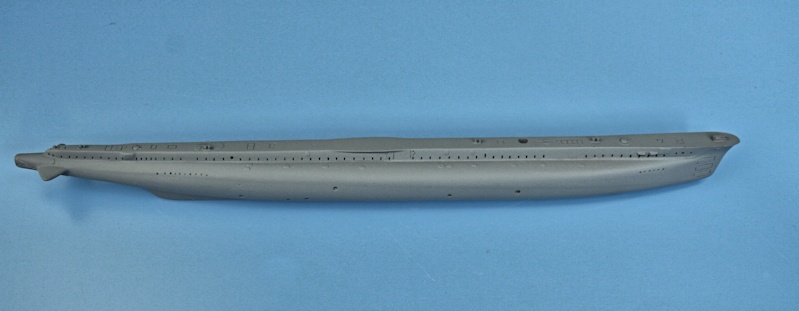
Ready for a coat of grey primer.
Note the botched attempt at depicting the vent near the sail.
After a coat of Halford's Grey Plastic Primer...
.... ready for the black topcoat.
Sprayed from a rattle can of Halford's Volvo Dark Grey......

..... which is a good off-black colour suitable on a model of this size.
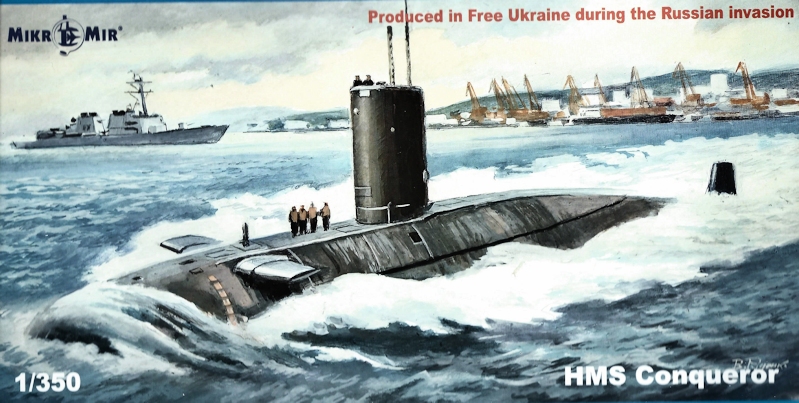
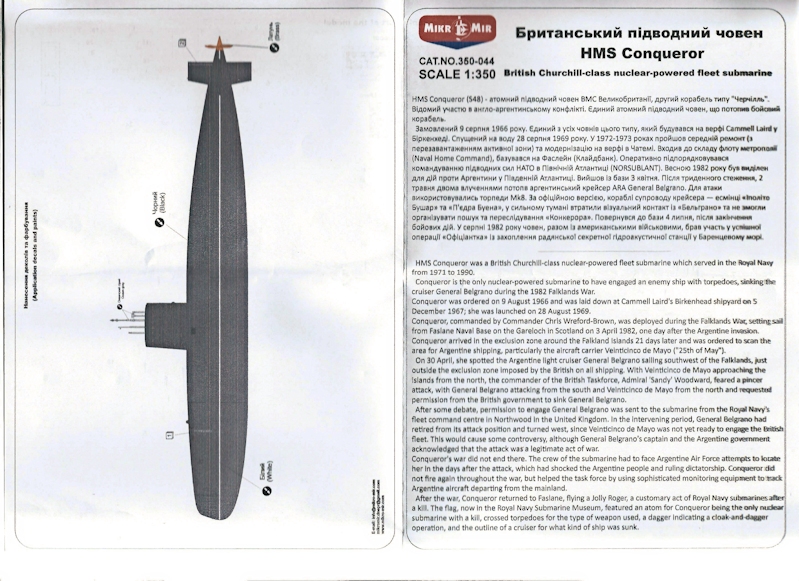
HMS Conqueror
Mikro-Mir Boxart - note the patriotic slogan.
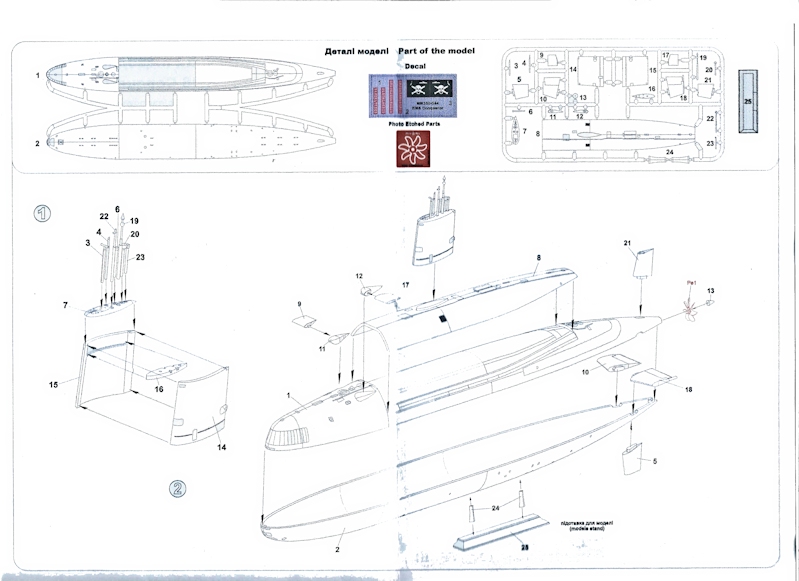
First page of the instruction sheet.
Second sheet.
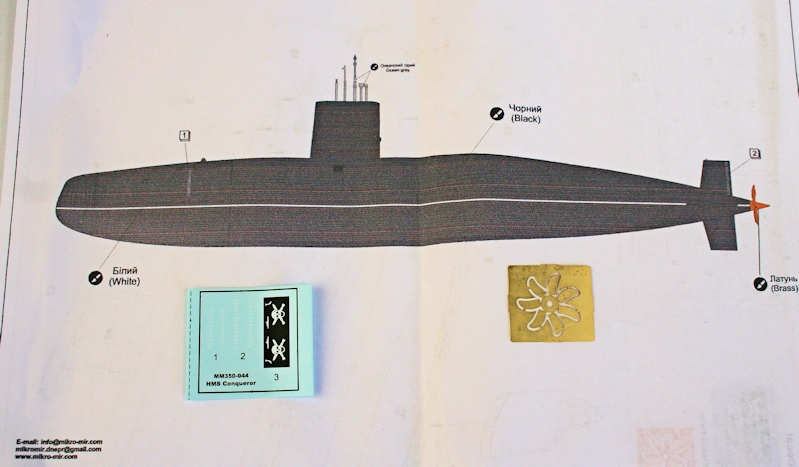
Decal sheet (note the skull and crossbones) and etched-brass propeller.
Upper and lower hull.
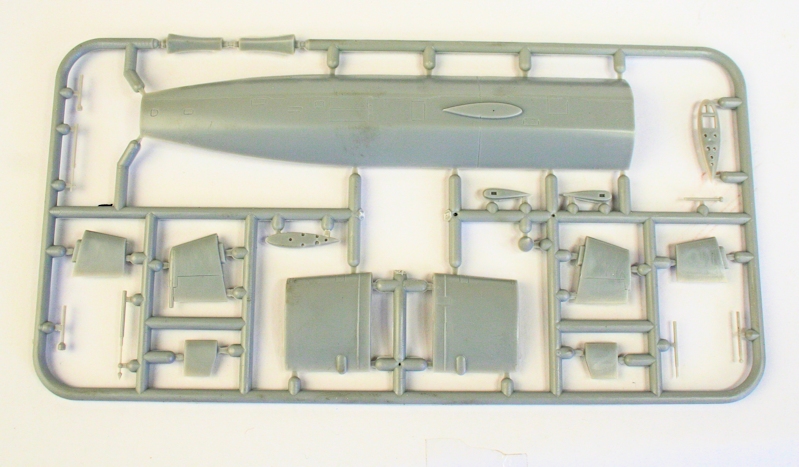
The rest of the parts.
White plastic card to make a 'lip' - to make the joint stronger.
Top and bottom hull halves joined.......
..... and filled with putty.
Filler sanded down.....
Closeup of the front join - and the separate forward diving plane 'shoulders'.
Sail/conning tower parts - complete with inner decking.
Ready for a coat of grey primer.
Note the botched attempt at depicting the vent near the sail.
After a coat of Halford's Grey Plastic Primer...
.... ready for the black topcoat.
Sprayed from a rattle can of Halford's Volvo Dark Grey......
..... which is a good off-black colour suitable on a model of this size.
© Ken Duffey